Skip to content
Fine Woodworking
Main Menu
Subscribe
GET THE MAGAZINE & MORE
Magazine Cover
  • Save 69% off the cover price
  • Or, get everything with UNLIMITED, including 40+ years of the online archive.
Subscribe Now!
Subscribe
  • Projects & Plans
  • How-To
  • Shop Tips
  • Tools & Materials
  • Videos
  • Magazine
  • Video Workshops
  • Members
  • Forum
  • Gallery
  • Blogs
  • More
    • Log In
    • Join
    Fine Woodworking Main Menu Subscribe
    Projects and Plans

    Countertop wine rack

    Details like a copper panel, sliding cheese board, and hand-forged hooks make this rack stand out from the pack.

    Author Headshot By Willie Sandry Apr 08, 2021
    Article Image

    Projects don’t always have to be complicated to be rewarding. Take this elegant little countertop wine rack. It’s chock full of details that enhance the look and function, yet no single step is very difficult to execute. Special features like an illuminated copper insert and a slide-out cheese board make it stand out from the rest.

    five boards glued up held together with clamps.
    Make the cheese board. Glue up strips of white oak and walnut to make the cheese board. Be sure to use water-resistant glue for this application.

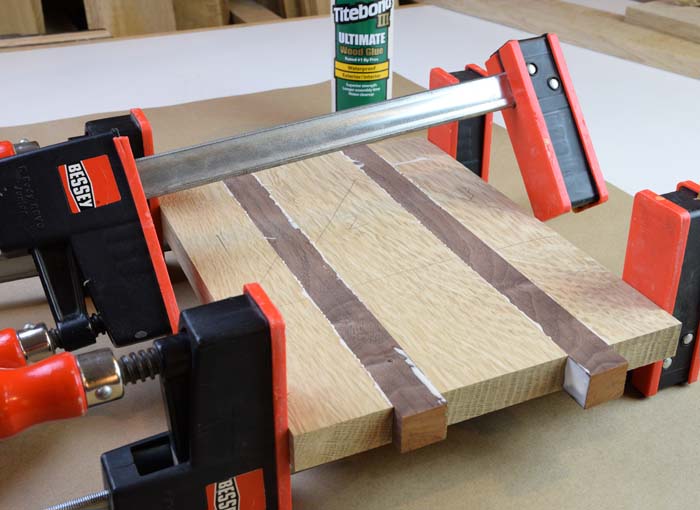
    Start by making the slide-out cheese board. It may seem odd to start with this step, but if you get the glue drying now, it saves time in the long run. Make the cheese board slightly oversize in all dimensions for now, and plane or trim it to final size once the wine rack is built. I chose white oak with walnut accents, but get as creative as you want here.

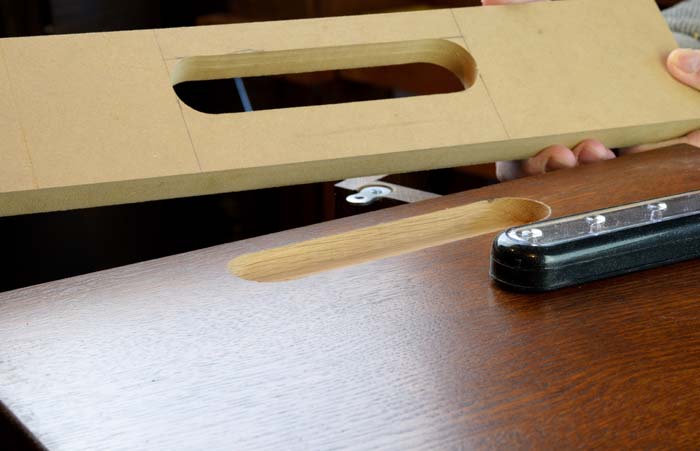
    A template helps shape the legs

    two photos making the legs of the wine rack
    Shaped template for the legs. Lay out the template on a piece of ½-in.-thick MDF. Cut the template out and continue refining the shape with a file and sanding blocks. Note the template is 1/8-in. longer than the finished leg at both top and bottom.

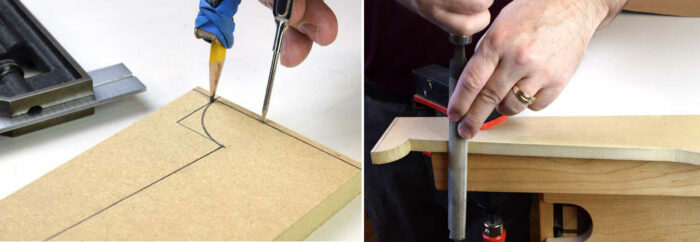
    Make a routing template for the shaped legs from a scrap of MDF. Cut out the template and carefully refine the shape with hand tools. Now use the template to make four identical oak legs. With leg blanks in hand, trace the shape on each one, and rough cut them at the bandsaw. Adhere the template to the leg with double-sided carpet tape to prepare for the next step. Finish shaping the legs with a bearing-guided, flush-trimming bit at the router table. I used a small diameter bit to accurately reproduce the convex shape at the top of each leg, but a larger diameter bit would work too.

    Cutting the template, taping it to the board and trimming it on the bandsaw
    Cut, tape and trim the legs. Saw just outside your layout lines to cut the legs to rough shape on the bandsaw (left). Temporarily affix the template to a leg with carpet tape (center). Press the parts firmly together and head over to the router table. Install a ¼-in.-dia. spiral flush-trimming bit, and trim the legs to final size (right).

    Panels and mortises

    A yellow router sitting on a board routing mortises into the board.
    Six mortises in each side panel. Use a shopmade straightedge jig to cut the 3/8-in.-wide by 1/2-in.-deep mortises in the side panels of the wine rack.

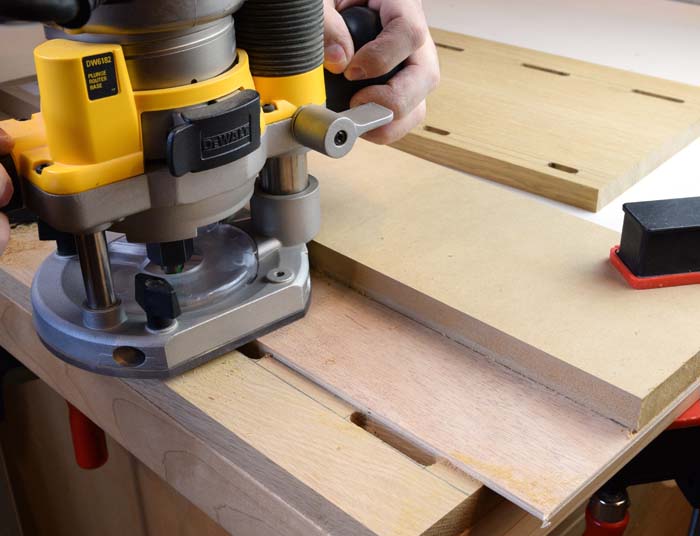
    Glue up the three panels required for the wine rack. You’ll need a top panel and two side panels. Once the sides are dimensioned, set out to mill the six mortises in each. There are perhaps a half dozen possible ways to cut these mortises, but I used a plunge router and straightedge jig. It’s a method that’s a little more stable than a router with an edge guide, and it ensures the mortises will all be correctly aligned. Chuck a 3/8-in.-dia. straight bit into a handheld router, and make a quick straightedge jig for your router. Use glue and brad nails to attach an MDF fence to a strip of 1/4-in. plywood. The dimensions aren’t critical, as long as the jig is longer than your workpiece, and wide enough to contact the bit you intend to use. Now use the router to trim the jig by running it along the fence. You’ve now created a handy reference that clearly shows where your 3/8-in. bit will cut. Position the jig on your side panel layout marks, and plunge the mortises in two successively deeper passes.

    Tenons on time and cut correctly 

    The quickest way to cut tenons must be with a dado blade at the tablesaw. Add an auxiliary fence and miter gauge as you tool-up the tablesaw, and set the fence for a 1/2-in. tenon length (or perhaps a shade less). Blade height for making the cheek cuts is about 3/16 in. Increase blade height to 1/4 in. for the shoulder cuts.

    Cutting and shaping the tenons
    Tenon the wine bottle rails. Gradually raise the dado blade until the tenon cheeks fit the corresponding mortise. Turn the rails on edge and complete the shoulder cuts in the same fashion. Round the tenons over to match the shape of the mortises.
    sanding a curve into a wooden piece with a spindle sander
    Sand the semicircular shapes. Clean up the bandsaw marks and sand to your line. An oscillating spindle sander is an ideal tool for the job.

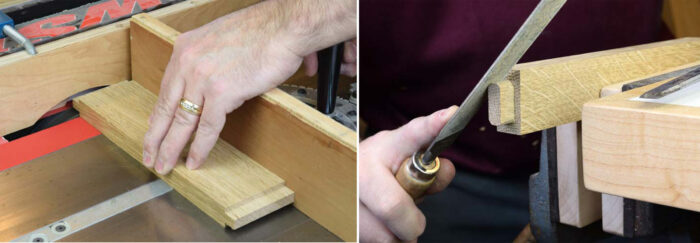
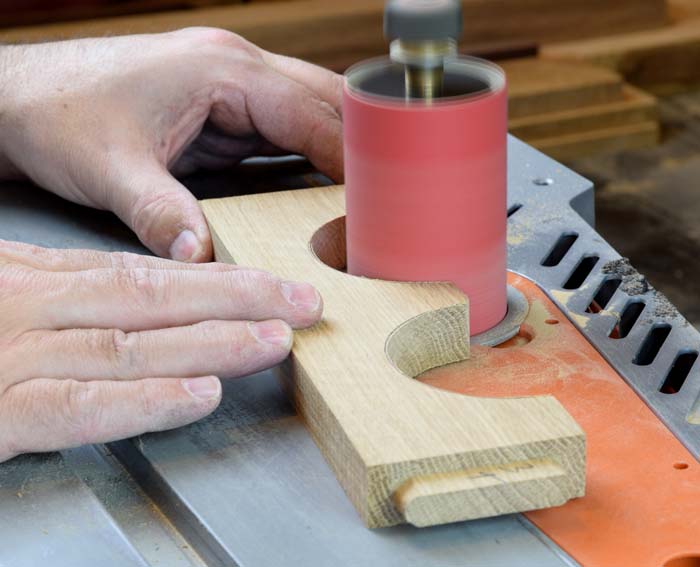
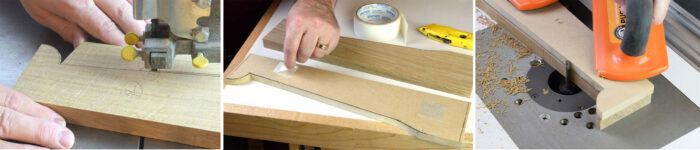
    Trace the semicircular shapes on the wine bottle rails, marking two curves on each rail. The curves are 1-1/2 in. diameter for the front rails, and 3 in. diameter for the rear rail. Using a bandsaw, cut just outside your pencil lines to remove most of the waste, and sand the parts smooth. Luckily, most oscillating spindle sanders have sanding sleeves in these diameters, making this a quick and easy job. If you don’t have a spindle sander, consider drilling the holes in oversize parts before cutting the joinery. Then you could simply rip them in half to divide the holes.

    Using a biscuit joiner to put slots in both parts of the wine rack
    Biscuits simplify assembly. Plunge three or four #20 biscuit slots in each long edge of the side panels. Orient the side panels mortises-down as you make these cuts (left). Complete the mating slots in the legs, this time with the workpiece held up on edge (right).

    Assemble the frame in two steps

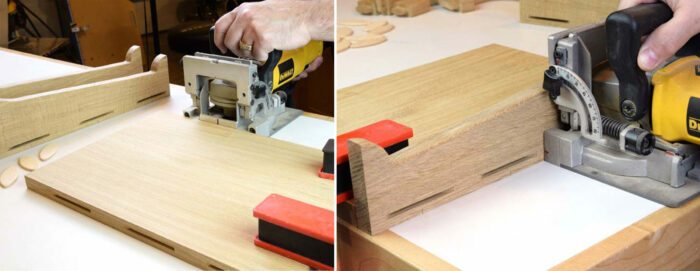
    Hold the legs next to the side panels and make tick marks for biscuit slots. Biscuits are great when you have several parts coming together with no other interlocking joinery. I find biscuits more forgiving than dowels when it comes time for permanent assembly, although each method has its place in my shop.


    Willie’s plans for this build are available here


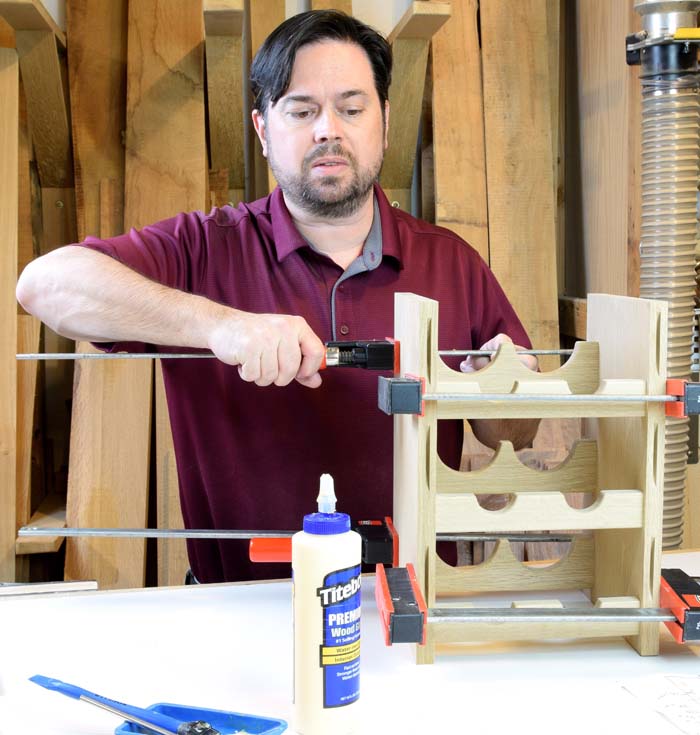
    Ease the edges of any parts as needed, and sand them at 120 and 150 grit. Now you’re ready for the first carcase assembly step. Glue the wine bottle rails into the side panels, and clamp the panels together on a flat surface.

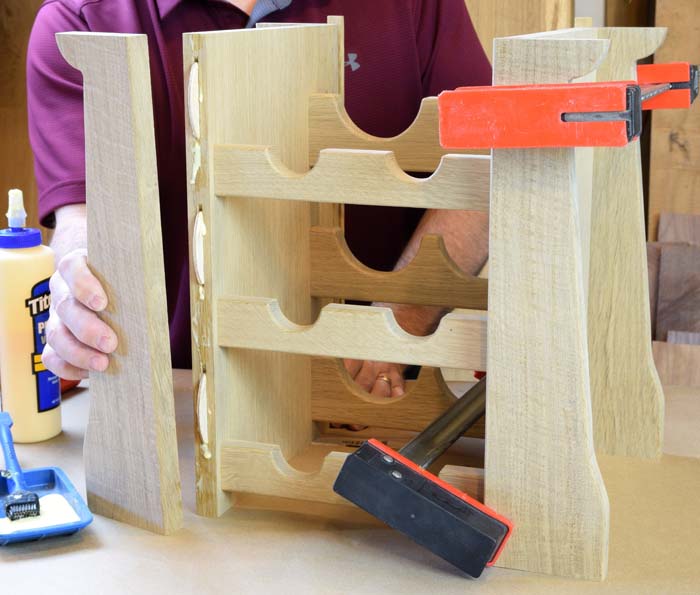
    Take a moment to cut a rabbet on both back legs. Once assembled, these recesses will receive the copper-faced 1/4-in. plywood back panel. Now move on to the second phase of the assembly and add the legs to the frame. Once the glue cures from the first assembly phase, remove the clamps and glue the legs in place. Here’s where the biscuits really help with alignment. Just align the top of each leg flush with the side panels as you clamp them home.

    Willie clamping up the frame assembly with a glue bottle in the foreground
    Frame assembly step one. Apply glue to the mortises, and insert the wine bottle rails. Bring the side panels together and apply clamps.
    Wooden frame assembly is being glued up with glue covered biscuits and clamps on the right half.
    Frame assembly step two. Add the legs to the wine rack frame, aligning the parts at the top as you go. Have two filler strips ready, sized to fit the rabbet of the rear legs. Filling these voids temporarily is helpful to give a flat bearing surface for the clamps.

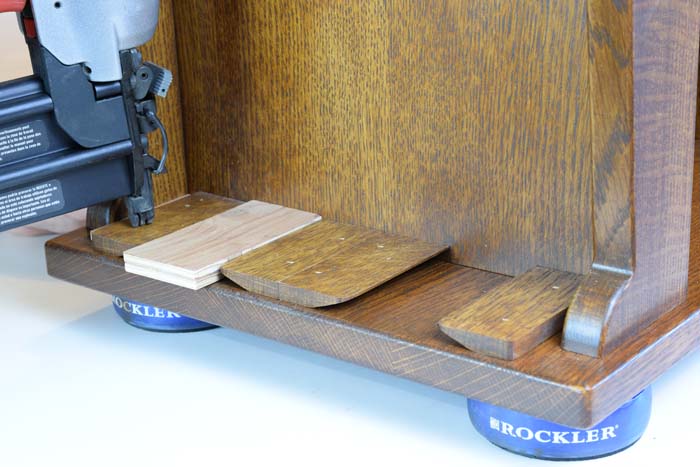
    Back to the cheese board

    router being lifted up after routing a small finger slot in the wooden panel
    Add a finger pull. Equip a plunge router with a core box bit and edge guide. Lay out the location of the finger pull so it falls just outside the lower rail. To minimize grain burning, cut the groove in multiple passes.

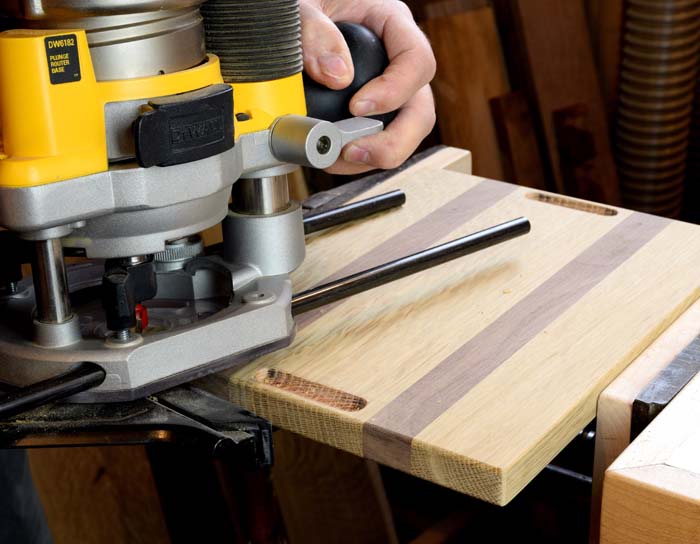
    Now you’ll notice a little pocket of space under the lower wine bottle rails. Let’s make use of that space and finish up the cheese board that was glued up earlier. Plane the cheese board until it easily slides under the rails, and rip it to width. When cutting the cheese board to length, plan for it to be inset from the front legs about 1/8 in.

    Copper adds a special touch 

    To give the wine rack a unique look, add a copper sheet to the plywood back panel. Size a piece of 1/4-in. plywood to the same dimensions as your copper sheet. Copper is commonly sold in a 12 in. by 24 in. size. Cutting copper sheets requires a special technique for safe and accurate results, but luckily you don’t need any special tools. The absolute key to cutting copper sheets is to adhere it to a substrate first. Use spray contact adhesive like 3M 90 high strength to coat both surfaces. Let the contact adhesive tack over for a minute or two, and press the copper sheet onto the plywood back panel. Ideally the pieces would be the same size, or the copper slightly smaller than the plywood. You only want to cut the copper where it’s adequately supported by the plywood backer.

    Finishing

    With the prep work and finish sanding complete, mix up a batch of Non Grain Raising Dye (NGR). I used Transtint Golden Brown concentrate mixed with one pint denatured alcohol and one pint lacquer thinner. Although Transtint dyes are soluble in almost any liquid (except mineral spirits) this 50/50 mix of alcohol and lacquer thinner is what makes it an NGR dye. Combine the 1-qt. mixture of solvents with a 2-oz. container of dye concentrate. Apply the dye with a terrycloth wrapped sponge (staining sponge). Wet the sponge with dye, but don’t make it dripping wet. Move quickly when applying the dye, and only go over each area once. Having a helper is a great idea so you can cover all surfaces in short order, then walk away. Once the dye dries, apply a coat of Bullseye Shellac Sealcoat, which is a thin de-waxed shellac. I like to spray finishes, but shellac can be wiped or brushed on if you must. Scuff-sand the shellac with a fine sanding sponge, and clean the surface with cheese cloth and compressed air. Now glaze the project with General Finishes Antique Walnut gel stain. Wipe on the gel stain with a lint-free rag. Let the stain dry overnight (THE most important step!) and move on to the final step: a topcoat of your choice. I sprayed a pre-catalyzed lacquer in a satin sheen, but amber shellac would be another option.

    Final details

    Using a forstner bit to drill into the end grain of the rack for a figure eight fastener
    Figure 8 Fasteners Attach the Top Panel. Drill shallow recesses with a Forstner bit to receive figure 8 fasteners. Use one fastener at each corner on the inboard side of the wine rack frame. Note the scrap block clamped to the side panel to prevent chipout.

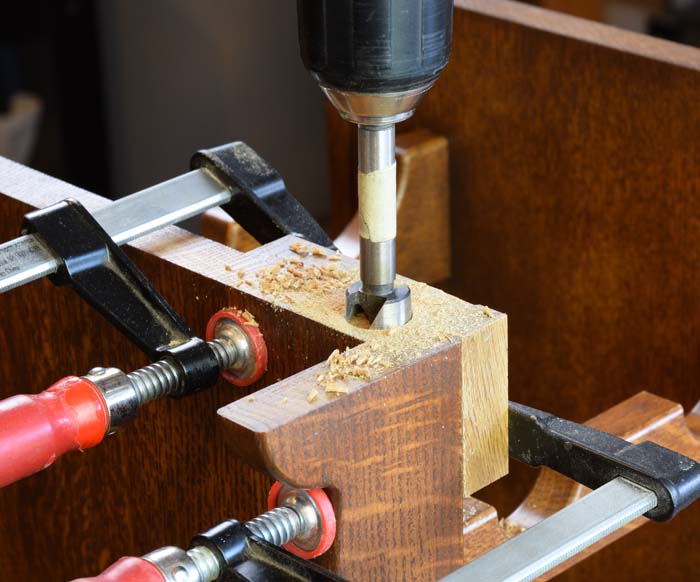
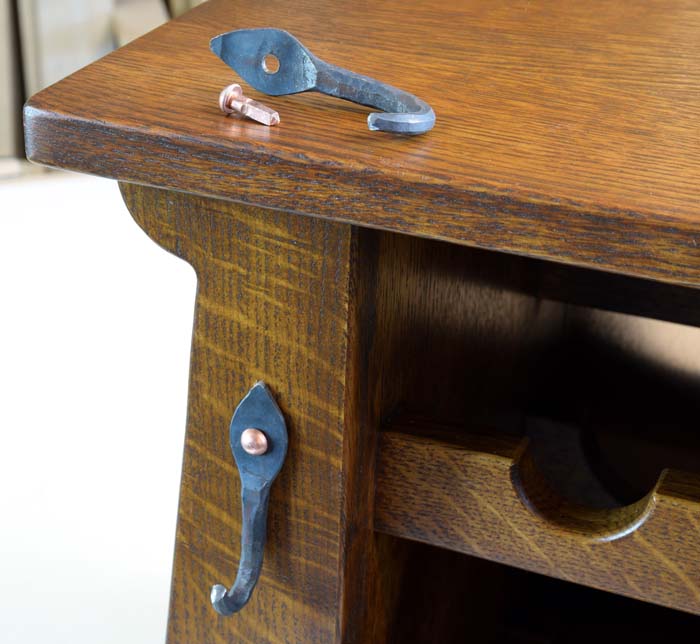
    Only a few steps remain to finish the wine rack. Drill recesses for figure-8 fasteners to attach the top to the frame. I used one fastener near each corner, and installed them with #6 x 5/8-in.-long screws. One optional accessory is a light bar to highlight the copper back panel. If you decide on a light, make a template the same size as your light. Clamp the template in place and rout a 1/2-in.-deep recess with a bearing-guided bit. Now add the wine glass holders to the overhang area. These are made from a single length of wood with a bevel ripped down one edge. Cut the pieces to length and install them with brad nails. Finally, add the decorative hooks to the front of the wine rack. The hooks pictured are hand-forged iron with copper nails, and were made by a Pacific Northwest craftsman. They are available from SolForge on Etsy.com. The copper nails that come with the hooks are a little too long, but are easily trimmed with wire cutters.

    A mdf template is held above the workpiece.
    Recess for optional light bar. Make a quick router template the same size as your selected light bar. Clamp the template to the underside of the top panel, and rout the recess in multiple passes. The battery-operated LED light simply installs with double-sided tape.
    Cabinet upside down and pieces of wood are being nailed in with a brad nailer
    Wine-glass holders. These small parts are cut from a single strip and prefinished before installation. Use spacer blocks to position the four pieces symmetrically and install them with short brad nails. The wine-glass holder pieces were spaced 1-3/4 in. apart for this project, but confirm that the wine glasses you intend to use slip easily in place.
    Metal hanger sitting on top of cabinet and one mounted to the front with a copper nail
    That handmade look. Forged iron hooks with copper nails complement the rich finish and copper back panel. Cut the nails to length as needed and use a file to sharpen the tip. Copper nails are soft, so pre-drill a hole nearly as big as the shank before tapping them in place.

    Willie’s plans for this build are available here

    Sign up for eletters today and get the latest techniques and how-to from Fine Woodworking, plus special offers.

    Sign Up

    Get woodworking tips, expert advice and special offers in your inbox

    Sign Up
    ×
    X
    X

    New Feature

    Fine Woodworking Forums

    Ask questions, offer advice, and share your work

    Get It All!

    UNLIMITED Membership is like taking a master class in woodworking for less than $10 a month.

    Start Your Free Trial

    Subscribe to Fine Woodworking

    Save up to 69%

    Subscribe

    Comments

    1. moleary | Apr 09, 2021 07:04am | #1

      All that, and not one picture of the copper?

    2. User avater
      Deleted | Apr 09, 2021 01:41pm | #2

      “[Deleted]”

    3. User avater
      pintodeluxe | Apr 09, 2021 01:45pm | #3

      Here are a couple pictures of the copper panel for you.

    4. User avater
      pintodeluxe | Apr 09, 2021 01:45pm | #4

      And this one.

      1. moleary | Apr 10, 2021 06:29am | #5

        But where does it belong on the wine rack?

        1. DaveRichards | Apr 10, 2021 09:31am | #6

          It's kind of hard to see but it looks like it goes in at the back of the rack. You can see a bit of it in the picture of the wine rack at the top of the page. If I had to guess I'd say it fits into grooves and is captured by the top and something at the bottom.

    5. User avater
      pintodeluxe | Apr 10, 2021 11:12am | #7

      There are rabbets cut in the back legs. It just installs from the back with screws.
      The key to cutting copper is to attach it to the 1/4" plywood first. I used 3M 90 spray, but liquid contact cement would work fine as well.
      Thanks

    6. 20FootWoodworker | Apr 15, 2021 12:06am | #8

      Can you share any drawing or dimensions?

    7. TimM | Apr 21, 2021 08:40pm | #9

      Are there dimensions available, or plans that can be downloaded?

    8. CraigAinKC | Apr 27, 2021 11:39am | #10

      I’ve hit the link for the plans and my DropBox opened and showed a page of Chinese characters and emojis.
      It’s got SketchUp file extension of .skb and I’ve changed it to .skp to see if I could open it.
      Any other suggestions?

      1. User avater FWW Editor
        BenStrano | Apr 27, 2021 01:42pm | #11

        You're right. I'm looking into it with Willie.

      2. User avater FWW Editor
        BenStrano | Apr 27, 2021 04:04pm | #12

        Try it now.

    9. user-7782347 | Jul 03, 2021 09:02am | #13

      I wish there were plans for this item that I can use. I have not been able to successfully navigate any of the link provided in FWW.

      1. User avater
        pintodeluxe | Jul 03, 2021 10:19am | #14

        You need to have Sketchup installed on your computer to view the plans. Sketchup or Sketchup Make is a free program. If you tried to access plans on your phone, just try again on a desktop with Sketchup.
        Best of luck!

    Log in or create an account to post a comment.

    Sign up Log in

    Up Next

    Featured Workshop

    a diagram of a round Shaker stand and an image or a round Shaker stand

    Shaker candle stand with Christian Beckvoort

    He’s built dozens of round Shaker stands over four decades, so there is no one more qualified than Christian Becksvoort to demonstrate making this classic. In this seven-part video series,…

    Featured Projects & Plans

    Build a Contemporary Sideboard

    Chris Gochnour's sideboard combines usefulness, strength, and beauty in a contemporary case piece

    Related Stories

    Discussion Forum

    Recent Posts and Replies

    • |
    • |
    • |
    • |
    • |
    • |
    View More Create Post

    Member Exclusives

    More Member Exclusives
    • Arts and Crafts chest

      Nancy Hiller builds a time-tested and versatile chest originally designed by Ernest Gimson.

    • Build a Contemporary Sideboard

      Chris Gochnour's sideboard combines usefulness, strength, and beauty in a contemporary case piece

    • Veneering Curved Doors

      No-hassle coopering is the core of this low-tech method

    • Arts-and-Crafts Cottage Bookcase

      This classic Limbert design offers a unique twist on a traditional style

    Highlights

    • Shape Your Skills

      when you sign up for our emails

      Plus tips, advice, and special offers from Fine Woodworking.

      Sign Up
    • Shop Talk Live Podcast

      Shop Talk Live Podcast

      Our biweekly podcast allows editors, authors, and special guests to answer your woodworking questions and connect with the online woodworking community.

    • Woodpecker Sweepstakes

      Woodpeckers Shop Upgrade Giveaway

      Enter now for your chance to win more than $2,000 worth of woodworking equipment from Woodpeckers. Click for full details.

    • Staff Picks Blog

      Our favorite articles and videos

      We have created these special content collections organized to give you a deep dive into a range of topics that matter.

    Casework

    View All
    • Shaker dresser finishing touches

    • bookcase project

      Building an Oak Bookcase

    • Free Plan: Shaker Enfield Cupboard

    • Designer's Notebook: A Finer Side of Pine

    View All

    From the Store

    View More
    • Complete Illustrated Guide to Woodworking USB

      Buy Now
    • The Why & How of Woodworking

      Buy Now
    • Tool Guide 2022

      Buy Now
    • Foundations of Woodworking

      Buy Now
    View More

    Get the latest from Fine Woodworking Magazine

    • #292-NOV/DEC 2021

      • Kerf-bent wall cabinet
      • Online extras from FWW issue #292
      • How to tame curved parts with patterns
    • #291-Sep/Oct 2021

      • Build a modern coffee table
      • Online Extras from FWW Issue #291
      • Editor's Letter: Something old, something new
    • #290-July/Aug 2021

      • Build a Shaker chest of drawers
      • Online Extras from FWW Issue #290
      • From the editor: What we make matters
    • #289-May/June 2021

      • Arts & Crafts Coffee Table with Story-Book Charm
      • Links from Fine Woodworking issue #289
      • Step-by-Step Guide to Tuning Your Block Plane
    • #288-Mar/Apr 2021

      • Phil Lowe: A craftsman and gentleman
      • Online Extras from FWW Issue #288
      • Phil Lowe: craftsman, teacher, friend

    UNLIMITED membership - Get access to it all

    Start Free Trial Upgrade Membership

    Fine WoodWorking

    Follow

    Newsletter

    Get woodworking tips, expert advice and special offers in your inbox

    Sign Up

    Membership & Magazine

    • Members
    • Digital Libraries
    • Join Unlimited
    • Magazine Subscription
    • Magazine Renewal
    • Gift a Subscription
    • Customer Support
    • Manage Preferences

    Taunton Network

    • Fine Homebuilding
    • Green Building Advisor
    • Fine Gardening
    • Threads
    • About
    • Contact
    • Advertise
    • Privacy Policy
    • Careers
    • Copyright
    • Terms of Use
    • Accessibility
    • California Privacy Rights
    • Site Map

    © 2021 The Taunton Press, Inc. All rights reserved.

    Get step-by-step instructions, woodworking tips, expert advice and special offers in your inbox. Sign Up Now!

      Main Menu

    • Projects and Plans
    • How-To
    • Shop Tips
    • Tools & Materials
    • Videos
    • Gallery
    • Magazine
    • Video Workshops
    • Members
    • Forum

      Popular Topics

    • Design
    • Small Projects
    • Beds
    • Chairs, Benches And Stools
    • Built-ins
    • Storage And Shelves
    • Cabinets
    • Carving
    • Casework
    • Desks
    • Tables
    • Shop Storage And Furniture
    • Woodturning Projects
    • Workbenches
    • Surface Prep

      More

    • TV
    • Forum
    • Blogs
    • Webinars
    • Podcasts
    • Customer Support

      Account

    • Log In
    • Join

      Magazine

    • Current Issue
    • Past Issues
    • Digital Libraries
    • Magazine Index
    • Subscribe

      Membership

    • Member Home
    • Start Free Trial
    • Gift Unlimited
    • Log In

      Shop the Store

    • Books
    • DVDs
    • Taunton Workshops

      Events

    • Fine Woodworking Live
    • Fine Woodworking HANDS ON

      Account

    • Log In
    • Sign Up

    Newsletter

    Get woodworking tips, offers, and expert advice in your inbox

    Sign Up

    Follow

    UNLIMITED

    Become an UNLIMITED member and get it all: searchable online archive of every issue, how-to videos, Complete Illustrated Guide to Woodworking digital series, print magazine, e-newsletter, and more.

    Start Your Free Trial

    Upgrade Membership