Skip to content
Fine Woodworking
Main Menu
Subscribe
GET THE MAGAZINE & MORE
Magazine Cover
  • Save 69% off the cover price
  • Or, get everything with UNLIMITED, including 40+ years of the online archive.
Subscribe Now!
Subscribe
  • Projects & Plans
  • How-To
  • Shop Tips
  • Tools & Materials
  • Videos
  • Magazine
  • Video Workshops
  • Members
  • Forum
  • Gallery
  • Blogs
  • More
    • Log In
    • Join
    Fine Woodworking Main Menu Subscribe

    Fine Woodworking Project Guides

    Shop Projects

    Guide Home
    Chapter
    • Bench Jigs
    • Machine Jigs and Fixtures
    • Tool Storage
    • Shop Storage
    • Workbenches
    • Shop Helpers
    Shop Tips

    Build an adjustable router-table fence

    Get safe, clean cuts on your router table with this shopmade auxiliary fence with removable spacers.

    Author Headshot By Tamar Hannah #291-Sep/Oct 2021 Issue

    Synopsis: Get safe, clean cuts on your router table with this shopmade auxiliary fence with removable spacers. The spacer system allows you to set the distance between fence and bit just once, while you make a series of incremental passes with the router, removing spacers one by one until you’ve reached your final dimension.

    From joinery to shaping, I use my router table a bunch. I’ve come to expect a lot from it, but I’ve also learned how to work efficiently within its limitations. For example, removing a lot of material in one pass with a router is a bad idea. Not only is it unsafe, but it can also damage your router, bits, and workpiece. To avoid these heavy cuts, it’s typical to keep adjusting the fence away from the bit between passes. This often means making small and deliberate changes slowly to make sure you don’t blow past your desired dimension. Plus, if you’re measuring each time you move the fence, the routine can disrupt your workflow even more.

    This is where an auxiliary fence with spacers comes in handy, allowing you to measure the distance between the fence and your bit just once. After that, all you need to do is remove a spacer between passes. The setup also guarantees safe, clean cuts. As a result, this jig, which is a breeze to make, will save plenty of time. It can also help in a pinch when you need to make a rabbet, groove, or dado bigger than your available bits.

    A breeze to build

    The jig comprises a few simple elements. First, there’s the auxiliary fence. This is what the stock rides against, so I make it from melamine. Second are the spacers. You don’t want these thicker than half the diameter of the bit’s shank. I typically use 1⁄2-in.-shank bits, so 1⁄4-in.-thick MDF works great. Having some 1⁄8-in. spacers is nice for smaller bits, as well as for overall versatility. I also like to resaw extra-thin spacers, about 1⁄32 in. thick or so, for when I want to use lighter cuts for a superior finish.

    The author holds spacers which fit behind the router table fence.

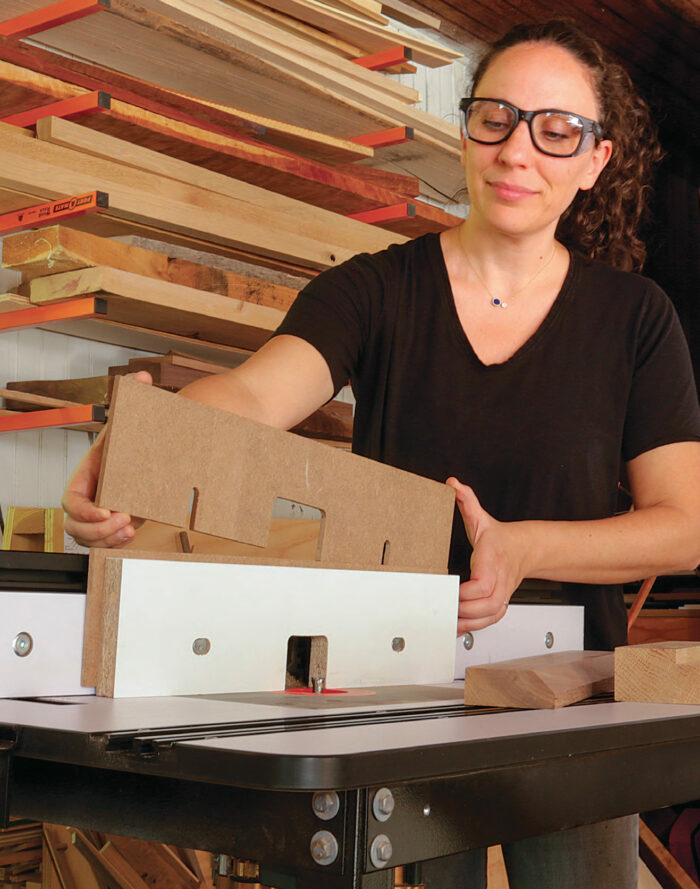
    Finally, there are the T-bolts and knobs, which secure the auxiliary fence and spacers to the main fence. These should be long enough to extend through both fences and the spacers while still having enough length left over for the knobs to engage the threads.

    The auxiliary fence and spacers should be built to fit your particular router table. When sizing the auxiliary fence, simply rip the melamine to the height of your main fence. The length of the auxiliary fence involves a little more thought. I mount it (and the spacers) using only two T-bolts, one on either side of the cutter, and I don’t want it so long that it will bow if it is not supported by more bolts. So, to determinethe length, I open the main fence all the. way and line up the melamine so that it extends past the bolts by about 31⁄2 in. on either side. Then I cut it to that length.

    Rip the spacers to the same width as the auxiliary fence, but crosscut them slightly longer. This will make them easier to install and remove when you use the jig.

    Next, locate the holes for the T-bolts. Measure the center-to-center dimension between the two bolts on the main fence and transfer that to the auxiliary fence and the spacers. Since the spacers are longer than the auxiliary fence, mark your pieces based on a centerline. For example, if the bolts are 10 in. apart center-to-center, make your marks 5 in. on either side of the centerline. Also use the main fence to determine the height of these holes on the auxiliary fence.  The T-bolts’ heads need to be recessed in the auxiliary fence so they don’t interfere with feeding the stock. So, before I drill for the T-bolts, I plunge-cut short, shallow grooves on the router table to fit the heads. After that, drill through-holes for the bolts.

    You can take a few steps to make the spacers easy to add to and remove from the auxiliary fence. First, drill the bolt hole about 1⁄2 in. lower, which will leave a slight gap underneath the spacers when they’re installed. This gap will make them easier to lift up and remove. Second, for a bit of wiggle room, the spacers’ hole should be larger than the diameter of the T-bolt. After drilling these holes, remove the waste below them at the bandsaw, creating a slot that will slide over the T-bolts.

    Now that the auxiliary fence and spacers can be attached, you need to make room for the router bit. You will most likely be using this jig with large router bits, so use your biggest ones to lay out this opening in the auxiliary fence and spacers. To easily cut out the opening, drill out the corners at the drill press, then clear out the waste at the bandsaw.

    As a last step, I put a very slight roundover on the opening’s outfeed side to prevent workpieces from getting caught on it.

    From Fine Woodworking #291

    To view the entire article and learn more about Tamar Hannah uses her adjustable router fence, please click the View PDF button below.


    Router table basics

    Get the most from this workshop workhorse

    Bench-Mounted Router Table

    A three-part table clamps to a workbench, and it hangs from the ceiling when not in use

    Router Table Fundamentals – Adjustments

    In this episode, Bob demonstrates tips and tricks to get your fence and bit set exactly where you need it

    Sign up for eletters today and get the latest techniques and how-to from Fine Woodworking, plus special offers.

    Sign Up

    Get woodworking tips, expert advice and special offers in your inbox

    Sign Up
    ×
    View FREE Project

    when you enter your email address below.

    Plus, get Fine Woodworking emails filled with plans, how-to, and special offers.

    or Log In

    Read our Privacy Policy
    Questions? Contact Customer Service

    View PDF
    X
    X
    Previous: Build a Router-Table Fence Next: Basic Wiring for a Router Table

    Guide

    Shop Projects

    Chapter

    Shop Helpers

    Comments

    1. ginabythebay | Jul 18, 2021 09:22am | #1

      I’ve been watching your videos for a while now and remember this one. It is awesome to see you appear in fine woodworking also!

    2. User avater
      RobertMorris348 | Aug 14, 2021 01:54am | #2

      I'm suspect of changes in humidity that can cause the spacers to shrink/swell and thus throw off the accuracy of the cut. Also, how do you handle 1/32" MDF without it falling apart?
      Outstanding idea, though, in spite of the above possible problems!

    Log in or create an account to post a comment.

    Sign up Log in

    Shop Projects

    Shop Projects

    Everything you need to know to make your shop your own.

    View Project Guide

    View All Project Guides »

    Become a member and get unlimited site access, including the Shop Projects Project Guide.

    Start Free Trial

    Bench Jigs
    • An Overview
    • Shooting Boards
    • Holdfasts, Stops, and Other Helpers
    Machine Jigs and Fixtures
    • Tablesaw Jigs and Accessories
    • Bandsaw Jigs
    • Router Jigs
    • Planer Jigs
    Tool Storage
    • Open Storage
    • Wall Cabinets
    • Tool Chests
    Shop Storage
    • General Storage
    • Lumber Storage
    • Clamp Storage
    Workbenches
    • Starter Benches
    • Small Benches
    • Full-Size Benches
    Shop Helpers
    • Router Tables
    • Outfeed Tables
    • Work Supports and Helpers

    Get the latest from Fine Woodworking Magazine

    • #292-NOV/DEC 2021

      • Kerf-bent wall cabinet
      • Online extras from FWW issue #292
      • How to tame curved parts with patterns
    • #291-Sep/Oct 2021

      • Build a modern coffee table
      • Online Extras from FWW Issue #291
      • Editor's Letter: Something old, something new
    • #290-July/Aug 2021

      • Build a Shaker chest of drawers
      • Online Extras from FWW Issue #290
      • From the editor: What we make matters
    • #289-May/June 2021

      • Arts & Crafts Coffee Table with Story-Book Charm
      • Links from Fine Woodworking issue #289
      • Step-by-Step Guide to Tuning Your Block Plane
    • #288-Mar/Apr 2021

      • Phil Lowe: A craftsman and gentleman
      • Online Extras from FWW Issue #288
      • Phil Lowe: craftsman, teacher, friend

    UNLIMITED membership - Get access to it all

    Start Free Trial Upgrade Membership

    Fine WoodWorking

    Follow

    Newsletter

    Get woodworking tips, expert advice and special offers in your inbox

    Sign Up

    Membership & Magazine

    • Members
    • Digital Libraries
    • Join Unlimited
    • Magazine Subscription
    • Magazine Renewal
    • Gift a Subscription
    • Customer Support
    • Manage Preferences

    Taunton Network

    • Fine Homebuilding
    • Green Building Advisor
    • Fine Gardening
    • Threads
    • About
    • Contact
    • Advertise
    • Privacy Policy
    • Careers
    • Copyright
    • Terms of Use
    • Accessibility
    • California Privacy Rights
    • Site Map

    © 2021 The Taunton Press, Inc. All rights reserved.

    Get step-by-step instructions, woodworking tips, expert advice and special offers in your inbox. Sign Up Now!

      Main Menu

    • Projects and Plans
    • How-To
    • Shop Tips
    • Tools & Materials
    • Videos
    • Gallery
    • Magazine
    • Video Workshops
    • Members
    • Forum

      Popular Topics

    • Design
    • Small Projects
    • Beds
    • Chairs, Benches And Stools
    • Built-ins
    • Storage And Shelves
    • Cabinets
    • Carving
    • Casework
    • Desks
    • Tables
    • Shop Storage And Furniture
    • Woodturning Projects
    • Workbenches
    • Surface Prep

      More

    • TV
    • Forum
    • Blogs
    • Webinars
    • Podcasts
    • Customer Support

      Account

    • Log In
    • Join

      Magazine

    • Current Issue
    • Past Issues
    • Digital Libraries
    • Magazine Index
    • Subscribe

      Membership

    • Member Home
    • Start Free Trial
    • Gift Unlimited
    • Log In

      Shop the Store

    • Books
    • DVDs
    • Taunton Workshops

      Events

    • Fine Woodworking Live
    • Fine Woodworking HANDS ON

      Account

    • Log In
    • Sign Up

    Newsletter

    Get woodworking tips, offers, and expert advice in your inbox

    Sign Up

    Follow

    UNLIMITED

    Become an UNLIMITED member and get it all: searchable online archive of every issue, how-to videos, Complete Illustrated Guide to Woodworking digital series, print magazine, e-newsletter, and more.

    Start Your Free Trial

    Upgrade Membership