Skip to content
Fine Woodworking
Main Menu
Subscribe
GET THE MAGAZINE & MORE
Magazine Cover
  • Save 69% off the cover price
  • Or, get everything with UNLIMITED, including 40+ years of the online archive.
Subscribe Now!
Subscribe
  • Projects & Plans
  • How-To
  • Shop Tips
  • Tools & Materials
  • Videos
  • Magazine
  • Video Workshops
  • Members
  • Forum
  • Gallery
  • Blogs
  • More
    • Log In
    • Join
    Fine Woodworking Main Menu Subscribe
    How-To

    Video: Creating a spring joint with a handplane

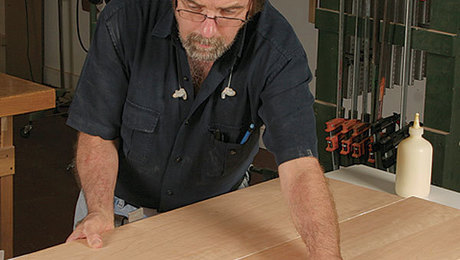
    Bob Van Dyke demonstrates how he creates a spring joint, making it easier to glue up a flush panel or tabletop that requires only light handplaning or scraping.

    Author Headshot By Bob Van Dyke Feb 07, 2020

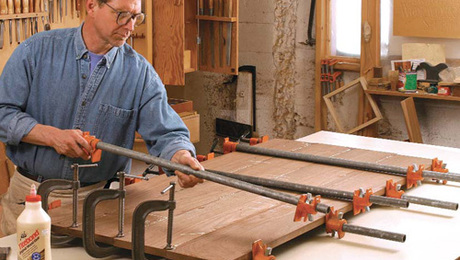
    Woodworkers have been using spring joints in large panel glue-ups for as long as they’ve been using glue. The concept of a spring joint is simple: Create a slight gap in the middle of an edge joint that is then drawn together with clamping during glue-up. The reasoning behind the practice is as varied as the methods used to create it. Many woodworkers sing the praises of the spring joint because, in theory, you only need one clamp to glue up a sizable panel or tabletop. Gary Rogowski uses spring joints in order to guarantee that the ends of his edge joints don’t open up over time. Some woodworkers, like Bob Van Dyke and Matt Wajda, create their spring joints with multiple passes of a smaller handplane (such as a No. 4 smoother). Others prefer to use their jointers to create a spring joint. Gary prefers to make multiple partial passes on the jointer, and in a series on making a tabletop, Bob Van Dyke used added pressure in the middle of the board when jointing his edges to create the concavity.

    Bob’s reasoning is simply that a spring joint makes it easier to glue up a flush panel that requires only light handplaning or scraping. Since the edges of the glue-up touch before the middle, it’s easy to keep them aligned as you add clamping pressure and finesse the middle of the board. In fact, as you’ll see in the video, Bob can create a panel that is strong enough to take out of the single clamp after 15 or 20 minutes.

    Creating an attractive tabletop, Part 2

    by Bob Van Dyke

    This second article in a three-part series on creating an attractive tabletop focuses on how to make joints that will stand the test of time, and how to keep the boards aligned during clamping.

    Ep 1: Panel glue-ups using a spring joint

    with Matt Wajda

    Matt shows you how he utilizes a spring joint to glue up boards and how to place your clamps to ensure a flat panel.

    Spring joints: An edge glue-up’s best friend

    by Gary Rogwoski

    For truly solid edge joints, try putting a little spring in your boards’ step.

    Sign up for eletters today and get the latest techniques and how-to from Fine Woodworking, plus special offers.

    Sign Up

    Get woodworking tips, expert advice and special offers in your inbox

    Sign Up
    ×
    X
    X

    New Feature

    Fine Woodworking Forums

    Ask questions, offer advice, and share your work

    Get It All!

    UNLIMITED Membership is like taking a master class in woodworking for less than $10 a month.

    Start Your Free Trial

    Subscribe to Fine Woodworking

    Save up to 69%

    Subscribe

    Comments

    1. User avater
      GregJones | Feb 08, 2020 07:53am | #1

      Very nice Bob, thanks!

    2. ecyor | Feb 08, 2020 10:00am | #2

      Enjoyed the surprise ending. Very good video!

    3. DustinDawind | Feb 08, 2020 11:16am | #3

      As a hobbyist without a power jointer, the doubled-up spring joint has been my go-to for ensuring that my panels and table tops have strong glue lines from end to end. They just work, no matter how wonky or off 90 degrees you get.

      One step I add: as soon as the panel is glued and clamped, I check again that the panel is actually flat across each section (both ends and in the middle). If single clamp is not putting pressure precisely in the middle of each board edge, I'll adjust the clamp to bring the joint back to straight. And on long boards (like 6ft long), I'll add a few more clamps along the entire panel to ensure it's straight as necessary, alternating sides of the clamps.

      Last thing I'll say is that if you're doing multiple boards with spring joints (like a table top), I avoid putting too much "spring" in the middle of the panel. I make sure that I can push the middle panel boards together by light-ish finger pressure only. You can get away with bigger springs with just 2 boards, but once you get into 6 boards with spring joints then I do fear the pulling pressure could build up in wonky ways. The glue lines would remain strong, but other weak points in the boards may eventually give way over time.

    4. User avater
      IdleWoodWorkshop | Feb 08, 2020 08:33pm | #4

      Why oh why did I watch this with my wife in the room? Now I can't buy more clamps...

    5. user-6296346 | Feb 08, 2020 09:08pm | #5

      BVD = BA

    6. PGMtl | Feb 10, 2020 12:36pm | #6

      I was going to chime in, Bob Van Dyke is the most bad-ass FWW'er, but someone beat me to the punch...
      Awesome video, also showing wood clamps usage... Thanks Bob!

    7. jfsksa | Feb 10, 2020 12:37pm | #7

      I was taught this technique in a woodworking class. They said that one benefit of this method is that it helps prevent checking as the boards continue to dry. We all know that moisture escapes from the ends first and the wood shrinks which can cause cracks. Having a spring joint means that the slight shrinking will first reduce the spring and hopefully prevent cracks.

    8. drano | Feb 10, 2020 07:34pm | #8

      I have to say I thoroughly enjoy every video that Bob makes. Usually I shake my head and say "Why didn't I know that 30 years ago?" Simply outstanding.

    9. RobK | Feb 12, 2020 11:38am | #9

      Love this 4 shaving lengths method; very deliberate and methodical. But pizza for lunch? Take better care of yourself Bob; u need to be making more of these vids for a long time...

    10. TboneTim | Feb 15, 2020 11:42pm | #10

      I love Bob's crisp, clear, and info-dense presentations, and this is no exception. Best of many tutorials on this fundamental technique. And gimme a break....pizza for lunch IS taking care of yourself. Add a pint of good ale when you're done in the shop for the day.

    11. chuckh | Feb 16, 2020 10:52pm | #11

      Thank you for the demonstration. I have often used a spring joint but never made it as methodically as you do. I like your method better. And it never occurred to me that I could use only one clamp. Duh!

    Log in or create an account to post a comment.

    Sign up Log in

    Up Next

    Featured Workshop

    a diagram of a round Shaker stand and an image or a round Shaker stand

    Shaker candle stand with Christian Beckvoort

    He’s built dozens of round Shaker stands over four decades, so there is no one more qualified than Christian Becksvoort to demonstrate making this classic. In this seven-part video series,…

    Featured Projects & Plans

    Build a Contemporary Sideboard

    Chris Gochnour's sideboard combines usefulness, strength, and beauty in a contemporary case piece

    Related Stories

    • Let's talk about the end-grain glue joint video

    • Workshop tip: Dental floss works glue deep into cracks

    • A look at Piher and their double-acting clamps

    • Mike Farrington's most-used glues

    Discussion Forum

    Recent Posts and Replies

    • |
    • |
    • |
    • |
    • |
    • |
    View More Create Post

    Member Exclusives

    More Member Exclusives
    • Ep 9: Prefinishing and gluing up the case

      Before gluing up the hanging wall cabinet case with only two clamps, Mike prefinishes the case parts with his simple wipe-on shellac method.

    • final glue-up

      Modern Desk: Final Glue-Up

      Breaking down the assembly into manageable sections will reduce the stress of this multipart glue-up.

    • Modern Desk: Gluing Up the Side Assemblies

      Curved parts can make a glue-up more stressful, but custom cauls ensure that things go smoothly.

    • How to upholster a slip seat

      How to upholster a slip seat

      Michael Mascelli demonstrates how to create a finished, professional-looking upholstered slip seat.

    Highlights

    • Shape Your Skills

      when you sign up for our emails

      Plus tips, advice, and special offers from Fine Woodworking.

      Sign Up
    • Shop Talk Live Podcast

      Shop Talk Live Podcast

      Our biweekly podcast allows editors, authors, and special guests to answer your woodworking questions and connect with the online woodworking community.

    • Woodpecker Sweepstakes

      Woodpeckers Shop Upgrade Giveaway

      Enter now for your chance to win more than $2,000 worth of woodworking equipment from Woodpeckers. Click for full details.

    • Staff Picks Blog

      Our favorite articles and videos

      We have created these special content collections organized to give you a deep dive into a range of topics that matter.

    Clamping And Gluing

    View All
    • a glued up board on a press breaking along the glue line

      Let's talk about the end-grain glue joint video

    • push glue into wood crack

      Workshop tip: Dental floss works glue deep into cracks

    • A look at Piher and their double-acting clamps

    • Mike Farrington's most-used glues

    View All

    From the Store

    View More
    • Complete Illustrated Guide to Woodworking USB

      Buy Now
    • Foundations of Woodworking

      Buy Now
    • Tool Guide 2022

      Buy Now
    • The Why & How of Woodworking

      Buy Now
    View More

    Get the latest from Fine Woodworking Magazine

    • #292-NOV/DEC 2021

      • Kerf-bent wall cabinet
      • Online extras from FWW issue #292
      • How to tame curved parts with patterns
    • #291-Sep/Oct 2021

      • Build a modern coffee table
      • Online Extras from FWW Issue #291
      • Editor's Letter: Something old, something new
    • #290-July/Aug 2021

      • Build a Shaker chest of drawers
      • Online Extras from FWW Issue #290
      • From the editor: What we make matters
    • #289-May/June 2021

      • Arts & Crafts Coffee Table with Story-Book Charm
      • Links from Fine Woodworking issue #289
      • Step-by-Step Guide to Tuning Your Block Plane
    • #288-Mar/Apr 2021

      • Phil Lowe: A craftsman and gentleman
      • Online Extras from FWW Issue #288
      • Phil Lowe: craftsman, teacher, friend

    UNLIMITED membership - Get access to it all

    Start Free Trial Upgrade Membership

    Fine WoodWorking

    Follow

    Newsletter

    Get woodworking tips, expert advice and special offers in your inbox

    Sign Up

    Membership & Magazine

    • Members
    • Digital Libraries
    • Join Unlimited
    • Magazine Subscription
    • Magazine Renewal
    • Gift a Subscription
    • Customer Support
    • Manage Preferences

    Taunton Network

    • Fine Homebuilding
    • Green Building Advisor
    • Fine Gardening
    • Threads
    • About
    • Contact
    • Advertise
    • Privacy Policy
    • Careers
    • Copyright
    • Terms of Use
    • Accessibility
    • California Privacy Rights
    • Site Map

    © 2021 The Taunton Press, Inc. All rights reserved.

    Get step-by-step instructions, woodworking tips, expert advice and special offers in your inbox. Sign Up Now!

      Main Menu

    • Projects and Plans
    • How-To
    • Shop Tips
    • Tools & Materials
    • Videos
    • Gallery
    • Magazine
    • Video Workshops
    • Members
    • Forum

      Popular Topics

    • Design
    • Small Projects
    • Beds
    • Chairs, Benches And Stools
    • Built-ins
    • Storage And Shelves
    • Cabinets
    • Carving
    • Casework
    • Desks
    • Tables
    • Shop Storage And Furniture
    • Woodturning Projects
    • Workbenches
    • Surface Prep

      More

    • TV
    • Forum
    • Blogs
    • Webinars
    • Podcasts
    • Customer Support

      Account

    • Log In
    • Join

      Magazine

    • Current Issue
    • Past Issues
    • Digital Libraries
    • Magazine Index
    • Subscribe

      Membership

    • Member Home
    • Start Free Trial
    • Gift Unlimited
    • Log In

      Shop the Store

    • Books
    • DVDs
    • Taunton Workshops

      Events

    • Fine Woodworking Live
    • Fine Woodworking HANDS ON

      Account

    • Log In
    • Sign Up

    Newsletter

    Get woodworking tips, offers, and expert advice in your inbox

    Sign Up

    Follow

    UNLIMITED

    Become an UNLIMITED member and get it all: searchable online archive of every issue, how-to videos, Complete Illustrated Guide to Woodworking digital series, print magazine, e-newsletter, and more.

    Start Your Free Trial

    Upgrade Membership