
Using a router at the lathe
Simple banjo-mounted router table makes it easy to add decoration to spindles, bowls, and ornaments.

Brought to you by:
![]()
This article, “Using a Router at the Lathe,” by John Lucas, is from the pages of American Woodturner and is brought to you by the American Association of Woodturners (AAW) in partnership with Fine Woodworking.
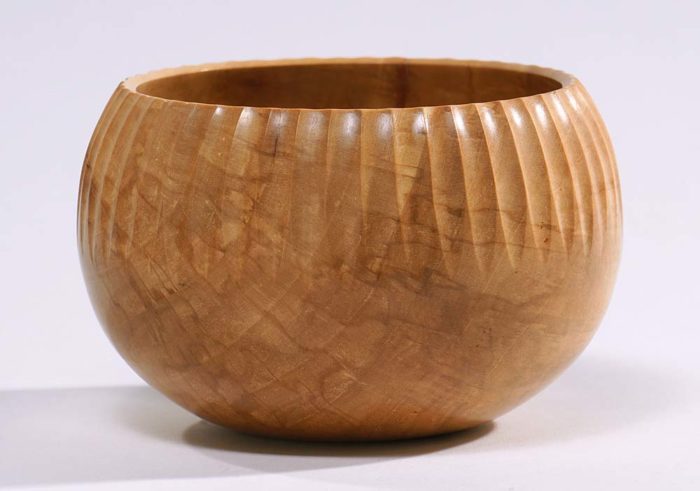
One of my very first power tools was a router. Since it is a versatile tool, I used it for many woodworking tasks—I planed and jointed boards, made many types of joints, and of course formed decorative edges. So when I got into woodturning, it was natural for me to try adapting the router for use at the lathe, and I have found it is a great way to add interesting features to turned items. In combination with a good indexing system on your lathe, a router setup enables you to create regularly spaced features on spindles, bowls, ornaments—almost any form turned on the lathe.
A friend had asked me to make some split-turned, fluted spindle decorations for a grandfather clock he was making. I glued up the wood and turned the spindle. Then I built a box to hold the spindle and support the router, which would be used to form the flutes. I rotated the wood, put a screw in the end to index the spindle, and then routed each groove. It wasn’t long before I decided there had to be a better way.

I designed a banjo-mounted table equipped with a fence to guide the router, which was held in a carriage. This setup allowed me to bring the versatility of the router to the lathe.
Router setup components: A banjo-mounted table
Building the banjo-mounted table can be challenging, but there are several possible approaches. The goal is to attach a post (sized to fit in your banjo and made of metal or wood) to the underside of the wood table and keep it square. I have found the simplest way is to glue a hardwood brace to the bottom of the table with a hole drilled to match the hole in your banjo. Then simply cut a piece of steel the correct diameter and length and glue it into the brace using epoxy.

If you have access to a welder, you could weld a large washer to a steel post, drill holes for screws, and mount it under the table. I have a pipe threader, so I cut threads on the end of a 1″- (25mm-) diameter rod, screwed the rod into a floor flange, and screwed the flange to the table. I also made one using all-thread rod, which allowed for fine adjustment of the table height.
You can also use a hardwood dowel as a post, but it will wear out relatively quickly. A wood post will work fine for several projects and can be replaced easily.

The size of the router table itself will depend on the router carriage you use and the project you will be routing. The table I use most measures 8″ ´ 16″ (20cm ´ 41cm). Equipped with a fence, this table is suitable for a wide variety of projects.
The router carriage

Build a carriage that will hold your router securely. I use a mini-router, but various sizes can be used, including a small rotary tool. I use threaded inserts set in a wood base to accept hold-down screws, but long screws with large threads would also work. You can be creative with how you secure the router to the base. I had some scrap aluminum on hand, which was easy to bend to fit the shape of the router and strap it down. Another option is to use custom-shaped wood blocks that clamp the router in place when screwed down.

To add to the versatility, your router carriage can be attached to a variety of custom-made bases to achieve different results. There are many possibilities, depending on the router bit being used and the shape of the guide fence the router will follow. I have a base for following concave guides, one for convex guides, one for creating arcs, and a few that allow me to mount the router at 45° or 90° to the work. Round-head screws mounted in front of the base allow for micro-adjustment of depth of cut.
Indexing systems
 You will also need a way to index the work so your routing can be made at regular intervals around the workpiece. Some lathes have an indexing wheel built in, as do some chucks. I have found the simplest way is to make your own indexing wheel, on which you can mark the number of positions you want. An L-bracket fixed to the lathe bed can be spring-clamped to the wheel, holding the workpiece in place (right). A homemade wheel has the advantage of offering any number of positions you choose, some of which might not be available on commercial indexing wheels (below).

Pencil carrier
 To reduce the chances of indexing errors, pre-mark the workpiece using a pencil mounted in a block at center height. This is an easy way to confirm your index spacing before cutting the wood. I made an adjustable pencil block, so I can use it at various heights if needed.
Table height spacers
For most cuts, the router bit should cut on the centerline of the turning. I have found a quick way to achieve the desired height is to make spacers out of 1″ PVC pipe. If you plan to use the same router and bit all the time, then you need only one. Setting the table higher or lower than centerline offers some interesting results, so I suggest making several spacers while you are at it.

A sample project
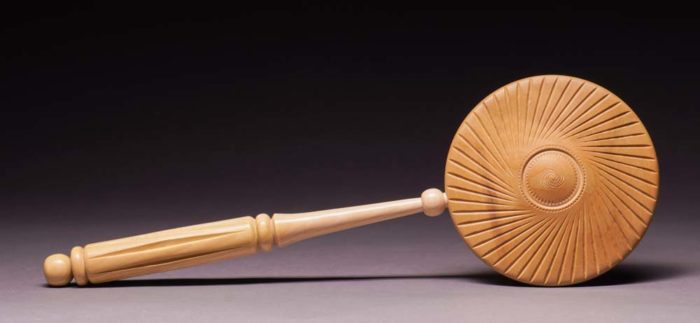
I made a tool handle with routed flutes to illustrate the basic process. Turn the handle and make the area to be fluted cylindrical (parallel to the lathe bed). Install the router table and adjust the height so the router bit is centered.
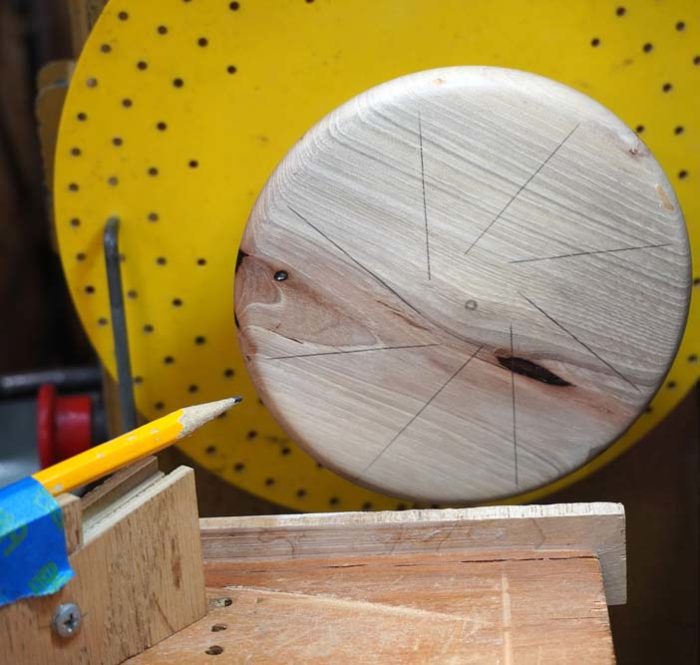
Next, decide on the number of index positions you want to use. Dividing the circumference of the workpiece by the width of the router bit will tell you the maximum number of positions possible for that workpiece. Pick a number of positions equal to or less than that number. Personally, I just eyeball it and use my pencil in the height block to mark off and confirm the positions before cutting. As long as the dimension between the pencil lines is greater than my bit diameter, I can use that index position. For this tool handle, I chose to make eight flutes using a 1/4″ (6mm) round-nose router bit.
I installed a fence to guide the router and stops to control the ends of the flutes. I usually just screw, hot glue, or clamp a piece of wood to the table as a guide that follows the length of the turning. Then I glue on blocks at either end to control how far the router moves left and right.
![]()
To achieve the desired depth of cut, I use a spacer the same thickness as my desired depth. Popsicle sticks or even drill bits work well. Place the spacer against the fence, then push the router up to the spacer. Then adjust the table position by moving the banjo until the router bit just touches the wood at both ends of the cut. Remove the spacer and you are ready to cut.

It is very important to push down on the router as you slide it along the cut. Since this is a plunge cut, the entire bit will be cutting at once, which will tend to pull the router upward and ruin your flute. Make several light passes until you are at the full depth.

The router may burn the wood at the ends of the flute, so approach these areas with light cuts. Another way to deal with end burning is to create ramps instead of end-of-cut blocks, so the router is guided gradually out of the cut. With this method, you are never stopping the cut in the wood, so there will be no burning. And yet another option is to simply turn a cove at the ends of the flutes after routing. That way, you simply cut away the burned ends.
Routing curved surfaces

Routing flutes on a curved surface such as the outside of a bowl can be done using a custom-shaped fence. After turning your bowl profile, mount the router table in the banjo and use a pencil to trace the bowl’s curve onto a piece of scrap wood. Cut the scrap and use it to guide the router. Leave extra wood at first so you can refine the curve, as the pattern may not have telegraphed perfectly.
For a purely convex surface, I use a router carriage base with two fine-adjustment screws at the front, as in the photo above. If during testing you see that the router doesn’t track as you want it to, simply change the shape of the guide/fence. For shapes that are not convex, use a carriage base with only one adjusting screw as your depth guide. This will allow you to follow a concave area, although it will be up to you to keep the router perpendicular to the cut by hand/eye.
Exploring angles and bits

Setting the router at an angle to the work creates some interesting possibilities and improved results. For example, if I wanted to rout a V-groove, I could set the router straight on to the work, as before, and use a V-cutting router bit. But this type of cutter often leaves a fuzzy area at the bottom of the groove that must be hand-sanded. Instead, I use a straight-cutting router bit in my 45° carriage. In this case, I am cutting the V-groove with only the outer edge of the bit, which has a much higher surface speed and leaves a very clean groove. You can also use a 45° carriage with a longer round-nose bit to produce a sort of J-shaped groove instead of a U.
I like to add contrasting wood inserts to my routed grooves. With a straight bit, this is simple enough—just rout the grooves and cut wood to fit accordingly. Note that with stopped cuts, you will have to either hand-cut the slot ends square or round over your insert. Round-nose bits work well to form recesses for inserts because you can cut short lengths of dowels and glue them into your round-bottomed groove. Using a V-groove router bit requires more attention to detail, as most V-groove bits do not form a true 90° angle. In reality, the angle may be 87° to 93°, which means when cutting your insert pieces, you’d have to tilt your tablesaw blade slightly to accommodate the discrepancy. Using a straight router bit at 45° produces the same problem.
 |
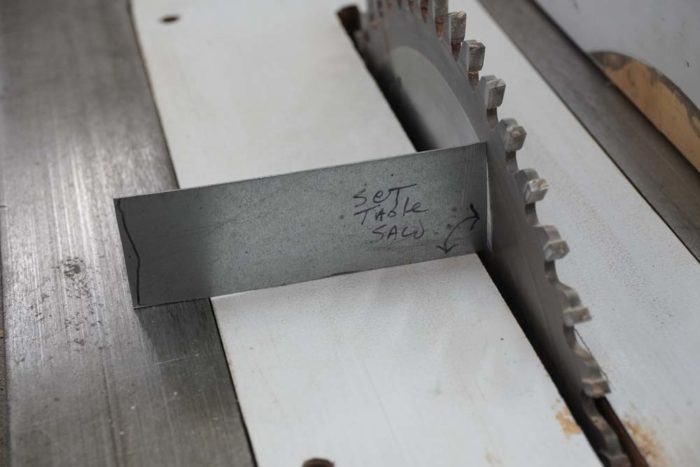 |
My solution was to file a piece of sheet metal until it fit perfectly into the routed V-groove. If you use this matched angle to set your tablesaw tilt, you’ll have perfectly shaped inserts.

I glue the contrasting wood inserts in place using epoxy, instead of wood glue, for two reasons. Epoxy is stronger, especially if you want narrow, pointed inserts like those on the mirror shown below. Epoxy also works as a gap filler, so if the fit of your inserts in the routed grooves isn’t perfect, the epoxy will offer some forgiveness.

 Other possibilities
Setting the router height above or below the centerline can produce exciting results. For example, if you rout grooves below center on a platter, the grooves will create the illusion that the form is rotating counterclockwise. If you rout the same grooves above center, the form will appear to rotate clockwise.
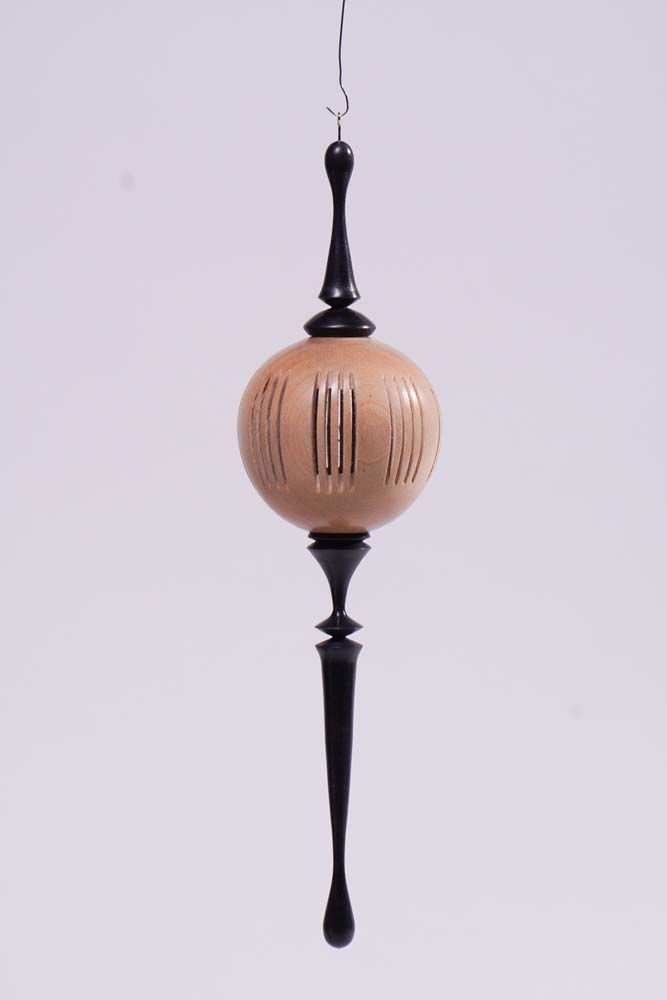
Finally, consider that it is possible to make carriages for other cutting tools. Rotary tools such as a Dremel or a Foredom handpiece work well and give you more options. The photos below show how I made a carriage to hold my Dremel at a 90° angle and cut slots in an ornament. I have also made a carriage for a metal air saw, so I could cut slots in the edge of a bowl, and for a biscuit cutter so I could form wider slots. Almost any tool that cuts is a possibility if you can build a carriage to hold it safely.
 |
 |
As I write this article and experiment in the shop, I can see many more ways of using the router or other cutting tools at the lathe. I hope these ideas will spark your imagination to expand the possibilities of your turning.
John Lucas, a retired photographer, has been working in wood for more than 35 years and also dabbles in metalworking. He enjoys modifying machines, making tools, and sharing his knowledge through written articles and videos. He has taught classes at John C. Campbell Folk School, Arrowmont, and The Appalachian Center for Crafts.
Brought to you by:
![]()


Comments
Lots of food for thought. Glad to see FWW collaborate with AAW. Seems like a great addition.
Log in or create an account to post a comment.
Sign up Log in