Skip to content
Fine Woodworking
Main Menu
Subscribe
GET THE MAGAZINE & MORE
Magazine Cover
  • Save 69% off the cover price
  • Or, get everything with UNLIMITED, including 40+ years of the online archive.
Subscribe Now!
Subscribe
  • Projects & Plans
  • How-To
  • Shop Tips
  • Tools & Materials
  • Videos
  • Magazine
  • Video Workshops
  • Members
  • Forum
  • Gallery
  • Blogs
  • More
    • Log In
    • Join
    Fine Woodworking Main Menu Subscribe
    Talking Tools

    Upgrading a planer to a segmented cutterhead – part 2

    And the beat goes on

    Author Headshot By Roland Johnson Nov 06, 2017
    Article Image

    In part 1 of this series we removed the cutterhead and gearbox from a Delta DC-380, 15-in. planer. The plan is to install a Byrd Shelix cutterhead, gaining improved performance and eliminating the hassle of changing knives. What a deal!

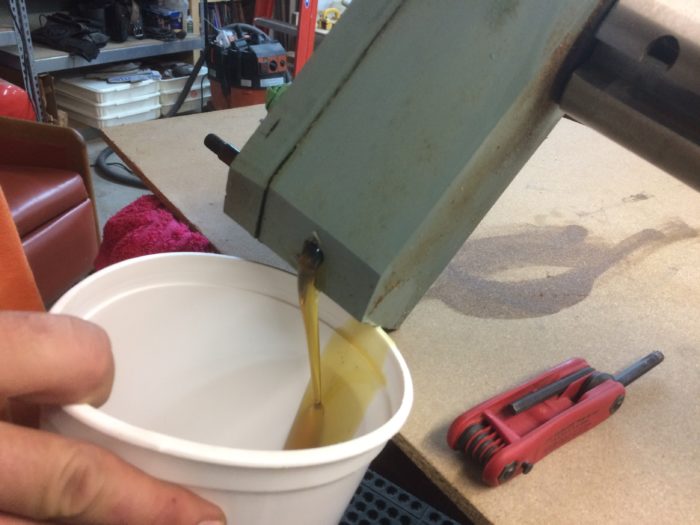
    The first thing we need to do with the freshly removed cutterhead assembly is to drain the oil out of the gearbox. We’ll replace the old lube with fresh 90w gear lube after reassembly.

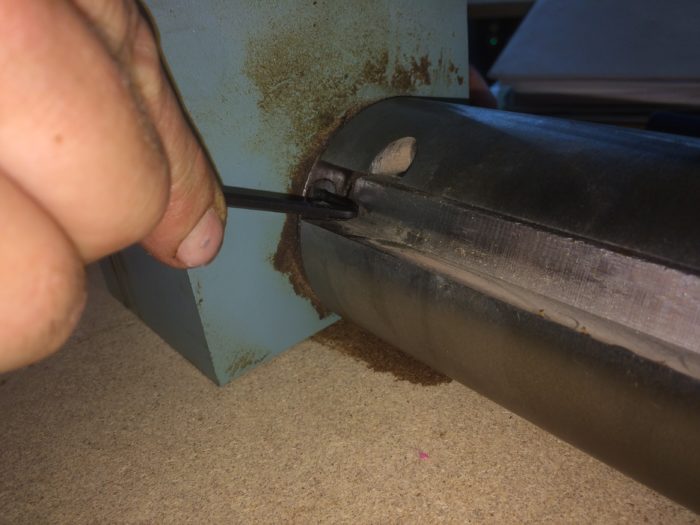
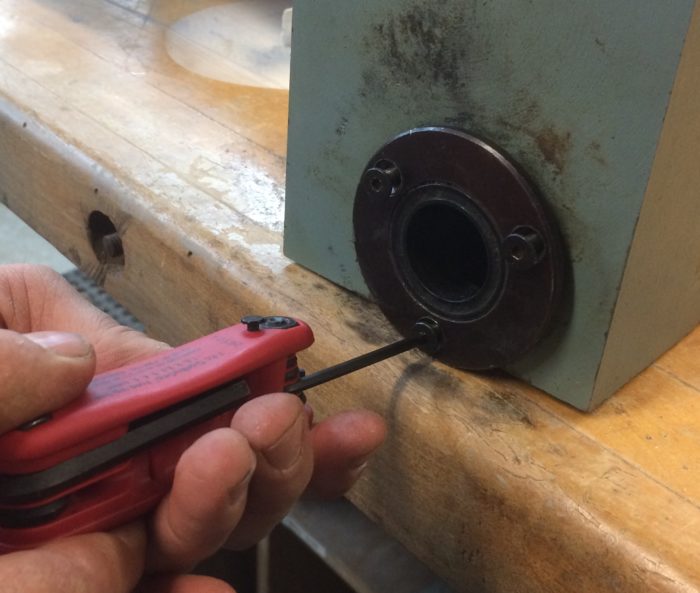
    The cutterhead assembly is joined to the gearbox with a collar that locks the bearing and bevel gear in place. There are three flush socket-head screws that hold the collar in place and these screws can be accessed through the ways milled in the cutterhead for the knife and gib assemblies. You might have to scrape a bit of built-up crud off the collar to locate the screws.

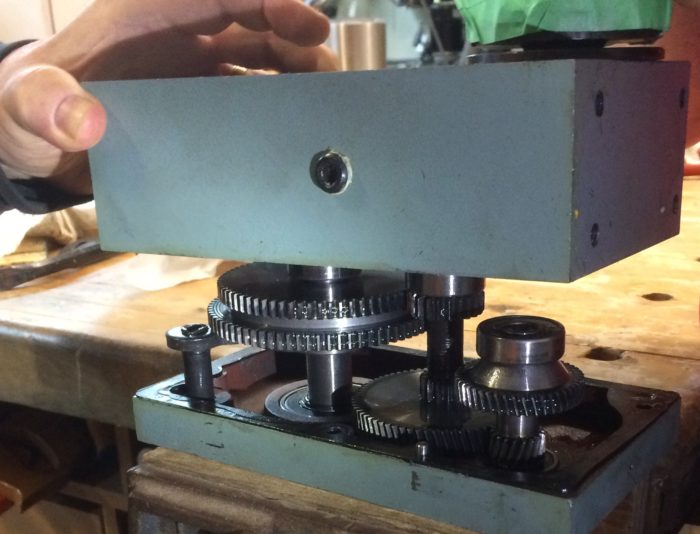
    Now it’s time to split the gearbox. On this machine there are four socket-head cap screws that hold the case together. With the screws removed, carefully pry the two halves apart using a slim putty knife. There is a fiber gasket between the halves, so be careful not to tear or slice it or you’ll be making a new one from gasket material. With the halves loose, carefully pry the two halves apart. Slow and easy will get the job done; the sprocket shaft bearings will slide out of their housings without much effort. I use slim pry-bars to pry lightly on the bearing (back) side of the sprockets. Set the sprocket side of the gearbox aside, being careful not to tip it over.

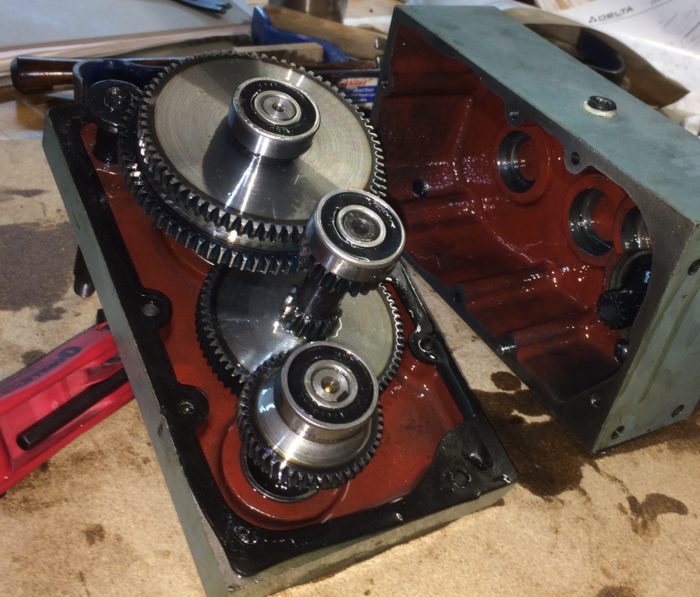
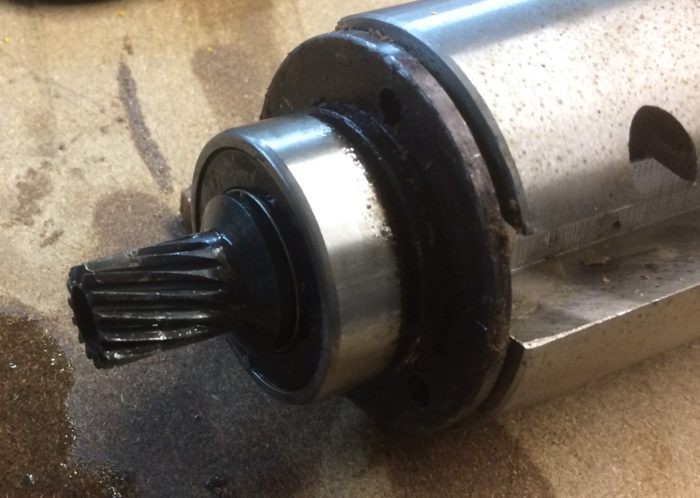
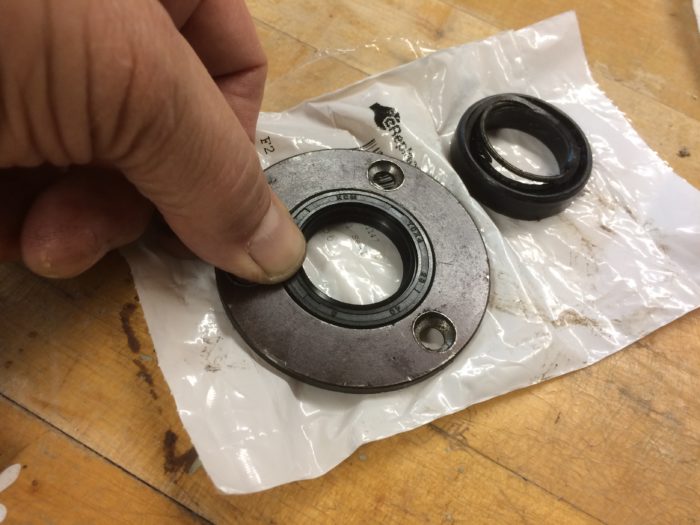
    With the gearbox split it’s easy to see the spiral bevel gear at the end of the cutterhead. It’s pretty easy to pull the cutterhead assembly out of the gearbox. If it resists, a tap or two on the end of the bevel gear with a wood block and hammer should get things moving. Ours slid out pretty easily. The gear is held in place by a socket-head screw in the end of the gear. Remove the gear; it has a tongue and groove to locate it on the end of the cutterhead. Now carefully pry the bearing off the shaft. Again this might be a place to use a gear puller but there’s not much space between the gear and the collar so you’ll need pretty slim feet on the puller arms. I prefer a pair of slim pry-bars. After the bearing is removed, the collar simply slips off the shaft. We discovered the spring-seal in the collar was toast so we installed a new seal. It’s easy. Simply pry out the old one with a screwdriver and press the new one in by hand. Since there’s a ton of stuff that has to be removed to replace one of these seals it would be a good idea to replace it now even if it looks OK.

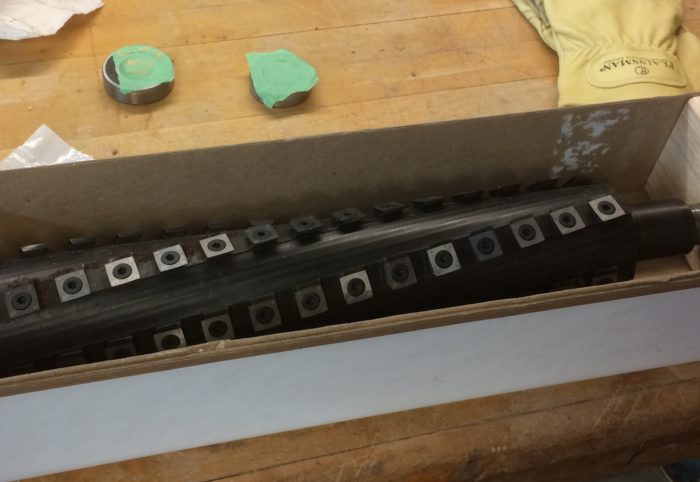
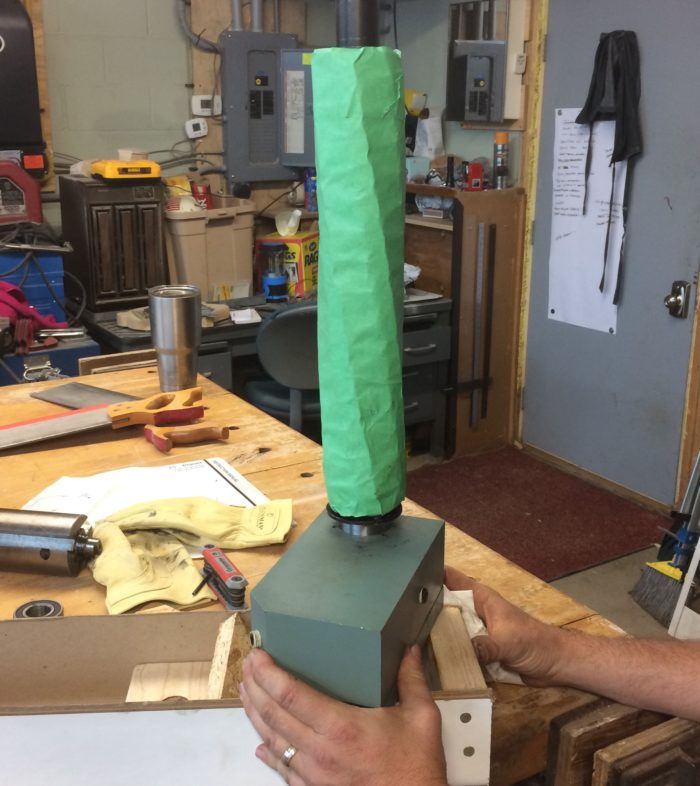
    Time for the cutterhead. Before removing it from its shipping cradle, wrap the head with a couple of layers of masking tape. The cutters are extremely sharp and bleeding shouldn’t be part of the process. Don’t use duct tape, the glue will stick to the cutters and leave a mess that’s hard to clean up.

    Install the bearing on the outboard end of the cutterhead. A piece of plastic pipe the same diameter as the inner race on the bearing is a good way to gently tap the bearing into place. Make sure the bearing is square to the shaft as you start. Take your time and be careful. The bearing moves down to the shoulder on the shaft so a piece of pipe about 5 in. long will work fine.

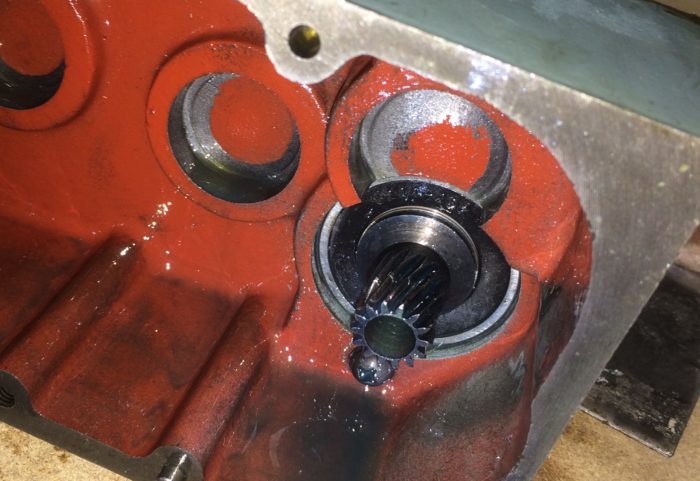
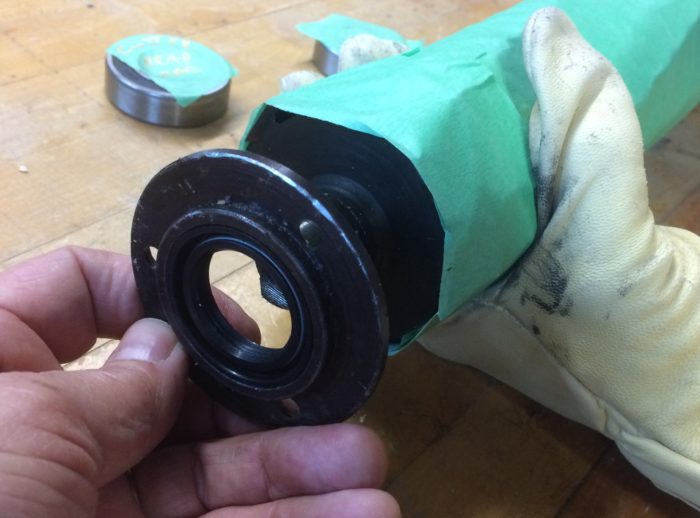
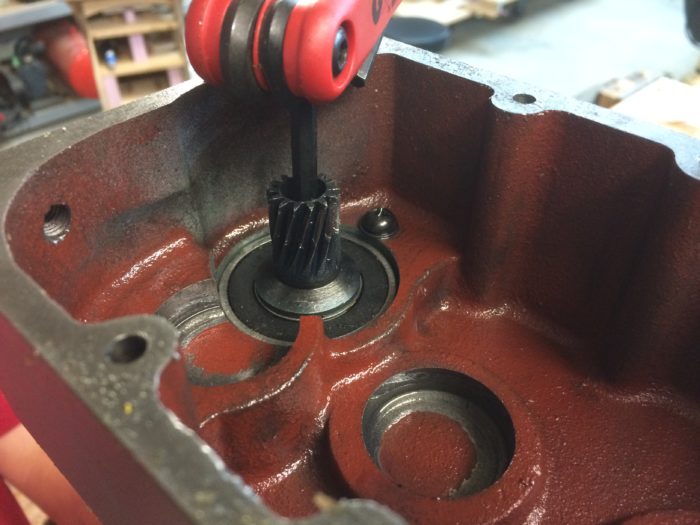
    One little problem arose as we were reassembling the cutterhead/gearbox. The collar that holds everything in place has to be installed, along with the cutterhead shaft bearing, before the cutterhead can be installed. The screws that hold the collar and bearing in place can’t be accessed with the cutterhead in place, there aren’t any knife ways to reach the screws through. Not a big deal, just install the parts and then carefully insert the cutterhead shaft into the bearing and use a hammer to tap the cutterhead into place. With the cutterhead bottomed out against the bearing race and the bearing bottomed against the retaining screw inside the case, reinstall the bevel gear. Get that screw tight! The really poor photo (sorry) shows the assembly with the outer bearing race against the retaining screw.

    Time to put the gearbox back together. This is where it’s a good idea to have an extra set of hands and a good flashlight. Carefully set the cutterhead/gearbox half onto the gears, lining up the bearings with their respective sockets. The gears can be pushed around a bit to help with alignment—that’s where the light and extra hands come in. Gently set the cutterhead side of the gearbox down and slowly spin the cutterhead as you go to make sure the bevel gear catches the sprocket it runs on without binding. Slow and easy gets it done. With everything meshed and smoothly rotating (watch the output shaft for rotation as the cutterhead is turned) replace the base bolts. Now fill the gearbox with 90w oil. Remove the cap screw on the side of the case and with the case upright (cutterhead on the upper end), pour lube into the case until it runs back out the hole. Now you’re ready to install the assembly back into the frame. Whew, time for a big sigh of relief here, the toughest part is done!

    With a stack of offcuts in place, slide the outboard cutterhead bearing back into its socket and bolt the gearbox back into place. Again, keep the gearbox/cutterhead assembly as close to its final location as possible when reinstalling it. The planer frame can be lowered a bit to use the offcuts to keep the assembly in place as the cutterhead shaft and inner bearing are reunited with the bearing socket. A hammer and block of wood against the gearbox can help push the parts together. Be patient and gentle, it goes together pretty easy.

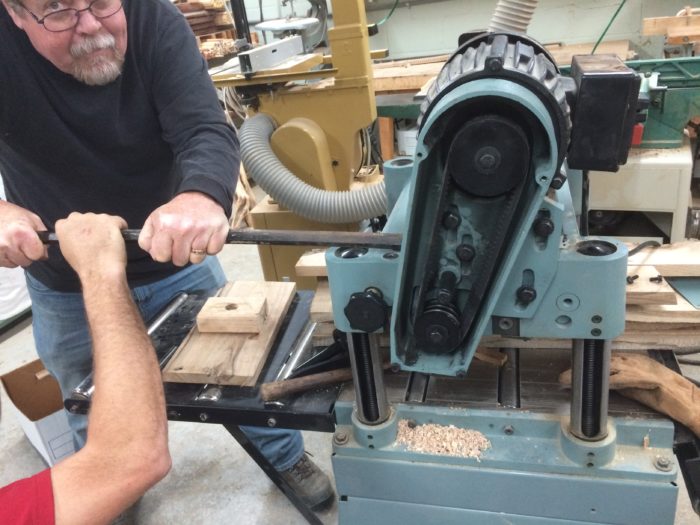
    Now it’s a simple mater of putting the sprocket/chain drive back on, reinstall all the covers, pulleys, and belts and your new cutterhead is installed, ready for years of high-quality planing. The photo below shows Don Peterson using a stout pry-bar to get proper belt tension. That motor is heavy and a little brute force works well here.

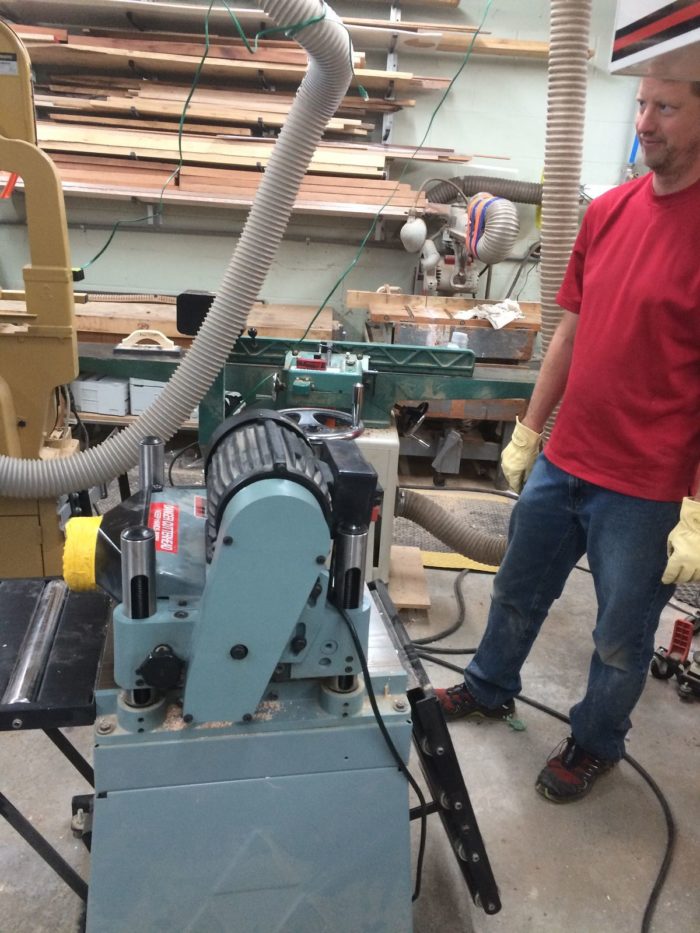
    Owner Don Wade is pretty happy about the update to his old workhorse!


    More on FineWoodworking.com

    • Segmented Cutterheads Change the Game – Plane hundreds of feet of lumber with no tearout and no knife changes
    • Upgrade Your Jointer with a Segmented Cutterhead -Step-by-step techniques for upgrading a jointer with a segmented cutterhead
    • Bottom Line on Segmented Cutterhead Cost – Is the cost of upgrading your planer’s conventional cutterheads with a segmented model worth it?

    Sign up for eletters today and get the latest techniques and how-to from Fine Woodworking, plus special offers.

    Sign Up

    Get woodworking tips, expert advice and special offers in your inbox

    Sign Up
    ×
    X
    X

    New Feature

    Fine Woodworking Forums

    Ask questions, offer advice, and share your work

    Get It All!

    UNLIMITED Membership is like taking a master class in woodworking for less than $10 a month.

    Start Your Free Trial

    Subscribe to Fine Woodworking

    Save up to 69%

    Subscribe

    Log in or create an account to post a comment.

    Sign up Log in

    More Talking Tools

    View All
    • Upgrading a planer to a segmented cutterhead - part 1

    • How to cut large stock with a miter saw

    • Use a Scrub Plane to Create a Textured Finish

    • Push pads that actually work. Are you ready?

    View All

    Up Next

    Featured Workshop

    a diagram of a round Shaker stand and an image or a round Shaker stand

    Shaker candle stand with Christian Beckvoort

    He’s built dozens of round Shaker stands over four decades, so there is no one more qualified than Christian Becksvoort to demonstrate making this classic. In this seven-part video series,…

    Featured Projects & Plans

    Build a Contemporary Sideboard

    Chris Gochnour's sideboard combines usefulness, strength, and beauty in a contemporary case piece

    Related Stories

    • Milling Your Own Lumber

    • Tilt-Top Table

    • Ep 6: Machine Setup - The planer

    • Tool Review: G0832 Planer by Grizzly

    Discussion Forum

    Recent Posts and Replies

    • |
    • |
    • |
    • |
    • |
    • |
    View More Create Post

    Member Exclusives

    More Member Exclusives
    • Tablesaw sleds for joinery

      Mike Pekovich has a sled for each job: a sled for cutting dovetails, one with a sliding fence for box joints, a sled with a lower fence and stops for cutting dadoes, one with a tall fence for cutting tenons, and a dedicated sled for mitered boxes.

    • A tablesaw sled for mitered boxes

      Known for efficiency in his work, Mike Pekovich has built a few iterations of his sled for making mitered boxes. In this video, he shows the progression of sleds he built, and unveils the final version. Or is it?

    • Build a folding tablesaw outfeed table

      Steve Fikar's space-saving mobile support can handle big jobs, too.

    • Wall-mounted dust collectors

      Tool Test: Wall-mounted dust collectors

      Models tested are: Grizzly G0785, Rikon 60-101, Rockler Dust Right 650 CFM, Rocker Dust Right 1250 CFM, Shop Fox W1844, Shop Fox W1826.

    Highlights

    • Shape Your Skills

      when you sign up for our emails

      Plus tips, advice, and special offers from Fine Woodworking.

      Sign Up
    • Shop Talk Live Podcast

      Shop Talk Live Podcast

      Our biweekly podcast allows editors, authors, and special guests to answer your woodworking questions and connect with the online woodworking community.

    • Woodpecker Sweepstakes

      Woodpeckers Shop Upgrade Giveaway

      Enter now for your chance to win more than $2,000 worth of woodworking equipment from Woodpeckers. Click for full details.

    • Staff Picks Blog

      Our favorite articles and videos

      We have created these special content collections organized to give you a deep dive into a range of topics that matter.

    Machinery

    View All
    • JessEm Mite-R-Excel II

      Tool review: JessEm Mite-R Excel II miter gauge

    • Webinar: PantoRouter - Advanced Joinery and Unconventional Applications

    • Webinar: Bandsaw Jigs and Fixtures with Michael Fortune

    • support long crosscuts

      Workshop tip: Conveyor rail supports long crosscuts

    View All

    From the Store

    View More
    • The Why & How of Woodworking

      Buy Now
    • Complete Illustrated Guide to Woodworking USB

      Buy Now
    • Foundations of Woodworking

      Buy Now
    • Tool Guide 2022

      Buy Now
    View More

    Get the latest from Fine Woodworking Magazine

    • #292-NOV/DEC 2021

      • Kerf-bent wall cabinet
      • Online extras from FWW issue #292
      • How to tame curved parts with patterns
    • #291-Sep/Oct 2021

      • Build a modern coffee table
      • Online Extras from FWW Issue #291
      • Editor's Letter: Something old, something new
    • #290-July/Aug 2021

      • Build a Shaker chest of drawers
      • Online Extras from FWW Issue #290
      • From the editor: What we make matters
    • #289-May/June 2021

      • Arts & Crafts Coffee Table with Story-Book Charm
      • Links from Fine Woodworking issue #289
      • Step-by-Step Guide to Tuning Your Block Plane
    • #288-Mar/Apr 2021

      • Phil Lowe: A craftsman and gentleman
      • Online Extras from FWW Issue #288
      • Phil Lowe: craftsman, teacher, friend

    UNLIMITED membership - Get access to it all

    Start Free Trial Upgrade Membership

    Fine WoodWorking

    Follow

    Newsletter

    Get woodworking tips, expert advice and special offers in your inbox

    Sign Up

    Membership & Magazine

    • Members
    • Digital Libraries
    • Join Unlimited
    • Magazine Subscription
    • Magazine Renewal
    • Gift a Subscription
    • Customer Support
    • Manage Preferences

    Taunton Network

    • Fine Homebuilding
    • Green Building Advisor
    • Fine Gardening
    • Threads
    • About
    • Contact
    • Advertise
    • Privacy Policy
    • Careers
    • Copyright
    • Terms of Use
    • Accessibility
    • California Privacy Rights
    • Site Map

    © 2021 The Taunton Press, Inc. All rights reserved.

    Get step-by-step instructions, woodworking tips, expert advice and special offers in your inbox. Sign Up Now!

      Main Menu

    • Projects and Plans
    • How-To
    • Shop Tips
    • Tools & Materials
    • Videos
    • Gallery
    • Magazine
    • Video Workshops
    • Members
    • Forum

      Popular Topics

    • Design
    • Small Projects
    • Beds
    • Chairs, Benches And Stools
    • Built-ins
    • Storage And Shelves
    • Cabinets
    • Carving
    • Casework
    • Desks
    • Tables
    • Shop Storage And Furniture
    • Woodturning Projects
    • Workbenches
    • Surface Prep

      More

    • TV
    • Forum
    • Blogs
    • Webinars
    • Podcasts
    • Customer Support

      Account

    • Log In
    • Join

      Magazine

    • Current Issue
    • Past Issues
    • Digital Libraries
    • Magazine Index
    • Subscribe

      Membership

    • Member Home
    • Start Free Trial
    • Gift Unlimited
    • Log In

      Shop the Store

    • Books
    • DVDs
    • Taunton Workshops

      Events

    • Fine Woodworking Live
    • Fine Woodworking HANDS ON

      Account

    • Log In
    • Sign Up

    Newsletter

    Get woodworking tips, offers, and expert advice in your inbox

    Sign Up

    Follow

    UNLIMITED

    Become an UNLIMITED member and get it all: searchable online archive of every issue, how-to videos, Complete Illustrated Guide to Woodworking digital series, print magazine, e-newsletter, and more.

    Start Your Free Trial

    Upgrade Membership