Skip to content
Fine Woodworking
Main Menu
Subscribe
GET THE MAGAZINE & MORE
Magazine Cover
  • Save 69% off the cover price
  • Or, get everything with UNLIMITED, including 40+ years of the online archive.
Subscribe Now!
Subscribe
  • Projects & Plans
  • How-To
  • Shop Tips
  • Tools & Materials
  • Videos
  • Magazine
  • Video Workshops
  • Members
  • Forum
  • Gallery
  • Blogs
  • More
    • Log In
    • Join
    Fine Woodworking Main Menu Subscribe
    How-To

    Tapering at the Jointer

    Mike Pekovich demonstrates how you can accurately and consistently taper parts on the jointer.

    Author Headshot By Michael Pekovich #280-Jan/Feb 2020 Issue
    Article Image

    When it would be difficult to bandsaw a taper cleanly or cut it on the tablesaw without scoring or burn marks, head to the jointer. You can make a quick taper in two passes.

    Step 1: Set the jointer to make a cut half the depth of the final taper

    The overall taper is 1/8 in. from end to end, so start by setting the jointer to take a 1/16-in.- deep cut, which is half of the total taper.

    Step 2: Take a single pass stopping halfway along the leg

    Then make a pass starting at the top of the leg and stopping at the halfway point. I place tape on the jointer fence so I know exactly where to stop.

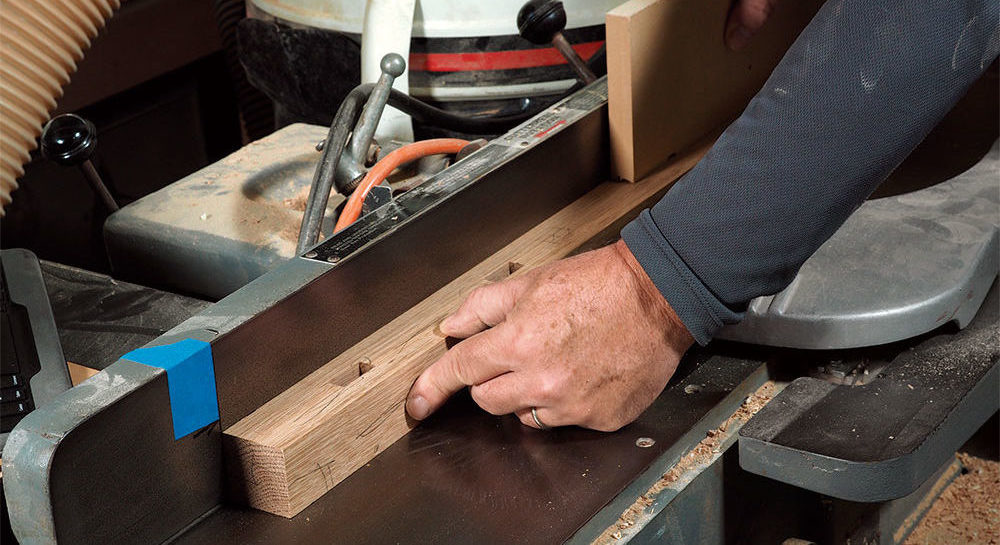
    Step 3: Rotate the leg and take a full pass to complete the taper

    Rotate the leg so that the bottom end is facing forward for the second pass. Put pressure on the trailing end of the leg so the front is pivoted above the jointer bed when making this pass.

    This should result in a continuous taper along the length of the leg. It’s fast and kind of fun once you get the hang of it.

    -This is an excerpt from Mike’s Arched Entry Table article in Fine Woodworking #280.


    How to handplane a taper to perfection

    Tom McLaughlin’s tapering jig makes quick work of any taper, but some work with a handplane makes it sing

    Table saw tapering jig how to video

    Tablesaw Tapering Jig is Safer and Faster

    Learn how an adjustable leg tapering jig can easily cut two, three, and four-sided tapers on the tablesaw

    Three Reliable Ways to Taper a Leg

    Tapers can be cut quickly and accurately with a bandsaw, a thickness planer or a tablesaw


    Sign up for eletters today and get the latest techniques and how-to from Fine Woodworking, plus special offers.

    Sign Up

    Get woodworking tips, expert advice and special offers in your inbox

    Sign Up
    ×
    X
    X

    New Feature

    Fine Woodworking Forums

    Ask questions, offer advice, and share your work

    Get It All!

    UNLIMITED Membership is like taking a master class in woodworking for less than $10 a month.

    Start Your Free Trial

    Subscribe to Fine Woodworking

    Save up to 69%

    Subscribe

    Comments

    1. flyfisher111 | Dec 31, 2019 11:30am | #1

      I've been using this for several years and it gives great results. My legs usually have the taper starting just below the apron, so carefully marking the start point is critical.

      Mike, thanks for this as well as a lot of other things I have learned form you.

    2. grbmds | Jan 02, 2020 11:43am | #2

      Just curious about tearout...Given the process requires reversing the board to finish the cut, it would seem that jointing the board in one direction or the other would be against the grain and possibly cause tearout. I own a helical head jointer so tearout isn't a regular occurrence but it still happens.

    3. User avater FWW Editor
      BenStrano | Mar 05, 2020 08:59am | #3

      -Grbmds

      If your grain in fairly straight, like Mike would use on tapered leg stock, the second pass will be running "downhill" and tearout shouldn't be an issue.

    4. jpe52 | Sep 19, 2020 01:09am | #4

      This is a neat technique for making tapers. However, there
      is one subtlety not mentioned by Mike: The diameter of your
      jointer cutterhead plays a role. Suppose, for example, your
      board is 24" long and you want to taper it by 1/4" along its
      length. If your first 1/8" pass through the jointer is 12"
      long as Mike suggests, the final taper after the second pass will not be
      exactly 1/4" end-to-end. In fact, very slightly more than 1/4" will
      have been removed from the leading end and, more importantly, a
      noticeable amount of wood is also removed from the tail end.
      In other words, the taper did not end precisely at the tail
      end of the board. All of this is due to the diameter of the
      cutterhead.

      Now, this may not be important to your project, but consider this:
      Suppose you want the taper to end at a precise spot, perhaps to
      line up with some other feature in your design. To avoid disappointment,
      you need to account for the cutterhead diameter. Regrettably, getting
      it correct requires some algebra! Here's the answer:

      If T is the total length of the desired taper (measured along the
      original edge of the board), then the length X of the first pass
      through the jointer should be X = T/2 - Y, where Y is given by
      Y = square root (D*R -D*D/4). In this formula, D is the original
      desired taper amount (1/4" in the above example), and R is the radius
      of the jointer cutter head. For my jointer, R = 1-17/32". So, if
      I want T=24" and D=1/4", then X = 11.394"; quite a bit less than half
      the length of the original board!

      (Note: The distance X is measured from the cutterhead top dead center.)

      Jim Eisenstein
      Pasadena, CA

    Log in or create an account to post a comment.

    Sign up Log in

    Up Next

    Featured Workshop

    a diagram of a round Shaker stand and an image or a round Shaker stand

    Shaker candle stand with Christian Beckvoort

    He’s built dozens of round Shaker stands over four decades, so there is no one more qualified than Christian Becksvoort to demonstrate making this classic. In this seven-part video series,…

    Featured Projects & Plans

    Build a Contemporary Sideboard

    Chris Gochnour's sideboard combines usefulness, strength, and beauty in a contemporary case piece

    Related Stories

    • How to Cut Double Tenons

    • Modern Desk: Curved Legs

    • How to handplane a taper to perfection

    • Tablesaw Tapering Jig is Safer and Faster

    Discussion Forum

    Recent Posts and Replies

    • |
    • |
    • |
    • |
    • |
    • |
    View More Create Post

    Member Exclusives

    More Member Exclusives
    • kerf-bent cabinet

      Kerf-bent wall cabinet

      Philip Morley's small wall cabinet has sides that curve inward at the top, with an asymmetrical arrangement of drawers, door, and open shelves.

    • steam-bend spiral

      Steam-bend a spiral

      Helical legs and a conical shade combine in a beautiful lamp.

    • bending wood

      How to bend wood to your will

      Use steam to create strong, curved parts with continuous grain.

    • Contemporary Stool: Adding Curves and Texture

      Give the stool an elegant look with subtle curves and hand-carved texturing on the legs, then glue it all together with hot hide glue.

    Highlights

    • Shape Your Skills

      when you sign up for our emails

      Plus tips, advice, and special offers from Fine Woodworking.

      Sign Up
    • Shop Talk Live Podcast

      Shop Talk Live Podcast

      Our biweekly podcast allows editors, authors, and special guests to answer your woodworking questions and connect with the online woodworking community.

    • Woodpecker Sweepstakes

      Woodpeckers Shop Upgrade Giveaway

      Enter now for your chance to win more than $2,000 worth of woodworking equipment from Woodpeckers. Click for full details.

    • Staff Picks Blog

      Our favorite articles and videos

      We have created these special content collections organized to give you a deep dive into a range of topics that matter.

    Shaping

    View All
    • Phillip Morley's hands cutting kerfs in a piece of wood

      Calculated kerfs

    • Shape and ebonize walnut pegs

      Workshop tip: Shape and ebonize walnut pegs in a single step

    • Creating a custom cove molding

    • best woods for steam bending

      The best woods for steam-bending

    View All

    From the Store

    View More
    • Complete Illustrated Guide to Woodworking USB

      Buy Now
    • Foundations of Woodworking

      Buy Now
    • Tool Guide 2022

      Buy Now
    • The Why & How of Woodworking

      Buy Now
    View More

    Get the latest from Fine Woodworking Magazine

    • #292-NOV/DEC 2021

      • Kerf-bent wall cabinet
      • Online extras from FWW issue #292
      • How to tame curved parts with patterns
    • #291-Sep/Oct 2021

      • Build a modern coffee table
      • Online Extras from FWW Issue #291
      • Editor's Letter: Something old, something new
    • #290-July/Aug 2021

      • Build a Shaker chest of drawers
      • Online Extras from FWW Issue #290
      • From the editor: What we make matters
    • #289-May/June 2021

      • Arts & Crafts Coffee Table with Story-Book Charm
      • Links from Fine Woodworking issue #289
      • Step-by-Step Guide to Tuning Your Block Plane
    • #288-Mar/Apr 2021

      • Phil Lowe: A craftsman and gentleman
      • Online Extras from FWW Issue #288
      • Phil Lowe: craftsman, teacher, friend

    UNLIMITED membership - Get access to it all

    Start Free Trial Upgrade Membership

    Fine WoodWorking

    Follow

    Newsletter

    Get woodworking tips, expert advice and special offers in your inbox

    Sign Up

    Membership & Magazine

    • Members
    • Digital Libraries
    • Join Unlimited
    • Magazine Subscription
    • Magazine Renewal
    • Gift a Subscription
    • Customer Support
    • Manage Preferences

    Taunton Network

    • Fine Homebuilding
    • Green Building Advisor
    • Fine Gardening
    • Threads
    • About
    • Contact
    • Advertise
    • Privacy Policy
    • Careers
    • Copyright
    • Terms of Use
    • Accessibility
    • California Privacy Rights
    • Site Map

    © 2021 The Taunton Press, Inc. All rights reserved.

    Get step-by-step instructions, woodworking tips, expert advice and special offers in your inbox. Sign Up Now!

      Main Menu

    • Projects and Plans
    • How-To
    • Shop Tips
    • Tools & Materials
    • Videos
    • Gallery
    • Magazine
    • Video Workshops
    • Members
    • Forum

      Popular Topics

    • Design
    • Small Projects
    • Beds
    • Chairs, Benches And Stools
    • Built-ins
    • Storage And Shelves
    • Cabinets
    • Carving
    • Casework
    • Desks
    • Tables
    • Shop Storage And Furniture
    • Woodturning Projects
    • Workbenches
    • Surface Prep

      More

    • TV
    • Forum
    • Blogs
    • Webinars
    • Podcasts
    • Customer Support

      Account

    • Log In
    • Join

      Magazine

    • Current Issue
    • Past Issues
    • Digital Libraries
    • Magazine Index
    • Subscribe

      Membership

    • Member Home
    • Start Free Trial
    • Gift Unlimited
    • Log In

      Shop the Store

    • Books
    • DVDs
    • Taunton Workshops

      Events

    • Fine Woodworking Live
    • Fine Woodworking HANDS ON

      Account

    • Log In
    • Sign Up

    Newsletter

    Get woodworking tips, offers, and expert advice in your inbox

    Sign Up

    Follow

    UNLIMITED

    Become an UNLIMITED member and get it all: searchable online archive of every issue, how-to videos, Complete Illustrated Guide to Woodworking digital series, print magazine, e-newsletter, and more.

    Start Your Free Trial

    Upgrade Membership