
An Exercise in Table Design
Given a common inspiration, three furniture makers create a diversity of designs


Synopsis: Given the same basic inspiration, how would three decidedly different woodworkers come up with a design for an arched-leg table? Fine Woodworking senior editor Mark Schofield decided to find out. Inspired by the graceful arches of a bridge spanning a Connecticut river, Schofield sent a photograph to Jere Osgood, Wayne Marcoux, and Garrett Hack and supplied a few main dimensions, requesting that they design a table based on those arches. The result may surprise you, or even inspire you to come up with your own design.

I’m sure I’m not the only woodworker who has embarked on a project without first working out all the details. After seeing the graceful arches of a bridge spanning Connecticut’s Housatonic River, I recently rushed into building an arched-leg table.
I did a quick sketch of the table, built a bending form, and steam-bent some ash arches. The first surprise was how springy the thin arches were; clearly they would need some kind of brace to stop them from widening and the table from getting progressively lower. As I was driving to work, I wondered: How would Garrett Hack make such a table? How would Jere Osgood tackle this design?
The readers of Fine Woodworking often ask for more design articles, but it is a hard subject to pin down. Asking great furniture designers how they develop their ideas is rather like asking Mozart how he came up with a tune—it’s not easily described. To solve my own design dilemma and to share with readers how original designs are created, I decided to give three other woodworkers, each with a reputation for original design, a photo of the bridge for inspiration and basic parameters to see what they would create.
Don’t let construction worries constrain your designs
I wasn’t surprised when the proposal arrived with its single photograph. It is one of the ways I work. I try to stay alert to interesting forms and to note them in my sketchbook. Great forms can and should be carried over to furniture; in this case I was inspired by the bridge’s arches.

Generally I work out the engineering and joinery after a design is under way: I feel we should design first and then find the techniques to carry it out. Despite its simple appearance, this table involves fairly advanced woodworking from the tapered lamination arches to the angled stub tenons. I believe it is worth the effort; many pieces wouldn’t be made if we had to stick to easy, straightforward joinery.
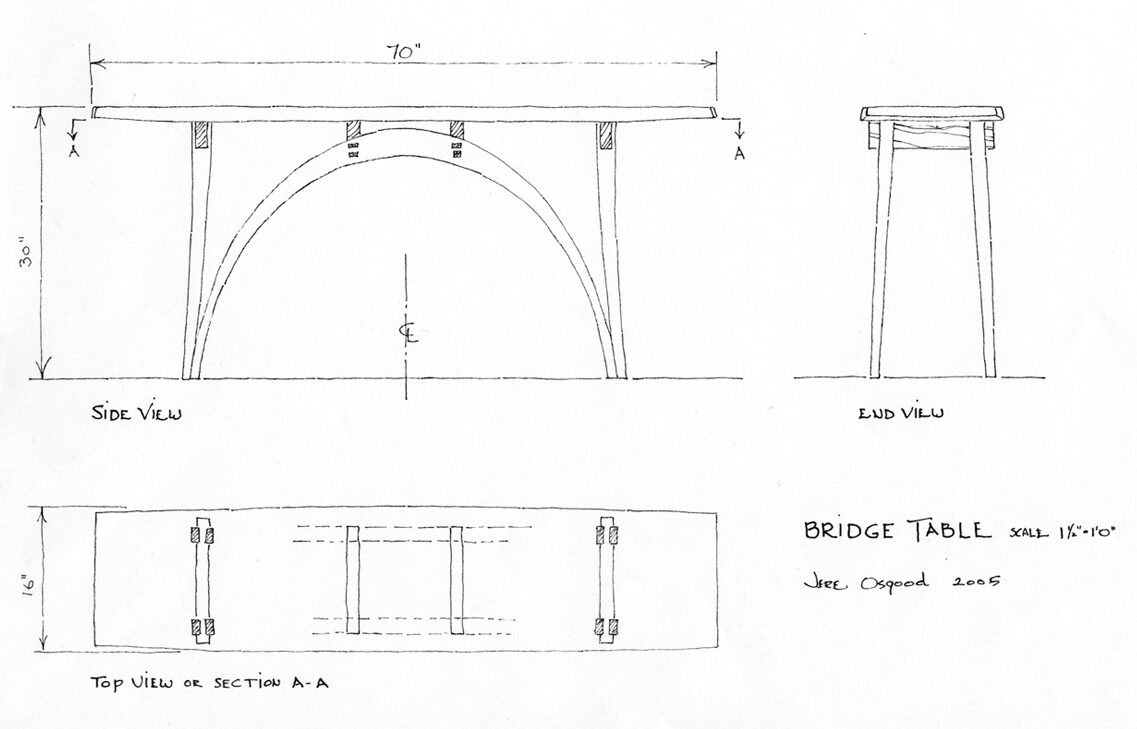
I used tapered laminations for the arches because they create a stiffer arch, less liable to spread under load. The outer legs are needed only to support the ends of the tabletop. They could be made from solid wood, but I would laminate them to harmonize with the arches. I designed the two arches to lean inward by 2º each. If they were vertical, at first glance they would appear to be splayed outward at the top. It is subtle, but I’ve seen tables designed both ways, and the more complicated joinery with the inward-leaning arches and legs is worth the effort.
I always do a full-size drawing; it helps me discover and tackle difficult areas such as the joint between the middle beams and the arches. Even though this table has no traditional apron, I kept the top of the end legs straight for about 4 in. to emphasize the introduction of the taper.
 |
“We should design first and then find the techniques to carry it out.”
—JERE OSGOOD
|
 |
|

Jere Osgood is a member of the New Hampshire Furniture Masters Association.
Each design builds on the last one
When I got Fine Woodworking’s letter, I thought, “They must be mind readers.” I had just visited a gallery where I exhibit and
noticed the perfect spot to display a long, narrow sofa or hall table. Not only did the arched-leg table’s dimensions fit perfectly, but the design fortuitously built on some of my previous creations.
I started sketching, thinking back to my earlier work: I had built a curved-leg table where the front legs were set closer together than those at the back, with a rectangular top and a half-moon shelf (see top photo, right). The table sold, but the design had an abstract look to it with the top and shelf in conflict. On the next table I tried for a more symmetrical look, with the aprons and stretchers crossing diagonally and a convex shelf complementing the concave edges of the top (see bottom photo, right). This produced a more graceful form that looked correct from any angle.

However, when I saw the idea of having the legs as two complete arches, I knew that was the missing element. I drew up an initial design using tapered laminations for stiffness, but strictly observing the set dimensions. On the final plans, I diverged. The difference between the overall height of the table and the 26-in. outside radius of the arched legs meant having a 3-in. apron. I preferred the more dynamic look of the top supported by the legs, so I lowered the height and had the top rest directly on the crown of the crossing legs. For extra support I added wings that extend 13 in. from the crown along the top of each leg. Viewed in perspective, the form has a very animalistic stance.
The tabletop is 1 in. thick with a 20º bevel cut on the underside while the top is still rectangular. The concave edges are cut through the slope, making the top appear thicker in the center than at the ends. With the long cantilever off the saddle, this gives the top a light and lofty look.
The shelf ends are similar to those of the tabletop, beveled and then profiled, but the sides are profiled and then beveled, making the front edge appear only 1⁄4 in. thick.

Wayne Marcoux is a furniture maker in Manchester, N.H.
Both bridges and tables must carry a load
 Given this challenge, my thoughts turned to the couple of covered bridges in our small Vermont town and how their simple, yet very strong, arched trusses work so well after almost 200 years. I also immediately saw the differences between engineering a bridge and a table: The major one is that while a bridge’s arches are braced by the banks of the river, the arches on a table will spread when subjected to any downward pressure. One solution is to make the arch heavier, but that would negate some of the design’s elegance. A second question is how to make a rigid connection to the tabletop if it joins only the apex of the arch.
My solution for each side of the table was to add half-arches to the full arches, marrying them with vertical posts so that they reinforce each other yet everything remains light in cross section. The half-arches strengthen the single arches, making them less apt to spread under load, and the load on the top is distributed along a number of points. To counteract racking forces across the width of the table, two stretchers spaced well apart connect the vertical posts. In my initial sketch the two posts touched the floor, giving the table six feet, but in my final design the post is cut back slightly so that the table rests solely on the four points of the main arches.

Steam-bending is my method of choice to form the arches, using a single elliptical form. Minor variations in the arches using this method would not be noticeable. I would use ash, which bends extremely well into smooth curves. The wood should be cut to nearly its final dimension, then planed and steam-bent. After a few days of drying, the parts will be ready for joinery.
The joinery follows the bridge analogy: Simple flat-head nuts and bolts connect the main arches to the half-arches and each post and allow some flexing, yet don’t diminish the strength of any member as mortises might. The absence of glue would allow the table to be leveled on its four feet before the bolts are snugged up.

Garrett Hack is a contributing editor.
From Fine Woodworking #184
For the full article, download the PDF below:


Log in or create an account to post a comment.
Sign up Log in