Skip to content
Fine Woodworking
Main Menu
Subscribe
GET THE MAGAZINE & MORE
Magazine Cover
  • Save 69% off the cover price
  • Or, get everything with UNLIMITED, including 40+ years of the online archive.
Subscribe Now!
Subscribe
  • Projects & Plans
  • How-To
  • Shop Tips
  • Tools & Materials
  • Videos
  • Magazine
  • Video Workshops
  • Members
  • Forum
  • Gallery
  • Blogs
  • More
    • Log In
    • Join
    Fine Woodworking Main Menu Subscribe
    Blog

    Shopmade clamps make edge banding easy

    Mike Farrington demonstrates how these simple clamps will help you apply edge banding like a pro.

    Author Headshot By Mike Farrington Oct 24, 2019
    Article Image

    Last week I finished up a pair of display cases. These are for the lobby of a local veterinarian clinic and will display a few different products they sell. These cases are not made of solid wood, but rather MDF-core plywood. During this build I used one of my very favorite techniques to cover up the edges of the plywood. The short version is, I used some shop-built edge-banding clamps and some 1/8-in.- thick solid-wood edge banding. This blog post is my best endeavor to explain how I accomplish results that even expensive industrial edge-banding machines would struggle with, and I do it on a curved surface. Better still, I do it with inexpensive shop-built clamps.  

    These cases are constructed from two layers of MDF plywood edge-banded with 1/8-in.-thick solid wood.

    A few words about edge banding. Edge banding is a by product of the cabinet industry using less solid wood in an attempt to reduce costs and create a more competitive product. Over the years, edge banding has gotten a bad rap, much like veneer. However, also like veneer, edge banding can be done in a variety of ways, all with different levels of quality. This method is my attempt to hit the highest level of quality.

    Cut 1-in. to 1 1/4-in. inner tubes into 6-in.-long chunks. Be sure to experiment with this length as it may vary depending spring clamp size.

    To get started I bought a bunch of inexpensive spring clamps. I bought a pack of 100 6-in. spring clamps on Amazon for about $115. With the spring clamps in hand, it’s time to take one over to a local bike store. Ask the clerk if they have any extra road bike tubes with a width of 25 to 32mm (1-in. to 1-1/4 in.). Most of the time they will give you as many tubes as you would like. Small punctures make inner tubes useless for a bike, but perfect for edge banding clamps. Or go ahead and buy a couple. Cut these tubes into 6-in. lengths. 

    I use a hand screw to hold the spring clamp open.

    Next, assemble the clamps. I used some diluted Simple Green as a lubricant to slide the tubes over each jaw of the spring clamp. I don’t think Simple Green is the best thing to use, it’s just what I had on hand. Use something that evaporates and doesn’t leave too much residue. 

    Slide the inner tube onto one side:
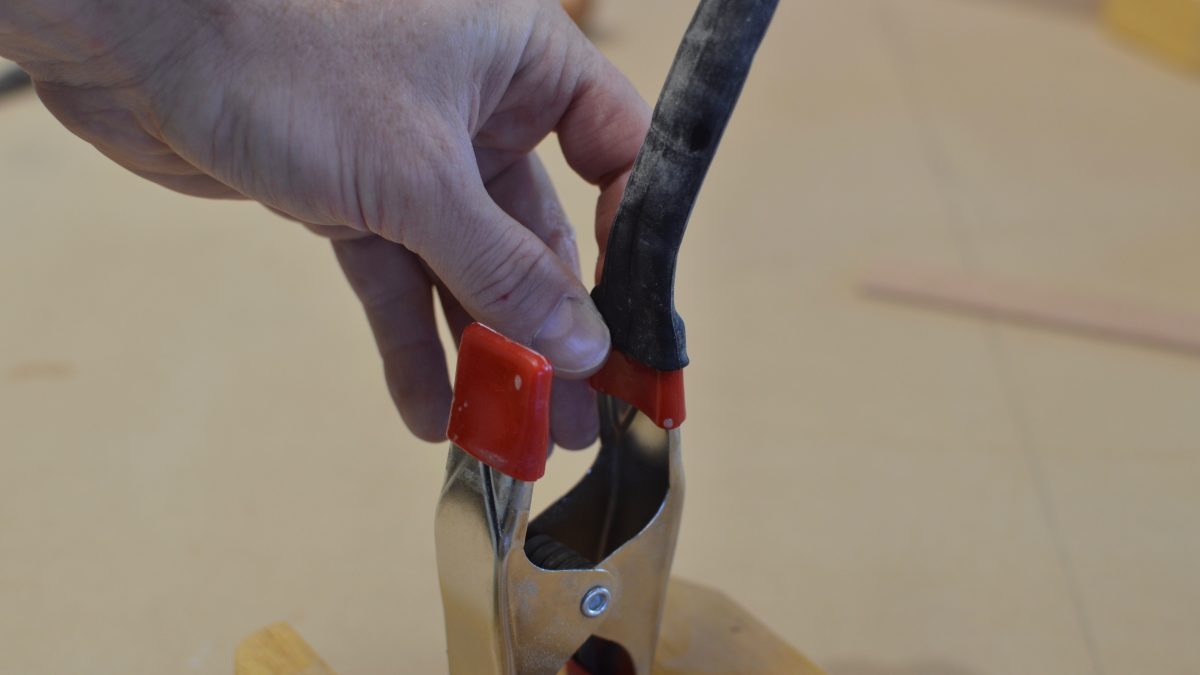
    … then the other.

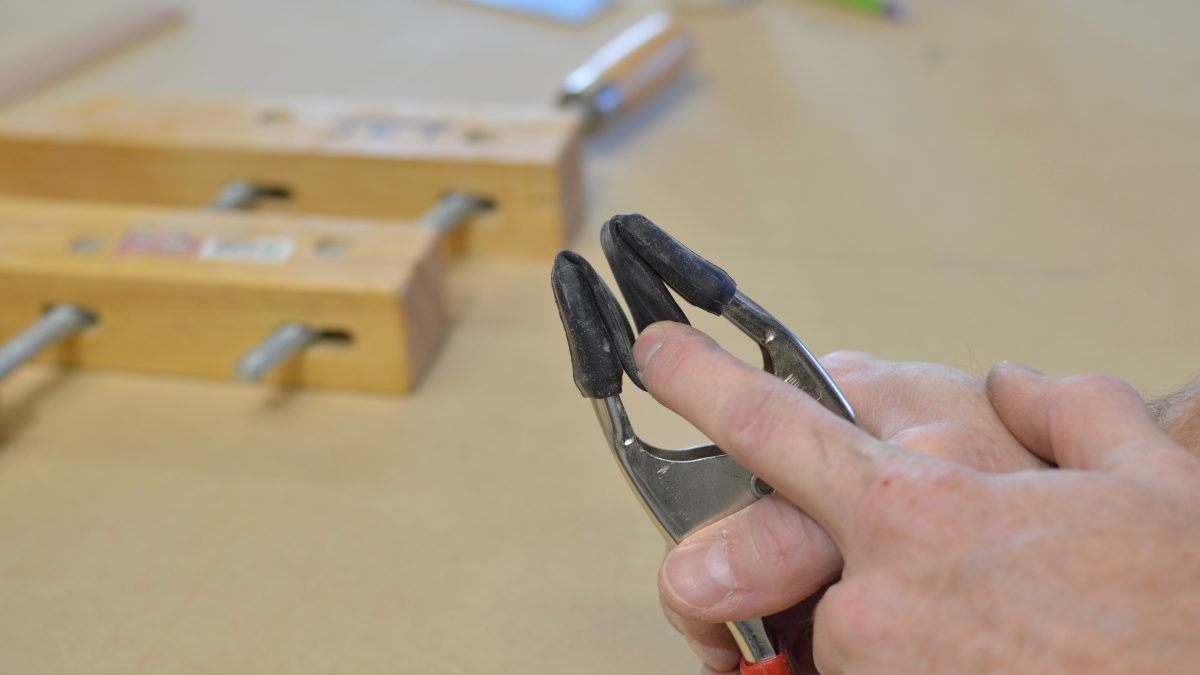
    Finish by folding the excess into the clamp.

    Putting the clamps into use

    At this point the clamps are ready to go, it’s now time to put them to use. After my plywood is cut to size, I mill up some edge banding material. I normally cut it about 1/8 in. to 3/16 in. wide. I use a variety of thicknesses from 1/8 in. all the way to 3/4 in. plus. For this project I went with 1/8 in. because I wanted it to conform to the curve easily.

    1/8 in. is about the thinnest material that works with this method and is perfect for curved work.
    Apply wood glue evenly, but don’t get carried away.

    I use any kind of wood glue; in this case I used Titebond 3. I like a nice even coat so I use my permanently attached glue spreader. I aim to use enough glue for a nice wet coat, but not enough to cause a mess. A little squeeze-out is perfect. I leave things clamped up for 30 minutes to an hour. Once the squeeze-out is hard enough that it won’t smear, I move on to the next step. 

    Add just the right amount of clamps.
    This method also works on two layers of plywood. This is what I did with my display case build.

    The last step is to cut back the overhanging material. I use a tool known as a lipping planer, but a router with a flush-trimming bit, or a good old-fashioned block plane would work great too. I clean up the ends with a flush-trim saw, router, tablesaw or a special attachment for my biscuit joiner called the Lamello Nova.

    A bottom bearing flush-trimming bit makes quick work of cleanup.
    A block plane works, too, with the added benefit of a quiet, Zen environment.

    One final note about this technique. This is not my original idea. As with most things in my life, I saw it somewhere “on the line” and have been using it for a few years now. I like this method for edge banding so much I just wanted it to share it with any and all who dare read this blog. I used to do this same procedure with blue tape. I find this method better because the elasticity of the inner tubes applies a better clamping pressure. I also find it faster.

    The end result is a nearly invisible glueline.
    Add a roundover for style points. I think a rounded edge is less susceptible to denting.


    Here is a close up of the display cases. That is a very good glueline if I do say so myself.

    If you would like to see this method in action I have a couple links to videos where I use this very technique, including  a build video documenting these bow-front display cases and showing how I use this method to edge-band a curved surface.

    Six Ways to Edge Plywood

    JUNE 1, 2002

    The choices vary in their complexity and durability and the time they take to execute

    Shopmade Trimmer

    Simple carriage steadies trim router to flush-cut plywood edge-bands

    Solid Edging for Curved Tops

    Craig Thibodeau demonstrates how to get a durable, beautiful edge and a flawless fit

    Sign up for eletters today and get the latest techniques and how-to from Fine Woodworking, plus special offers.

    Sign Up

    Get woodworking tips, expert advice and special offers in your inbox

    Sign Up
    ×
    X
    X

    New Feature

    Fine Woodworking Forums

    Ask questions, offer advice, and share your work

    Get It All!

    UNLIMITED Membership is like taking a master class in woodworking for less than $10 a month.

    Start Your Free Trial

    Subscribe to Fine Woodworking

    Save up to 69%

    Subscribe

    Log in or create an account to post a comment.

    Sign up Log in

    Up Next

    Featured Workshop

    a diagram of a round Shaker stand and an image or a round Shaker stand

    Shaker candle stand with Christian Beckvoort

    He’s built dozens of round Shaker stands over four decades, so there is no one more qualified than Christian Becksvoort to demonstrate making this classic. In this seven-part video series,…

    Featured Projects & Plans

    Build a Contemporary Sideboard

    Chris Gochnour's sideboard combines usefulness, strength, and beauty in a contemporary case piece

    Related Stories

    • Steam-bend a spiral

    • Torchiere with a twist

    • Make an Oval Bandsawn Box

    • Workshop tip: Short clamp makes great tape and towel holder

    Discussion Forum

    Recent Posts and Replies

    • |
    • |
    • |
    • |
    • |
    • |
    View More Create Post

    Member Exclusives

    More Member Exclusives
    • how to make banding

      How to make banding

      Pete Michelinie's shares his techniques for creating a timeless furniture element.

    • Veneered Boxes Made Easy

      Veneered Boxes Made Easy

      Veneering pro Craig Thibodeau shows how to make a mitered, veneered box that he describes as simple but that looks anything but.

    • Ep 18c: Trimming a kumiko panel to size

      Finishing off the panel, Mike trims it to size, and adds a paper backer to the kumiko panel.

    • Ep 18b: Kumiko–Asa No Ha pattern part 2

      In part two of this episode, Mike begins placing the kumiko pieces into the grid, creating the beautiful latticework.

    Highlights

    • Shape Your Skills

      when you sign up for our emails

      Plus tips, advice, and special offers from Fine Woodworking.

      Sign Up
    • Shop Talk Live Podcast

      Shop Talk Live Podcast

      Our biweekly podcast allows editors, authors, and special guests to answer your woodworking questions and connect with the online woodworking community.

    • Woodpecker Sweepstakes

      Woodpeckers Shop Upgrade Giveaway

      Enter now for your chance to win more than $2,000 worth of woodworking equipment from Woodpeckers. Click for full details.

    • Staff Picks Blog

      Our favorite articles and videos

      We have created these special content collections organized to give you a deep dive into a range of topics that matter.

    Inlay And Veneering

    View All
    • press for inlay

      Workshop tip: Handy little press for inlay

    • marquetry

      The art of marquetry

    • STL238: Tim Coleman's shopsawn veneer secrets–revealed!

    • Finger inserting a piece of green wood into a panel that looks like a leaf.

      Video: Marquetry in motion

    View All

    From the Store

    View More
    • Foundations of Woodworking

      Buy Now
    • Complete Illustrated Guide to Woodworking USB

      Buy Now
    • The Why & How of Woodworking

      Buy Now
    • Tool Guide 2022

      Buy Now
    View More

    Get the latest from Fine Woodworking Magazine

    • #292-NOV/DEC 2021

      • Kerf-bent wall cabinet
      • Online extras from FWW issue #292
      • How to tame curved parts with patterns
    • #291-Sep/Oct 2021

      • Build a modern coffee table
      • Online Extras from FWW Issue #291
      • Editor's Letter: Something old, something new
    • #290-July/Aug 2021

      • Build a Shaker chest of drawers
      • Online Extras from FWW Issue #290
      • From the editor: What we make matters
    • #289-May/June 2021

      • Arts & Crafts Coffee Table with Story-Book Charm
      • Links from Fine Woodworking issue #289
      • Step-by-Step Guide to Tuning Your Block Plane
    • #288-Mar/Apr 2021

      • Phil Lowe: A craftsman and gentleman
      • Online Extras from FWW Issue #288
      • Phil Lowe: craftsman, teacher, friend

    UNLIMITED membership - Get access to it all

    Start Free Trial Upgrade Membership

    Fine WoodWorking

    Follow

    Newsletter

    Get woodworking tips, expert advice and special offers in your inbox

    Sign Up

    Membership & Magazine

    • Members
    • Digital Libraries
    • Join Unlimited
    • Magazine Subscription
    • Magazine Renewal
    • Gift a Subscription
    • Customer Support
    • Manage Preferences

    Taunton Network

    • Fine Homebuilding
    • Green Building Advisor
    • Fine Gardening
    • Threads
    • About
    • Contact
    • Advertise
    • Privacy Policy
    • Careers
    • Copyright
    • Terms of Use
    • Accessibility
    • California Privacy Rights
    • Site Map

    © 2021 The Taunton Press, Inc. All rights reserved.

    Get step-by-step instructions, woodworking tips, expert advice and special offers in your inbox. Sign Up Now!

      Main Menu

    • Projects and Plans
    • How-To
    • Shop Tips
    • Tools & Materials
    • Videos
    • Gallery
    • Magazine
    • Video Workshops
    • Members
    • Forum

      Popular Topics

    • Design
    • Small Projects
    • Beds
    • Chairs, Benches And Stools
    • Built-ins
    • Storage And Shelves
    • Cabinets
    • Carving
    • Casework
    • Desks
    • Tables
    • Shop Storage And Furniture
    • Woodturning Projects
    • Workbenches
    • Surface Prep

      More

    • TV
    • Forum
    • Blogs
    • Webinars
    • Podcasts
    • Customer Support

      Account

    • Log In
    • Join

      Magazine

    • Current Issue
    • Past Issues
    • Digital Libraries
    • Magazine Index
    • Subscribe

      Membership

    • Member Home
    • Start Free Trial
    • Gift Unlimited
    • Log In

      Shop the Store

    • Books
    • DVDs
    • Taunton Workshops

      Events

    • Fine Woodworking Live
    • Fine Woodworking HANDS ON

      Account

    • Log In
    • Sign Up

    Newsletter

    Get woodworking tips, offers, and expert advice in your inbox

    Sign Up

    Follow

    UNLIMITED

    Become an UNLIMITED member and get it all: searchable online archive of every issue, how-to videos, Complete Illustrated Guide to Woodworking digital series, print magazine, e-newsletter, and more.

    Start Your Free Trial

    Upgrade Membership