Skip to content
Fine Woodworking
Main Menu
Subscribe
GET THE MAGAZINE & MORE
Magazine Cover
  • Save 69% off the cover price
  • Or, get everything with UNLIMITED, including 40+ years of the online archive.
Subscribe Now!
Subscribe
  • Projects & Plans
  • How-To
  • Shop Tips
  • Tools & Materials
  • Videos
  • Magazine
  • Video Workshops
  • Members
  • Forum
  • Gallery
  • Blogs
  • More
    • Log In
    • Join
    Fine Woodworking Main Menu Subscribe

    Fine Woodworking Project Guides

    Tables and Desks

    Guide Home
    Chapter
    • Design and Techniques
    • Dining Tables
    • Side Tables
    • Coffee Tables and Hall Tables
    • Desks
    Projects and Plans

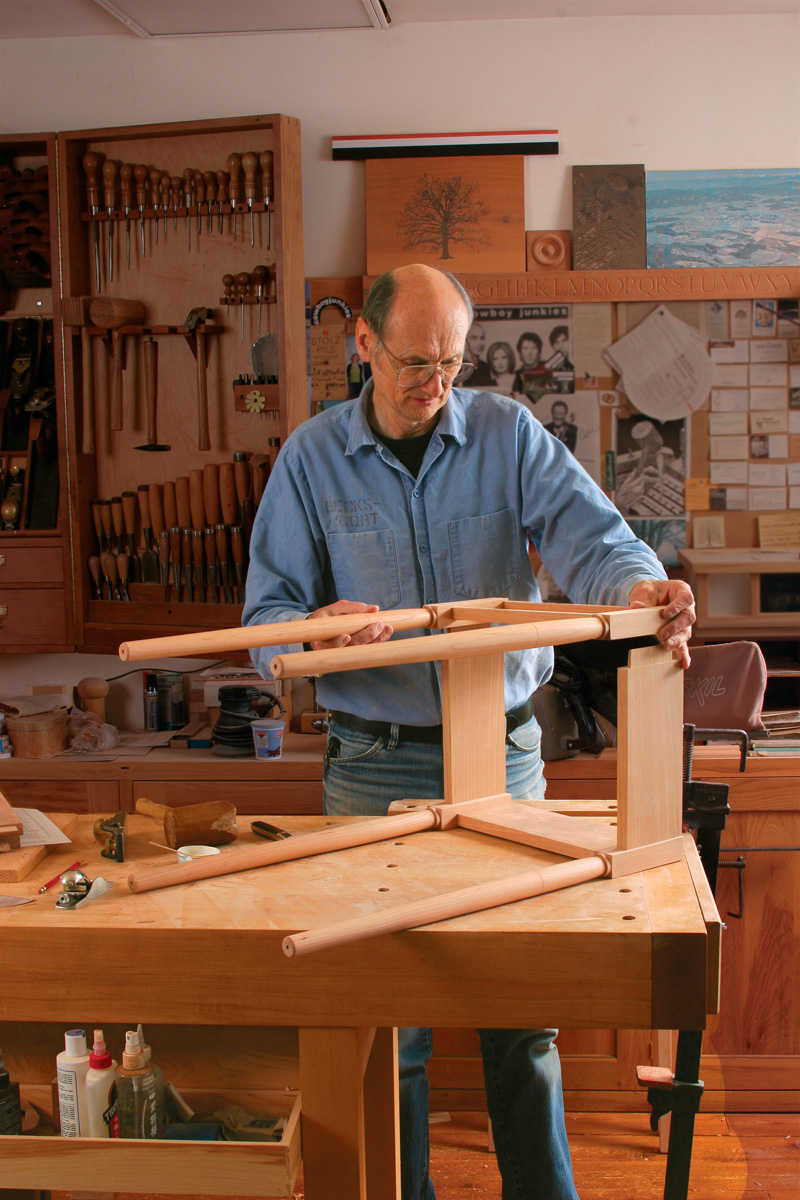
    Shaker Classic, 2 Ways

    Change the legs to change the look of this classic piece.

    Author Headshot By Christian Becksvoort #210–Jan/Feb 2010 Issue

    Not long ago, a couple ordered a set of cherry side tables from me, one for each side of their pencil-post bed. I based the design on a Shaker side table from Canterbury, n.H., although virtually every other Shaker community had similar designs. As a surprise (I don’t recommend this unless you are very familiar with your clients), I decided to make slightly different versions: one with square tapered legs, the other with turned tapered legs.

    The overall design is a basic, timeless one that can move from bedroom to living room. But notice how the simple leg change alters the whole feel of the table. Tweaking the dimensions or shapes can make a big difference in the look of a piece of furniture. As far as difficulty goes, the table with tapered legs is a very good project to tackle if you’re a beginner, and the one with turned legs adds a bit of a challenge. The rest of the construction is standard mortise-and-tenon joinery, a dovetailed top rail, and a dovetailed drawer. I start with the legs, move on to the joinery, add the drawer, and finish.

    Tackle the joinery: mortises, tenons, and a dovetail

    Once the legs are finished (see “2 options for legs”), the construction is the same for both tables. The first step is to add the side and back aprons and drawer rails to the legs. I start with the mortises for the back and side aprons and the rail below the drawer. Then I cut the tenons on all of those pieces. The rail above the drawer is dovetailed into the top of the leg, and I tackle that after the mortises and tenons.

    2 Options for Legs

    The tapering jig to create these two-sided tapered legs is simple to make. Use a piece of plywood 4 in. to 6 in. wide and 3 in. to 4 in. longer than the leg. I mark the end of the leg to see the final dimensions and use those marks to position the leg on the ply-wood. Set the leg on the edge of the plywood with the portion to be tapered flush with the end and overhanging the edge. Then, trace around the leg and cut the leg area away freehand on the bandsaw. Once that’s done, screw that piece of plywood to a base piece and add hold-down clamps to keep the leg stock secure as you run it through the tablesaw.

    After cutting the first taper, turn the leg 90° in the jig and cut the second one. The final step is cleaning up the tapers with a sander.

    shaker classic legs
    Use a leg to lay out the jig. Then bandsaw the leg cutout on the top piece.

    shaker classic legs
    First taper. With the leg in the jig and the rip fence set to the width of the jig, rip the taper on the first inside face of the leg.

    shaker classic legs
    Second taper. Turn the leg blank 90º in the jig and cut the taper on the second inside face.

    Mortise the legs—I have a dedicated slot-mortiser for this job, but a drill press and mortising chisel also will work. After you lay out the locations for the mortises, waste away the majority of the material on the drill press with a brad-point bit. Then you can use chisels to clean up the edges and ends.

    Tenon the aprons and lower front stretcher—I cut the apron tenons on the tablesaw using a dado blade (see “Tenon Shootout” on p. 42 for more on this method). There are three different blade-height settings, one for each cheek and one for the top and bottom edges. By the way, the first cheek-cut height isn’t critical; it’s the second one that sets the final thickness and fit of the tenons. Also, on legs this small I try to maximize the length of the tenons, so I do end up mitering them.

    I cut the lower front-rail tenons the same way as I cut the apron tenons. Then I use the shoulder-to-shoulder measurement of that piece to mark out the dovetail shoulders for the upper rail.

    Dovetail the upper front rail to the legs—Once I have dry-fitted the three aprons and the bottom rail, I lay out the dovetails on both ends of the top rail, cut them with a handsaw, and refine them with a chisel. On the tablesaw, I skim a small rabbet on the underside of the dovetail, which creates a shoulder and helps locate the dovetail on the leg. Once that’s done, transfer the dove-tails to the tops of the front legs, using a knife. A small router with a 1⁄8-in. or 1⁄4-in. bit takes out most of the waste material. Use a chisel to clean the corners.

    shaker classic table
    Cut a rabbet on the underside of the dovetails. Use a tenoning jig. The shallow lip (1⁄16 in.) helps when you are marking the dovetail’s position on the legs.

    shaker table legs
    Transfer the lay-out to the legs. Dry-fit the lower rail to the legs, and position the upper rail across the top of the legs to transfer the dovetail profile. Use a small router to cut close to the line and a chisel to finish the job

    shaker legs glue-up
    Fit the upper rail. A final dry-fit of the rails to the front legs ensures an accurate fit and a stress-free glue-up. These parts will be the first step of the gluing process.

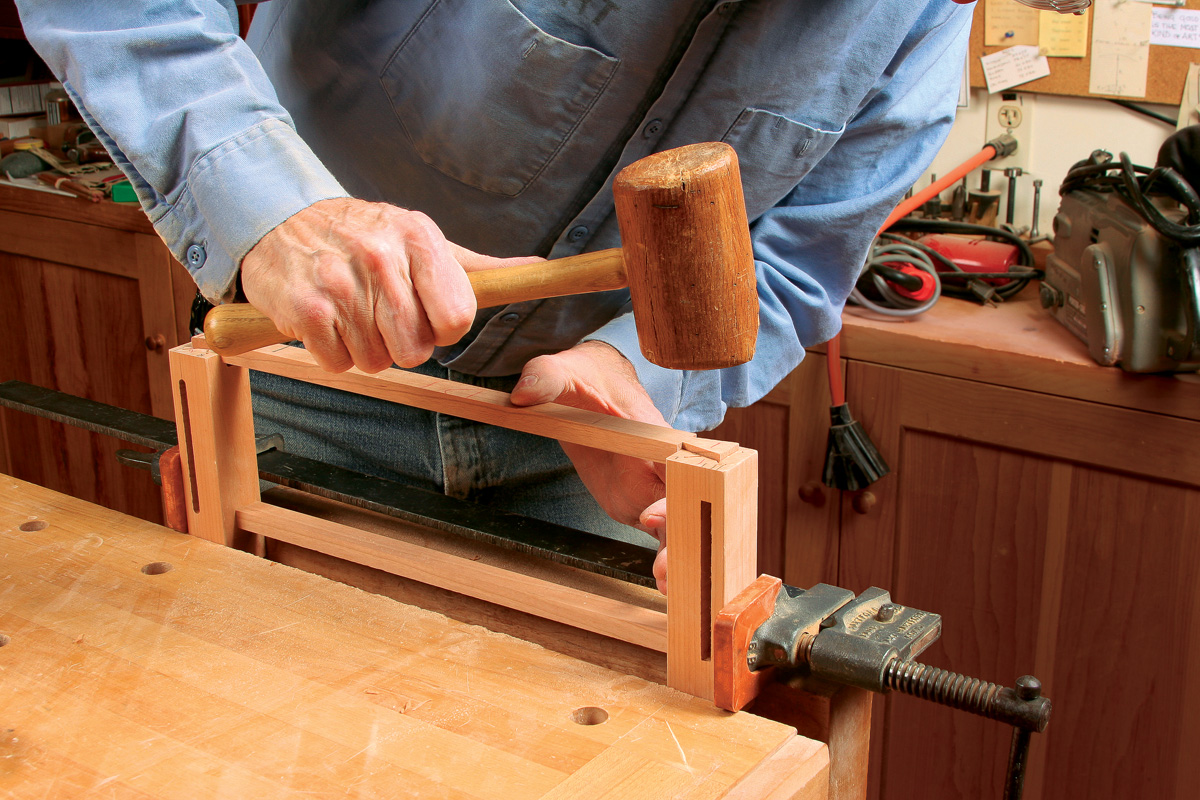
    Glue up the bases and add runners, kickers, and spacers

    Before adding the runners and kickers, sand the legs, aprons, and rails to P320-grit and glue the

    shaker table assembly
    Assemble in stages. Start with the front and back, gluing the back apron to the back legs and the front stretchers to the front legs. Then join the two assemblies, and add the internal pieces that form the drawer pocket.

    bases together. Begin by gluing the front legs to the rails and the back legs to the back apron in two separate assemblies. Once they are dry, add the two side aprons as a final assembly. And once that is dry, you can glue in the runners and kickers.

    The drawer runners and kickers (a pair on each side of the drawer) are the same size and shape, simply a strip of wood notched to fit between the front and back legs. The runners sit below the drawer sides and provide the track that the drawer runs on while it moves in and out of the side table. A kicker is a strip of wood that is placed above each drawer side to keep the drawer from tipping down as it is opened and closed. In addition, I use the kicker to screw the top in place. Also, because the sides are inset from the legs, I glue in a spacer just above the runner. This spacer keeps the drawer from tilting left or right.

    There is no joinery involved in adding the runners and kickers; they are simply cut to fit the interior, then glued and clamped in place, flush with the top and bottom of the aprons and rails. Trim the spacers perfectly flush with the inside faces of the legs.

    Hand-cut dovetails in the drawers

    The drawer fronts are cut to fit the openings. I make my fronts 3⁄4 in. thick, the back 5⁄8 in. thick, and the sides 1⁄2 in. thick. I make the back a little thicker than the sides for three reasons: First, thinner sides make the drawer appear more graceful, and you’ll seldom pull it all the way out to see the thickness of the back. Second, the added thickness gives a bit more glue surface to the dovetails, resulting in stronger joints on all four corners. Finally, it allows a solid bottom (not plywood) to expand and contract while remaining hidden under the back.

    I cut half-blind dovetails in the front and through-dovetails in the back, cutting the tails first. I make the drawer bottoms from resawn, book-matched stock and secure them with a screw and slot in the back to allow for seasonal movement.

    I turn the mushroom-shaped knobs on the lathe (see “Authentic Shaker Knobs,” FWW #196).

    table drawer
    Transfer trick. Becksvoort runs the groove for the drawer bottom on the tablesaw, and then uses the groove (and a small scrap) to align the parts when transferring the tails to the pin board.

    table boards
    Keep it level. Secure the pin board in a vise and use a spacer block to keep the tail board level on the pin board for layout.

    table drawer
    Solid drawer bottom made easy. Cut the bottom of the drawer back to line up with the drawer groove, so the bottom can slide into place. A single screw secures the solid bottom to the back, with a slot to allow seasonal movement.

    Screw the top in place

    oil finish shaker
    Shakers used an easy oil finish. After all the construction is finished, Becksvoort uses an oil finish inside and out, but uses only wax on the interior drawer parts.

    Last, I edge-glue the 3⁄4-in.-thick top, cut it to size, sand it, and use the tablesaw to add a slight bevel to the underside. With the top facedown, I center the base (11⁄2 in. front and back, 4 in. on the sides) and drill three countersunk holes through each of the drawer kickers (one in the center, one at either end) to screw the base to the top. I made the end holes oval-shaped to allow for wood movement.

    I give the tables three coats of an oil finish. The first coat is straight Danish oil and the next two coats are a ratio of two parts Tried & True Varnish oil and one part spar varnish. I use only wax on the drawer runners, spacers, kickers, and drawer sides and bottom, to help them run more smoothly.

    Download the plans for this table from the Digital Plans Library. Plus, browse 100+ other plans available for members only.

    From Fine Woodworking #210

    Sign up for eletters today and get the latest techniques and how-to from Fine Woodworking, plus special offers.

    Sign Up

    Get woodworking tips, expert advice and special offers in your inbox

    Sign Up
    ×
    View FREE Project

    when you enter your email address below.

    Plus, get Fine Woodworking emails filled with plans, how-to, and special offers.

    or Log In

    Read our Privacy Policy
    Questions? Contact Customer Service

    View PDF
    X
    X
    Previous: Side Table with Carved Details Next: Federal Details Transform a Simple Table

    Guide

    Tables and Desks

    Chapter

    Side Tables

    Log in or create an account to post a comment.

    Sign up Log in

    Tables and Desks

    Tables and Desks

    Expert design and construction advice to help you build tables and desks that are comfortable, useful, and attractive.

    View Project Guide

    View All Project Guides »

    Become a member and get unlimited site access, including the Tables and Desks Project Guide.

    Start Free Trial

    Design and Techniques
    • Design
    • Tabletops
    • Legs and Stretchers
    Dining Tables
    • Tables with Aprons
    • Trestle Tables
    • Pedestal Tables
    • Expandable Tables
    Side Tables
    • Side Tables
    • Stands
    Coffee Tables and Hall Tables
    • Coffee Tables
    • Hall Tables
    Desks
    • Design
    • Techniques
    • Projects

    Get the latest from Fine Woodworking Magazine

    • #292-NOV/DEC 2021

      • Kerf-bent wall cabinet
      • Online extras from FWW issue #292
      • How to tame curved parts with patterns
    • #291-Sep/Oct 2021

      • Build a modern coffee table
      • Online Extras from FWW Issue #291
      • Editor's Letter: Something old, something new
    • #290-July/Aug 2021

      • Build a Shaker chest of drawers
      • Online Extras from FWW Issue #290
      • From the editor: What we make matters
    • #289-May/June 2021

      • Arts & Crafts Coffee Table with Story-Book Charm
      • Links from Fine Woodworking issue #289
      • Step-by-Step Guide to Tuning Your Block Plane
    • #288-Mar/Apr 2021

      • Phil Lowe: A craftsman and gentleman
      • Online Extras from FWW Issue #288
      • Phil Lowe: craftsman, teacher, friend

    UNLIMITED membership - Get access to it all

    Start Free Trial Upgrade Membership

    Fine WoodWorking

    Follow

    Newsletter

    Get woodworking tips, expert advice and special offers in your inbox

    Sign Up

    Membership & Magazine

    • Members
    • Digital Libraries
    • Join Unlimited
    • Magazine Subscription
    • Magazine Renewal
    • Gift a Subscription
    • Customer Support
    • Manage Preferences

    Taunton Network

    • Fine Homebuilding
    • Green Building Advisor
    • Fine Gardening
    • Threads
    • About
    • Contact
    • Advertise
    • Privacy Policy
    • Careers
    • Copyright
    • Terms of Use
    • Accessibility
    • California Privacy Rights
    • Site Map

    © 2021 The Taunton Press, Inc. All rights reserved.

    Get step-by-step instructions, woodworking tips, expert advice and special offers in your inbox. Sign Up Now!

      Main Menu

    • Projects and Plans
    • How-To
    • Shop Tips
    • Tools & Materials
    • Videos
    • Gallery
    • Magazine
    • Video Workshops
    • Members
    • Forum

      Popular Topics

    • Design
    • Small Projects
    • Beds
    • Chairs, Benches And Stools
    • Built-ins
    • Storage And Shelves
    • Cabinets
    • Carving
    • Casework
    • Desks
    • Tables
    • Shop Storage And Furniture
    • Woodturning Projects
    • Workbenches
    • Surface Prep

      More

    • TV
    • Forum
    • Blogs
    • Webinars
    • Podcasts
    • Customer Support

      Account

    • Log In
    • Join

      Magazine

    • Current Issue
    • Past Issues
    • Digital Libraries
    • Magazine Index
    • Subscribe

      Membership

    • Member Home
    • Start Free Trial
    • Gift Unlimited
    • Log In

      Shop the Store

    • Books
    • DVDs
    • Taunton Workshops

      Events

    • Fine Woodworking Live
    • Fine Woodworking HANDS ON

      Account

    • Log In
    • Sign Up

    Newsletter

    Get woodworking tips, offers, and expert advice in your inbox

    Sign Up

    Follow

    UNLIMITED

    Become an UNLIMITED member and get it all: searchable online archive of every issue, how-to videos, Complete Illustrated Guide to Woodworking digital series, print magazine, e-newsletter, and more.

    Start Your Free Trial

    Upgrade Membership