
On a Job Site, Improvisation Is the Name of the Game
If working on site has taught Nancy Hiller anything, it's how to think outside the box in order to get the job done.
 Dec 11, 2019

During the early years of my career, when I was employed by other woodworkers, my work was limited to the shop. Whether the job involved freestanding pieces or casework destined to be built-in, once the fabrication was done, someone else picked it up. I never met the customers. Delivery and installation were completely out of my hands.
It was only in my late 30s, nearly 20 years into my career, that I began to learn the kind of adventures built-in cabinetry can involve. Between such delights as working in rooms with walls, floors, and ceilings that are rarely square, level, or plumb; discovering electrical outlets hidden from sight that should have been killed at the panel during the last remodel–or, failing that, made accessible; finding that a four-foot stretch of wall appears to have been built with no intermediate studs (how are we going to hang this cabinet?); or learning that the hardwood on the floor was laid after the previous built-ins were installed (how will I avoid a sunken patch of OSB at the dishwasher recess?), I quickly realized that when you’re working in the wilds of a jobsite, as distinct from the controlled conditions of a shop, improvisation is the name of the game.
I used to be completely beside myself on encountering such conditions, but gradually I learned to roll with the punches. Ideal conditions are rare; challenges are the norm. A pair of sawhorses combined with a couple of light-pattern Jorgensen clamps will make a perfectly good work-holding set-up for many tasks. A straight-edge, router, and pattern-cutting bit will remove material from the top of a door in a flash, no vise or hand plane required. And when you grab your trusty jigsaw, only to find it’s given up the ghost…well, there’s nothing to be done but get thee to the nearest hardware store and buy another. As time goes on, you learn to anticipate (i.e., develop a neurotic tic that predisposes you to imagine) likely problems and develop a list of basic tools, small machines, and versatile props such as scraps of plywood and solid lumber, along with a variety of screws and other fasteners you might need. Still, no matter how thoroughly you think you’ve prepared, there will almost always be some new condition that pops up–and it will be your job to figure out how to handle it. If working on site teaches you anything, it’s how to think outside the box in order to get the job done.
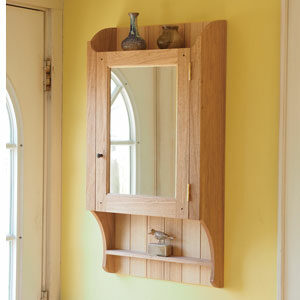
My most recent installation was for a kitchen in Indianapolis, a drive of about 60 miles each way from my shop: two basic cabinets, each consisting of a base cupboard with a counter I’d made from reclaimed heart pine, topped with a four-door upper section, and a shallow wall-hung cabinet for spice jars and other small containers. The first step was to deliver the parts and get them installed; then I would return to fit the doors and drawers, shelves, and other parts.
I’d planned to use a standard crown moulding, following the pattern of an old cabinet the client and I used for inspiration. All was going smoothly until my helper and I heaved the 6′-tall upper section of the first set into place and fastened it to the wall. Standing back to check how it looked, I realized it was closer to the top course of window trim than I had remembered; when measuring, I had only taken account of the window casing at the side, not the extra 1-1/2″ or so sticking out at the top, a two-part moulding that formed a simple crown.

Moving the cabinet to the left would have left a thin strip of wall between the window trim and the cabinet side that would make me the bane of the painter’s life. Beyond this, there would have been three different crown mouldings coming together in the space of 9 square inches–the room crown (a large profile, not original to the room but apparently added during an earlier remodel), the top trim of the window, and the moulding on my cabinet. After chewing myself out for not having anticipated this cluster of converging crowns, I turned to the constructive task of problem solving. I discussed my proposed fix with the client, then here’s what I did.
Step 1: Never say never

I make a point of designing work that will respect a room’s original trim. Few things are less appealing than a truncated crown, or a door casing with a huge cut-out made to accommodate a Formica counter.
Beyond this, there’s a school of thought among preservationists according to which original architectural fabric should remain intact wherever possible. In this case, however, the most graceful solution seemed to lie in making the cabinet flush with the window–after all, both would now be part of the room’s integral millwork, and the heights worked out well. So my first step was a prayer to the old-house gods requesting forgiveness. Then I removed the protruding sections of trim with a Fein oscillating tool.


Step 2: Cozy up
I used a level to extend the line of the window casing down the wall. Next we moved the base over to the line (it was a matter of just over an inch, so my careful scribing of the flush kick and side panel to the floor were still, thankfully, a good fit) and fastened it. We put the upper section on top and screwed it to the wall with cabinet fasteners.
Step 3: Reproduce the trim
I took a section of the compound trim from the top of a door back to my shop and milled up enough for both of the cabinets. I also made enough of the lower section to use as a crown for the spice cabinet, which is quite a bit smaller than the others and so demanded a more diminutive profile.

Step 4: Install
My husband, Mark, who is a builder and trim carpenter, joined me on a snow day. While I fitted doors and drawers, he installed trim, coping the moulding where the cabinet crown meets the window. It looks like part of the original millwork–not part of my plan, but a happy result of jobsite improvisation.

-Nancy Hiller is a professional cabinetmaker who has operated NR Hiller Design, Inc. since 1995. Her most recent books are English Arts & Crafts Furniture and Making Things Work, both available at Nancy’s website.
Addendum from Nancy: I couldn’t imagine replying adequately in the comments here–there’s too much to address. So I wrote a new post at my own blog.


Comments
Sorry Nancy,
You should be posting this article in "Billy Bob's Hack a House" magazine not in Fine Woodworking. You made a mistake. Go back to the shop and make it again and simply eat the loss. Then again, the house looks like a wreck. I'm surprised that you're not even embarrassed to reveal that you made this mistake. It was staring you in the face. Sounds to me like 1 year of experience repeated 20 times.
That cabinet should have been narrower so as not to interfere with the window or door trim. It should have gone right to the ceiling. The wall/ceiling crown should have been cut and the crown moulding on the new cabinet matched to that existing crown, so that it wrapped around the cupboard. That's the proper way.
The cabinet has a major design flaw in that it doesn't have a toe kick. It's going to be difficult for the homeowner to do any work at that counter without developing a sore back. Without a toe kick, he/she will be continually leaning very uncomfortably forward over the counter.
Did I mention that the paint will become scuffed from the toes of shoes hitting it? The design will necessitate that the whole cabinet will have to be painted, not just the kick which could have been painted with a colour that was close to the original.
This cabinet and installation are just "a fail" in so many ways.
If the owner wants the molding to go to the ceiling, seems to me it could be easily fixed with added on molding that matches the crown molding on the wall. It looks to me like the counter is for an appliance like a microwave, dehydrator, or a toaster and not a work space. Therefore, I see no need for a toe kick. I see it as a built in to suit the customer's preferences. It looks great to me.
You know, as Chris Becksvoort pointed out recently, we all end up doing built- ins once in a while, to pay the bills or to please a spouse. By their nature, built-ins are a series of compromises, especially the renovation ones. The best choices are the ones that work, and the ones that make it look like it belongs to the room. I like the choice to tie it into the window casing. It looks more like it was always meant to be there.
We recently bought a 200 year old plantation house and the layers of past renovation are truly mind boggling. Some were reasonable choices and some were very unfortunate. So as we are going about our own upgrades and renovations, we try to make the best choices we can given the circumstances. Some are true to the Federal style of the original house, but many are not. The original Federal house had no electricity or plumbing, and the versions of those that were added many years later is all obsolete by current standards.
We all do the best that we can in each situation and move on.
@Suburbanguy - And "I'm surprised that you're not even embarrassed" to write so much and add so little of value to this community with your comment!
Continuing the cabinet to the ceiling and wrapping the crown is not "the proper way," nor is a toe kick appropriate on a traditional shaker style cabinet. Just as this cabinet combines inset doors with overlay drawers, it also eschews a recessed toe kick. All of these are hallmarks of traditional shaker cabinetry.
So while you may not like it, that does not make it incorrect.
Let me begin by saying that this is not a Shaker reproduction. I don't think that it even qualifies as an interpretation of "Shaker Style", and Nancy made no such claims. Shakers did not use glass, divided glass no less!! They did not use those fancy schmancy curved side pieces. They did not use those "farmhouse style" chrome drawer pulls. They did not use little "farmhouse style" chrome catches. Many, many Shaker cabinets were actually on short legs (feet) and this one should also have had a small raised base and feet to improve its functionality if it was to reflect "Shaker style". --but it isn't Shaker style. It's a mish-mash.
Tall cabinets having a face of doors and drawers often had no feet, and often but not always, had moulding around the base. Nancy's cupboard does not have this embellishment. The (freestanding) washstand from the Mount Lebanon community that is in the Andrews collection is one example of a small piece that breaks this pattern, having no feet and also no moulding at its base.
Even new, Shaker-inspired kitchens incorporate modern, appropriate modifications to enhance functionality. A toe kick is one such enhancement.
I have the three volume set of measured Shaker drawings from the Hancock Shaker Village from which I built the very well known and admired, Isaac Young wall clock. I have Thomas Moser's book, How to Build Shaker Furniture, although his plans are interpretations and not measured from actual pieces in collections. I have Best of Fine Woodworking, Shaker Furniture, a publication almost exclusively the writings of the "Shaker master", Christian Becksvoort and in which Nancy has a chapter on "Rediscovering Milk Paint".
I stick by my original comment. I don't think that the installation looks aesthetically pleasing as it stands. This article detailing "this fix" should not be in Fine Woodworking and I'm unsure why Nancy would want to present it as a representation of her otherwise fine work.
I suggest you research "Shaker Style" rather than getting your knowledge from the salesman at the furniture store.
user-3260958 How could I have forgotten. Tell me how that crown moulding on the top of the tall cabinet fits in with your idea of "Shaker style". The Shaker style always had a flat top with perhaps a small cove under the edge--similar to the top on the hanging wall cabinet that's pictured. Ornamentation, like crown moulding, was never incorporated into Shaker furniture.
@Suburbanguy - wow, thank you for all that well-researched information. I was mistaken in my idea of what constituted shaker-style and oversimplified based only on doors, drawers, and scribed bottom rails. Apologies. Thank you for the thorough explanation, I learned from it.
Though I do still think this is a lovely cabinet! As a cabinetmaker I also enjoy the inclusion of more installation and built-in related content, which seems to be considered too rough for Fine Woodworking and too fine for Fine Homebuilding much of the time.
Suburbanguy, show us on the doll where the cabinet touched you.
user-3260958 You Sir, are a gentleman. Please accept my apology for lobbing sarcasm at you.
I think your solution was a practical and effective response to the problem. Things happen. You deal with them. Good work!
Hi there. I couldn't imagine replying adequately in the comments here--there's too much to address. So I wrote a new post at my own blog.
https://nrhiller.wordpress.com/2019/12/16/publish-and-perish-736/
I was a licensed builder for more than 35 years and occasionally ran into situations like the one Nancy describes here, where there was no 'right,' 'official, or even 'ideal' way to handle some awkward element of design or function. Nancy's solution was elegant in that it took into account the fact that the existing crown molding had to remain in place, and, in creatively dealing with the measuring error on the cabinet, the window trim was then able to wrap around the top of the cabinet, which neatly tied things together.
Most important, she consulted and worked with the client in order to come up with something that integrates a lot of different things coming together in one spot. Nancy brought her expertise to bear on the client's wishes and created something tastefully eye-catching and functional in this older home. It works, it looks good, the client is pleased. I don't see anything wrong with that.
Finally, kudos to Nancy for being so open and willing to share the screw-ups we all make from time to time. The mark of a good craftsperson is not that he or she never makes mistakes - it is to be able to fix or otherwise overcome the mistakes that inevitably crop up.
Log in or create an account to post a comment.
Sign up Log in