
An interesting dovetailed saw till
Bill Pavlak looks to the past to find a unique method to house his favorite handsaws
 Apr 11, 2018

Few things inspire a collision of opposing thoughts in my head quite like a beautiful tool chest. Every time I see one there’s a simultaneous burst of “Oh I really want to make something like that” and “why would anybody spend that much time on a tool chest?!” Because I’m in the midst of designing and building a traditional cabinetmaker’s chest, the noise and impact of these clashing thoughts has intensified. The potential for headaches is high; thanks, in part, to my own indecisiveness and to a mysterious man named R.F. Matthews. Writing his name amounts to telling you close to half of what I know about him. The other half is that when Mr. Matthews emigrated from England to America in the early 19th century, he brought his neatly fitted-out chest of tools with him. It’s still here with many of its original tools in the collection of Colonial Williamsburg.

Though I often copy original pieces directly, I wanted to make a tool chest that was uniquely my own while still within the parameters of historic examples. This is, after all, exactly how so many 18th-century cabinetmakers made their tool chests. The Matthews chest is stunning and unique in some ways, but in a lot of ways, it’s just like many other tool chests from the era (its overall size, general interior organization, and decoration are all pretty standard). There is one feature of the Matthews chest that I couldn’t resist borrowing and that’s its saw storage system.

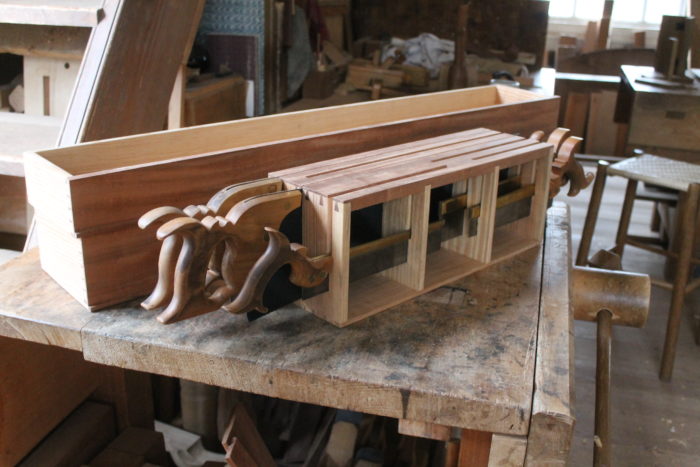
Sure, there are simpler and equally effective ways to build saw storage into a chest till, but a dovetailed box with saws sticking out of it is undeniably cool. When I started designing my own chest, I wanted to keep its decoration fairly austere – show off nicely figured mahogany, but no elaborate veneer work – and its organization straightforward – no mechanically activated, secret compartments. Nonetheless, like so many originals, I wanted my chest to have some features that transcend the purely practical and that could become small points of pride going forward. The pull of the Matthews saw till was irresistible, so let’s take a closer look at it.


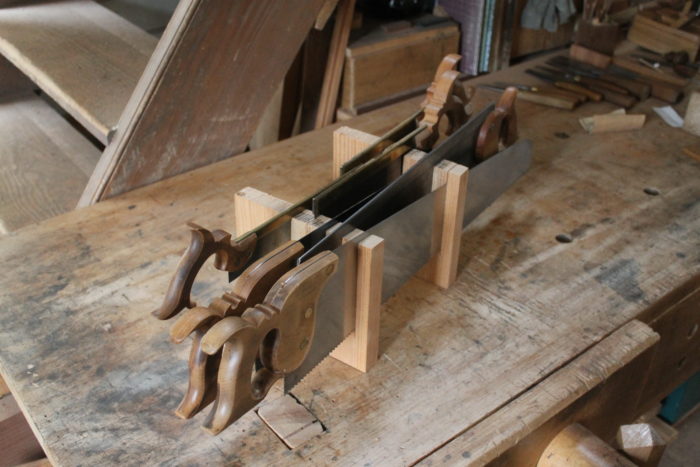
As the above photos show, the saw box is built like a traditional drawer, but turned on end – half-blind dovetails and primary wood (mahogany) up top, and through-dovetails in secondary wood below (spruce on the original and long leaf pine on mine). The partitions in the middle are dadoed to the underside of the top and secured to the bottom with wedged through-tenons. These partitions solidify the box (remember it will be sawn nearly through several times) but also support and restrain the toe end of the shorter joinery saws. The slots for the saws run deep to keep the saw handles below the plane of the box top. In both the Matthews chest and mine, there is a till above the open till where this saw box is kept, so nothing can stick out above it. The saw box should be made to fit your saws, so I’m not going to get into measurements here other than to suggest an overall length between 16 in. and 20 in. One more word on the structure of this saw box: It’s weak all by itself – some of those saw slots undermine its strength laterally. It will, however, last at least a couple of centuries if it’s kept snugly in another box that will prevent it from flexing to the side – the larger till in both the Matthews chest and mine.
Though the construction is straightforward, the building process requires a few special considerations. The layout of the half-blind dovetails is dependent on saw placement. Matthews was careful not to saw through any of his fine dovetail pins, but rather place them between the saw slots. This approach means you first need to figure out where the saws will go. To do this, I simply cut a couple of scrap boards to the overall width of the till and experimented with where to place each saw so that there was enough room around each handle for my hands to get in.
Once this was done, I could confidently lay out my dovetails and proceed with all of the joinery. You may have noticed that the saw box top has half-tails instead of half-pins on its outer edges. While this might offend the sensibilities of woodworking writers from the past century and a half, it held up quite well, so don’t worry about that – half-tails show up regularly in period work.
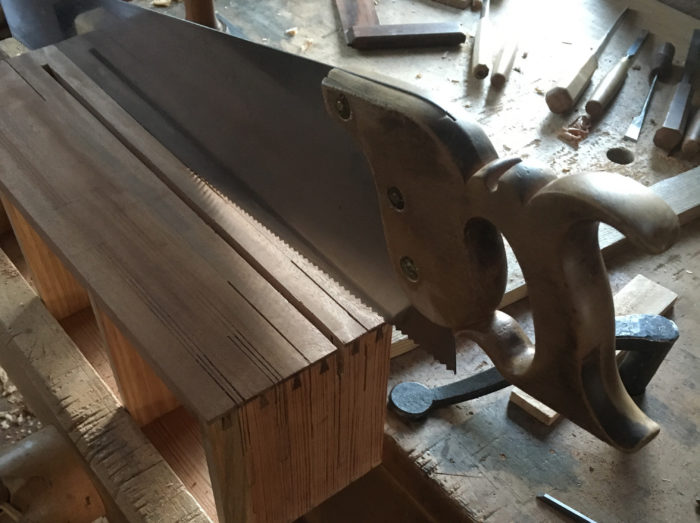
If you want to glue up your box and then cut your saw slots on the tablesaw, skip this paragraph. If you’d rather cut your handsaw storage slots with your handsaws, there a few things to keep in mind. Before I glued up my box, I dry-fitted it and made sure that all of the parts (except for the bottom) were perfectly coplanar on one side. I marked this edge as a reference on each board then knocked everything apart. While I knew it was a terrible idea to completely saw the slots into the parts before assembly, I also felt that at least starting the cuts in each part would help keep things far more accurate and easier later on. The only risk in starting the cuts prior to assembly is that they might not line up perfectly (misalignment would result in storing the saws with bent blades). This is where the aforementioned reference edge comes into play. With a marking gauge riding along this edge, I scribed the location of the saw slots on each board. Next, I clamped all the boards together, face to face, with the scribe lines perfectly aligned and cut the first 2 in. or so of each saw slot all at once. For each backsaw I made three cuts: one for each side of the spine and one in the middle for the blade. On my box, because only two of the saws go through all four vertical pieces (the ends and partitions), I had to remove pieces from this clamped-up stack as I went along.

Once everything was glued up I connected all of my saw cuts. Sawing a nicely dovetailed box is likely to test your nerves, but the starter cuts will guide you and go a long way toward making everything come out great. In general, I used a saw with a larger kerf than the saw that was going to live in a particular slot so things wouldn’t be too tight. For the wider backsaw slots, I used a coping saw and chisels to finish up the stopped ends. With the slots that run all the way through the box, I started my cut from one end and after I made it a little over halfway across the top, came in from the other side.
When you get right down to it, the scraps I used to figure out saw placement could have been fixed into my saw till and might have done a fine job keeping my saws safe for a lifetime. There’s nothing wrong with something so simple and practical, but there’s also nothing wrong with treating yourself to some impractical cabinetmaking every now and then.
More on Fine Woodworking.com:
- Dan Smith’s Dream Shop and Tool Chest – A look into the beautiful shop and tool chest Dan Smith uses to build furniture and wooden boats
- The Essential Tool Chest – Learn what makes this heirloom-quality tool chest tick
- The Studley Tool Chest gets a Facelift – Compare before and after photos of the H.O. Studley Tool Chest to identify repairs and replacement tools


Comments
Well done!! Like this.
This is an ingenious design! At first I wondered about the backsaws sitting so deep, the I realized the lower CG and a lower chance of the till tipping over. I need to design something like this for my Japanese handsaw collection.
Making the top parts with the tiny dovetails is the difficult part. You can make a till without the tops that works and space the saws apart based on the width of each handle. R.F. Matthews and Bill Pavlak exhibit expert mastery with those top pieces.
Log in or create an account to post a comment.
Sign up Log in