Skip to content
Fine Woodworking
Main Menu
Subscribe
GET THE MAGAZINE & MORE
Magazine Cover
  • Save 69% off the cover price
  • Or, get everything with UNLIMITED, including 40+ years of the online archive.
Subscribe Now!
Subscribe
  • Projects & Plans
  • How-To
  • Shop Tips
  • Tools & Materials
  • Videos
  • Magazine
  • Video Workshops
  • Members
  • Forum
  • Gallery
  • Blogs
  • More
    • Log In
    • Join
    Fine Woodworking Main Menu Subscribe
    How-To

    How to dovetail thin parts

    Mike Pekovich's technique combines machines and handwork for fast, consistent dovetails with a handcut look.

    Author Headshot By Michael Pekovich Jan 06, 2021
    Article Image

    Lots of little dovetails

    Rip the case parts to width and then cut them to length. Rather than crosscut all of the parts with a crosscut sled, I square up one end of each panel on the sled, and then use the rip fence to cut them to length. While this is technically a crosscut, which should usually be avoided on the rip fence, the panels are wide enough and short enough to make it a safe operation.

    The benefit of this technique is that mating parts will be exactly the same length and the ends will be perfectly parallel to each other, increasing the odds of ending up with a square case once you’re done. The case is joined by dovetails. The twist is that I build a rabbet into the joint for the case back. Start by cutting the rabbet in each case part and then move on to the tails. You can tackle them by hand, but I head to the table-saw and use a blade ground for dovetails. Either way, this step isn’t overly critical because you’ll scribe the pins directly from the tails. Be sure to skip the half-pin socket at the back corners of the case where the rabbet is.
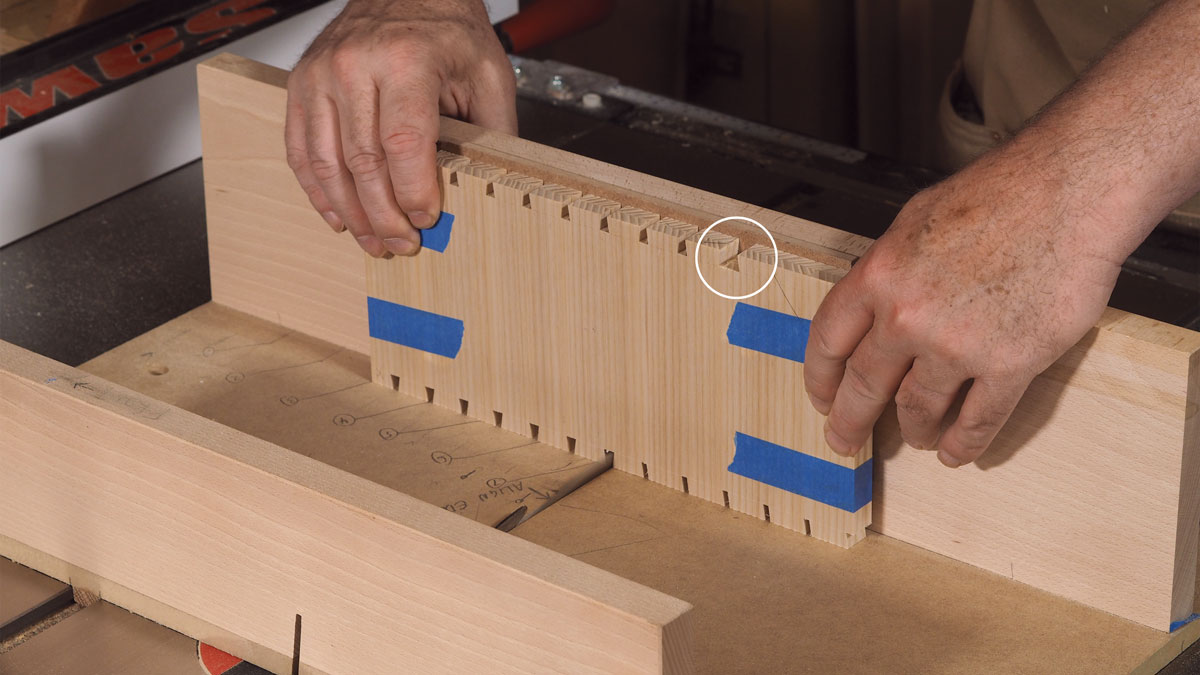
    Cut tails in both sides at once. The author uses a tablesaw blade ground for dovetails, but whether you cut them by hand or machine, taping the sides together will make faster work of the many dovetails. Create an extrawide pin socket (circled) at the front of the top edge to make scribing for the case top easier later.

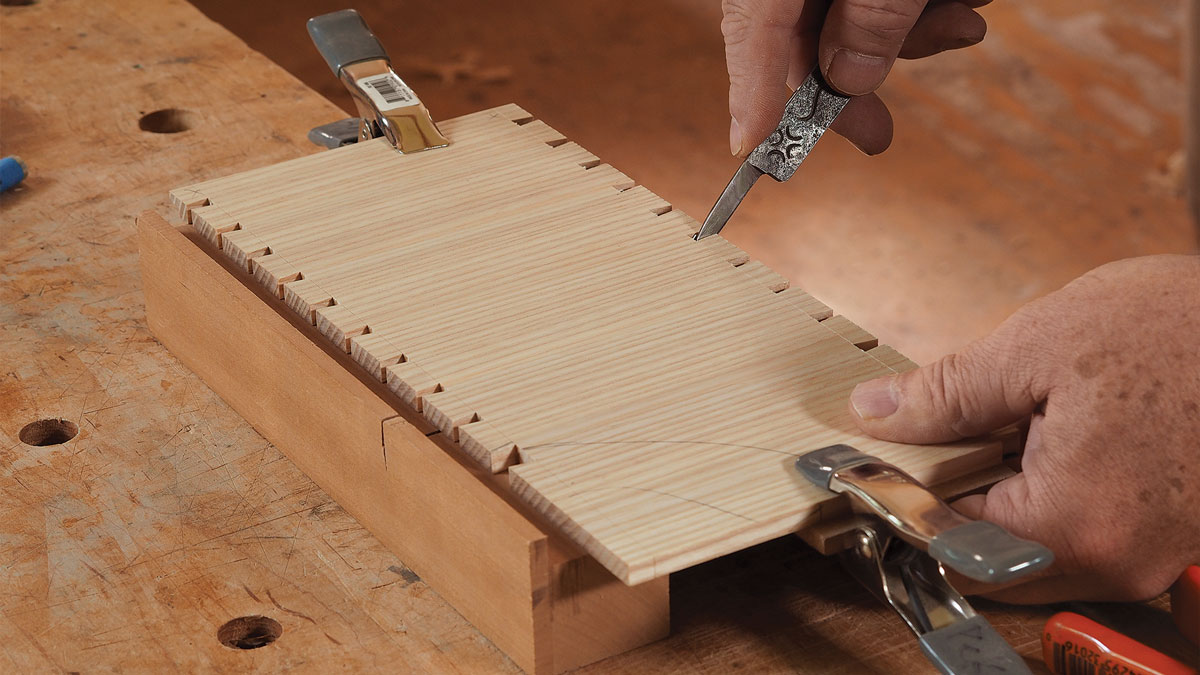
    Minimize flex when scribing the pins. Add blue tape on the end grain and clamp the pin board low to the benchtop. If the panel is wider than your vise jaws, clamp the unsupported end to the front edge of the bench.

    Alignment is everything. Clamp a piece of MDF along the baseline of the tails. This creates a lip that makes it easier to align the parts for scribing. If the parts shifted or flexed during scribing, you’d have a tougher time fitting the joint.
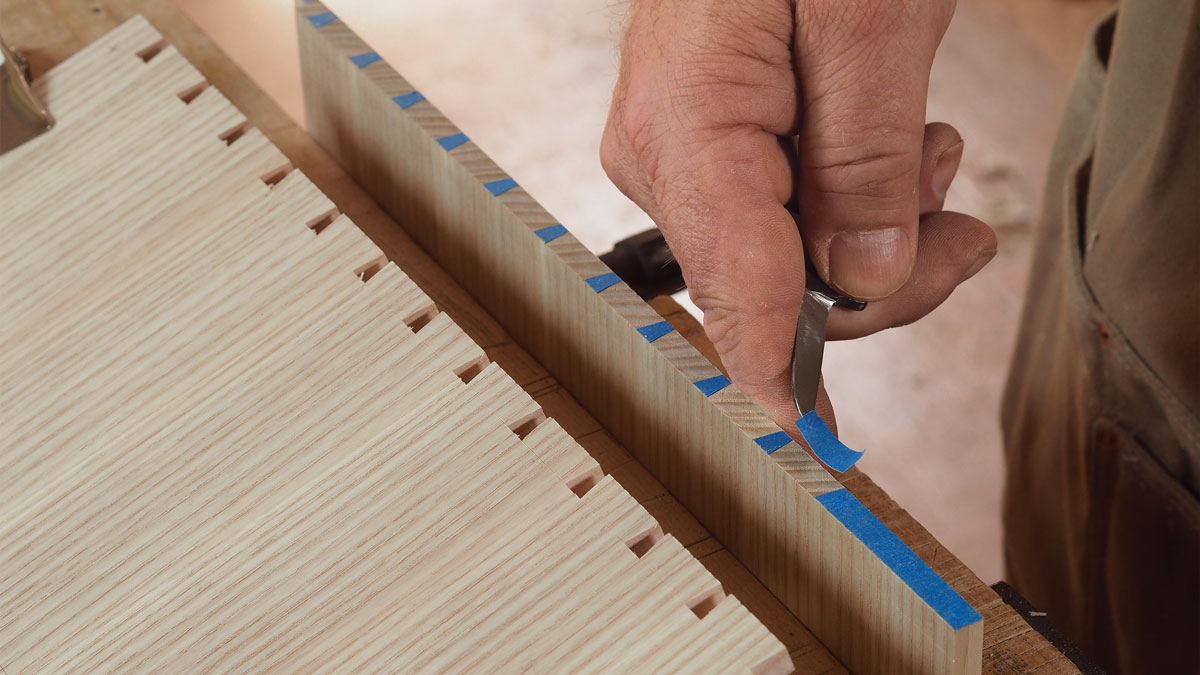
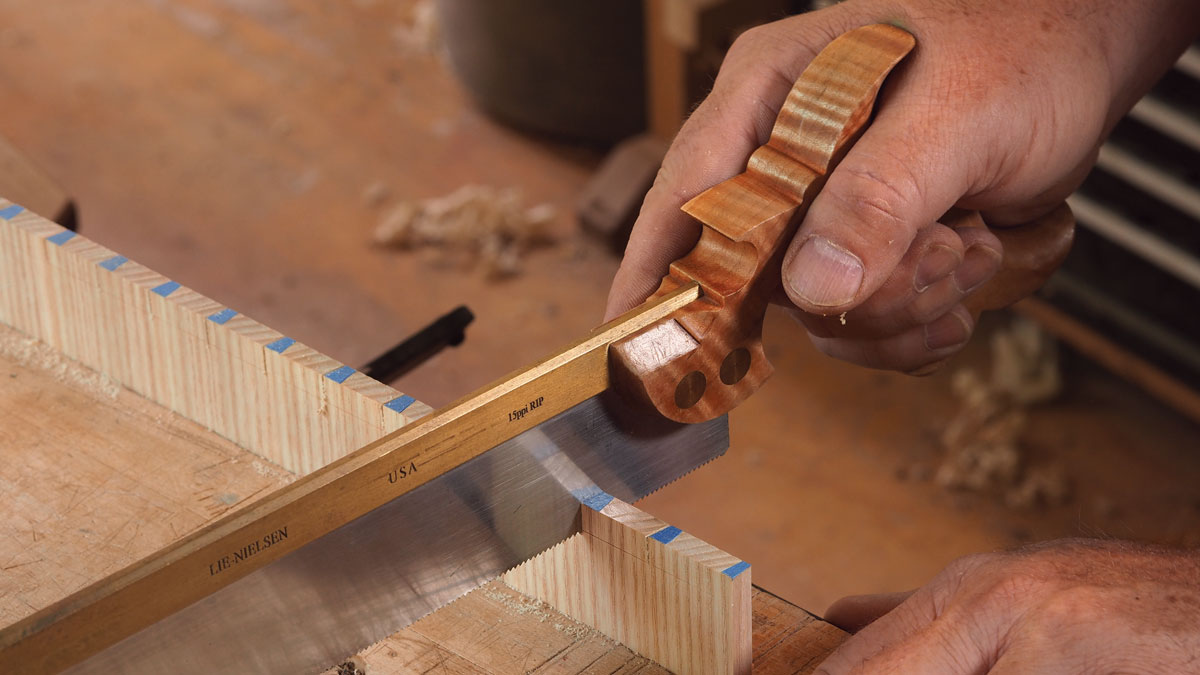
    Peel and saw. After scribing though the tape, peel away the pieces from the waste areas, creating a clear road map for sawing. The tape can also help when paring the joint to fit later.

    On to the pins

    I always do the pin layout and sawing by hand. The challenge is keeping the thin, flexible panels aligned while scribing. To ensure that the pin board stays flat, I clamp it fairly low in my vise, reducing flex. And to help with alignment, I clamp a thin piece of MDF along the tail board’s shoulder line as a registration stop. I use a block to set the height of the pin board above the benchtop, and then use the same block to support the far end of the tail board when scribing. The case top is narrower than the sides, so be sure to register the back edges of the parts. As a visual aid when sawing, I add blue tape to the pin board’s end grain. After scribing the pins, remove the tape from the waste areas and you’ll have a clear road map for sawing.

    The last task is to remove the waste between sawkerfs. I cut out the majority of waste with a fretsaw, then chop to the baseline with a chisel. Another option is to rout to the baseline with a flush-trimming bit. This creates a nice flat baseline along the width of the board. If I’ll be routing, I still remove most of the waste with a fretsaw. For information on making a support stand for routing dovetails, see “All-in-One Workstation for Dovetails,” FWW #282.
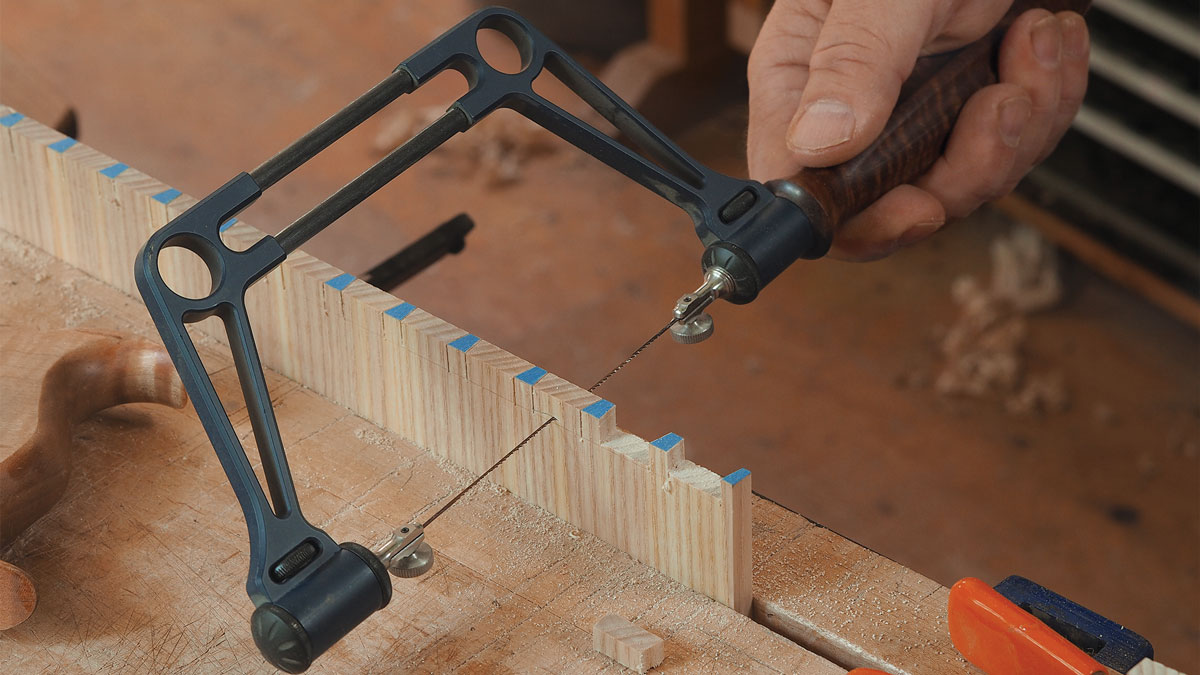
    Cope out most of the waste. Use a fretsaw (or a coping saw) to remove the majority of the waste, staying just above the baseline. This makes getting down to the baseline easier and provides an opportunity to test the fit of the joint before moving on.

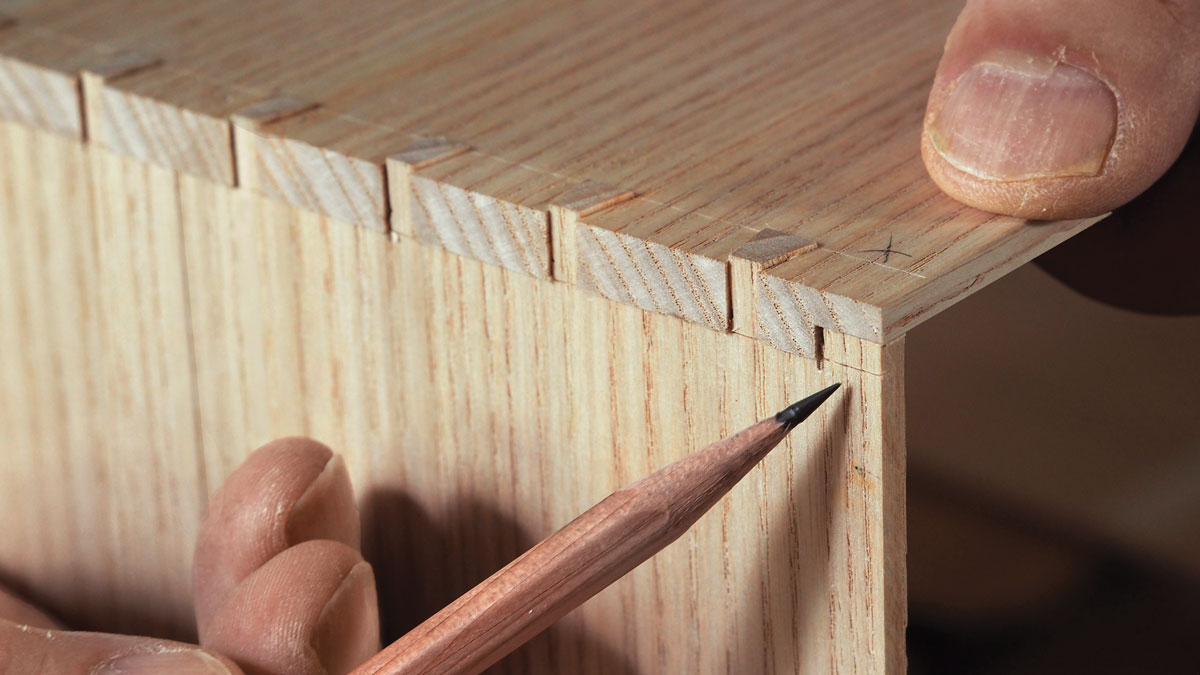
    Two ways to get to the finish line. With most of the waste removed, you’ve avoided a lot of wear and tear on your chisel from heavy chopping. Now use the chisel to pare to the baseline. Another alternative is to rout to the baseline using a bearing-guided bit. If you don’t mind the noise and dust, a router makes quick work of the job.
    From Fine Woodworking #285


    Make a dovetailed desktop organizer

    Mike Pekovich’s efficient organizer not only has room for bills, receipts, stamps, and pens, but also holds a lesson in working thin.

    All-in-one workstation for dovetails

    Mike Pekovich’s simple stand holds the work for every step of the dovetailing process.

    Dovetailing on the tablesaw

    Mike Pekovich begins his dovetailing master class at the tablesaw, where he creates the tails quickly and efficiently using a sled and a custom-ground blade.

    Sign up for eletters today and get the latest techniques and how-to from Fine Woodworking, plus special offers.

    Sign Up

    Get woodworking tips, expert advice and special offers in your inbox

    Sign Up
    ×
    X
    X

    New Feature

    Fine Woodworking Forums

    Ask questions, offer advice, and share your work

    Get It All!

    UNLIMITED Membership is like taking a master class in woodworking for less than $10 a month.

    Start Your Free Trial

    Subscribe to Fine Woodworking

    Save up to 69%

    Subscribe

    Log in or create an account to post a comment.

    Sign up Log in

    Up Next

    Featured Workshop

    a diagram of a round Shaker stand and an image or a round Shaker stand

    Shaker candle stand with Christian Beckvoort

    He’s built dozens of round Shaker stands over four decades, so there is no one more qualified than Christian Becksvoort to demonstrate making this classic. In this seven-part video series,…

    Featured Projects & Plans

    Build a Contemporary Sideboard

    Chris Gochnour's sideboard combines usefulness, strength, and beauty in a contemporary case piece

    Related Stories

    • Interesting dovetail layout tools

    • A quick way to clean up half-blind dovetails

    • Ep 15a: Half-blind dovetailed drawer - part 1

    • When Spelching Makes You Feel Good

    Discussion Forum

    Recent Posts and Replies

    • |
    • |
    • |
    • |
    • |
    • |
    View More Create Post

    Member Exclusives

    More Member Exclusives
    • How to make a rule joint

      This joint links drop leaves to the tabletop and looks good with the leaves up or down.

    • How to make a knuckle joint

      Steve Latta demonstrates how to create a knuckle joint, the heart of a period drop leaf table.

    • How to Make a Tabletop Float

      Simple and sturdy joinery allows the top of this table to float without overshadowing the rest of the design or blocking the flow of light between base and top.

    • Simple Dovetailed Box

      How to Lay Out and Cut Dovetails for a Box

      A box is the perfect project to learn how to cut dovetails by hand.

    Highlights

    • Shape Your Skills

      when you sign up for our emails

      Plus tips, advice, and special offers from Fine Woodworking.

      Sign Up
    • Shop Talk Live Podcast

      Shop Talk Live Podcast

      Our biweekly podcast allows editors, authors, and special guests to answer your woodworking questions and connect with the online woodworking community.

    • Woodpecker Sweepstakes

      Woodpeckers Shop Upgrade Giveaway

      Enter now for your chance to win more than $2,000 worth of woodworking equipment from Woodpeckers. Click for full details.

    • Staff Picks Blog

      Our favorite articles and videos

      We have created these special content collections organized to give you a deep dive into a range of topics that matter.

    Joinery

    View All
    • Japanese joinery in practice

      Japanese joinery in practice

    • 5 spectacular Japanese joints

    • Using a dowel plate to peg a Shaker cat table

    • Geeky woodworking tests

    View All

    From the Store

    View More
    • Foundations of Woodworking

      Buy Now
    • Complete Illustrated Guide to Woodworking USB

      Buy Now
    • Tool Guide 2022

      Buy Now
    • The Why & How of Woodworking

      Buy Now
    View More

    Get the latest from Fine Woodworking Magazine

    • #292-NOV/DEC 2021

      • Kerf-bent wall cabinet
      • Online extras from FWW issue #292
      • How to tame curved parts with patterns
    • #291-Sep/Oct 2021

      • Build a modern coffee table
      • Online Extras from FWW Issue #291
      • Editor's Letter: Something old, something new
    • #290-July/Aug 2021

      • Build a Shaker chest of drawers
      • Online Extras from FWW Issue #290
      • From the editor: What we make matters
    • #289-May/June 2021

      • Arts & Crafts Coffee Table with Story-Book Charm
      • Links from Fine Woodworking issue #289
      • Step-by-Step Guide to Tuning Your Block Plane
    • #288-Mar/Apr 2021

      • Phil Lowe: A craftsman and gentleman
      • Online Extras from FWW Issue #288
      • Phil Lowe: craftsman, teacher, friend

    UNLIMITED membership - Get access to it all

    Start Free Trial Upgrade Membership

    Fine WoodWorking

    Follow

    Newsletter

    Get woodworking tips, expert advice and special offers in your inbox

    Sign Up

    Membership & Magazine

    • Members
    • Digital Libraries
    • Join Unlimited
    • Magazine Subscription
    • Magazine Renewal
    • Gift a Subscription
    • Customer Support
    • Manage Preferences

    Taunton Network

    • Fine Homebuilding
    • Green Building Advisor
    • Fine Gardening
    • Threads
    • About
    • Contact
    • Advertise
    • Privacy Policy
    • Careers
    • Copyright
    • Terms of Use
    • Accessibility
    • California Privacy Rights
    • Site Map

    © 2021 The Taunton Press, Inc. All rights reserved.

    Get step-by-step instructions, woodworking tips, expert advice and special offers in your inbox. Sign Up Now!

      Main Menu

    • Projects and Plans
    • How-To
    • Shop Tips
    • Tools & Materials
    • Videos
    • Gallery
    • Magazine
    • Video Workshops
    • Members
    • Forum

      Popular Topics

    • Design
    • Small Projects
    • Beds
    • Chairs, Benches And Stools
    • Built-ins
    • Storage And Shelves
    • Cabinets
    • Carving
    • Casework
    • Desks
    • Tables
    • Shop Storage And Furniture
    • Woodturning Projects
    • Workbenches
    • Surface Prep

      More

    • TV
    • Forum
    • Blogs
    • Webinars
    • Podcasts
    • Customer Support

      Account

    • Log In
    • Join

      Magazine

    • Current Issue
    • Past Issues
    • Digital Libraries
    • Magazine Index
    • Subscribe

      Membership

    • Member Home
    • Start Free Trial
    • Gift Unlimited
    • Log In

      Shop the Store

    • Books
    • DVDs
    • Taunton Workshops

      Events

    • Fine Woodworking Live
    • Fine Woodworking HANDS ON

      Account

    • Log In
    • Sign Up

    Newsletter

    Get woodworking tips, offers, and expert advice in your inbox

    Sign Up

    Follow

    UNLIMITED

    Become an UNLIMITED member and get it all: searchable online archive of every issue, how-to videos, Complete Illustrated Guide to Woodworking digital series, print magazine, e-newsletter, and more.

    Start Your Free Trial

    Upgrade Membership