Skip to content
Fine Woodworking
Main Menu
Subscribe
GET THE MAGAZINE & MORE
Magazine Cover
  • Save 69% off the cover price
  • Or, get everything with UNLIMITED, including 40+ years of the online archive.
Subscribe Now!
Subscribe
  • Projects & Plans
  • How-To
  • Shop Tips
  • Tools & Materials
  • Videos
  • Magazine
  • Video Workshops
  • Members
  • Forum
  • Gallery
  • Blogs
  • More
    • Log In
    • Join
    Fine Woodworking Main Menu Subscribe
    Blog

    How to build hanging shelves with integrated lighting-part 1

    Working on a project that involves opening up the wall between the kitchen and living room while keeping each one a distinct space, Nancy Hiller creates suspended shelves which act as a subtle divider.

    Author Headshot By Nancy R. Hiller Jul 08, 2020
    Article Image
    Shelves with integral lighting in a kitchen designed by Christine Matheu, AIA

    I’m working on a kitchen for a 1959 ranch. The project involves opening up the wall between the kitchen and living room while keeping each one a distinct space — a great opportunity to incorporate suspended shelves as a subtle divider. The plans also call for adding lights over the sink area, where these shelves will go. Instead of building can fixtures into the ceiling, I suggested that we incorporate them into the lower shelf, a clever trick I learned from architect Christine Matheu while working on her kitchen (above) in 2006.

    Drawing of the peninsula where the sink will be.

    The clients decided to use a cast iron-enamel apron-front sink in view of the relative softness of the soapstone they chose for their counters. Although the sink has no historical relationship to the architectural style of the house, its front edge will stand up far better to the wear and tear from a family of five who really use their kitchen than the narrow expanse of stone counter that would otherwise have been subjected to daily wear and tear.

    Part 1: Make The shelves

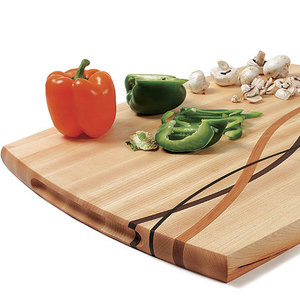
    The shelves are made of 3/4-in.-thick veneer-core plywood with white oak faces, with 1-5/16-in.-thick solid white oak edging. Although they will be supported by cleats at one end, they’ll hang over the sink peninsula, suspended by 3/8-in.-dia. all-thread rod concealed by oak “tubing” made to match the shelves.

    My electrician, Isaiah Merriman, dropped off three types of lighting that would work for this job. I chose this one for its contemporary look, low profile, and because it will provide practical task lighting (i.e., more practical lighting than an ambient glow).

    Threaded rod

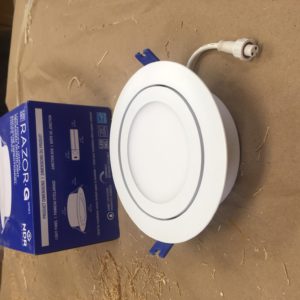
    At this point, the lighting shelf is simply a box with a lid that will sit on fillets and remain removable for future maintenance. When it’s time for installation, we’ll cut the openings for the lights with a hole saw. The electrician is roughing in the wires at the wall; they’ll be long enough to run into the hollow box from the open end (see the following image). After the finish wiring work is complete, we’ll pop the lid back on to form the shelf.

    Dropping the shelf/lid onto the support fillets

    I attached the beefy solid-oak edging to the shelves with biscuits and glue. You could certainly use Domino tenons or other joinery; what’s important is to have a solid joint, because the rods that will suspend the shelves will go through the solid oak outer frame, making it not just decorative, but structural.

    The end that will be supported by a cleat at the wall is left open, without edging. The electrician will rough in the wire at the designated height on the wall; when it’s time for finish electrical work, we’ll run the wire into the cavity. Note that the shelf is upside-down in this image.
    The protruding end is capped with mitered edging that’s purely decorative and will hold no weight.

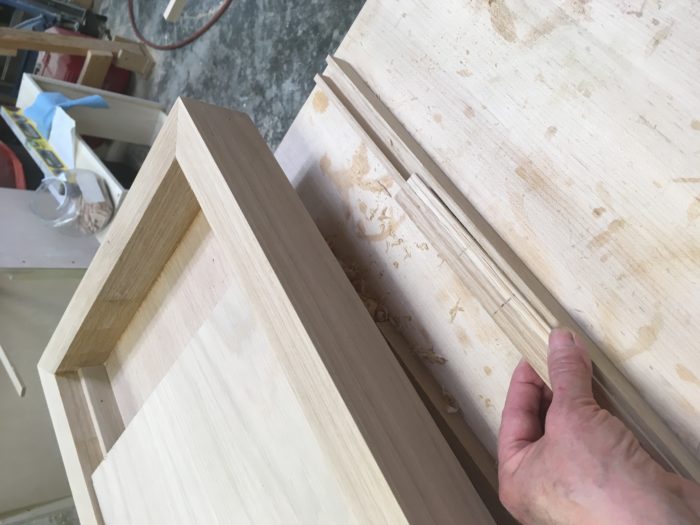
    After you’ve determined the clearance needed by the lights inside the box, make fillets (like the one visible here) to support the shelf. The shelf can be flush with the top edge of the solid-wood edging or slightly lower, as in this case, where the lip will keep objects from falling off the shelf. Fit the shelf but don’t attach it; you will need access to the inside of the box during installation.

    Part 2: Creating the oak tubing

    There are various ways to conceal the threaded rod. Hardware stores sell metal tubing in a variety of finishes; you can cut it to length and slide it over the rod before you fasten the nuts for each shelf. In this case, I thought oak sleeves would fit better with the aesthetic. They’re simple to make.

    The finished “tube.” The walls needn’t be exactly the same thickness.

    Cut your parts roughly to size. It’s a good idea to make the channel larger than the diameter of the threaded rod, to give you a little leeway at installation time. Depending on your preferred proportions, you may make the channel large enough to accommodate the nut. Ours is slightly undersized for the nut, because I wanted to keep the outside dimensions of the tubing as slight as possible. At installation time I’ll simply chisel out a little material to fit over the nuts.

    Rip the lid

    Rip a section off the main piece of stock to use as a “lid.” The thickness of the lid should be sufficient to keep from flexing under finger pressure so as to keep it from breaking in use.

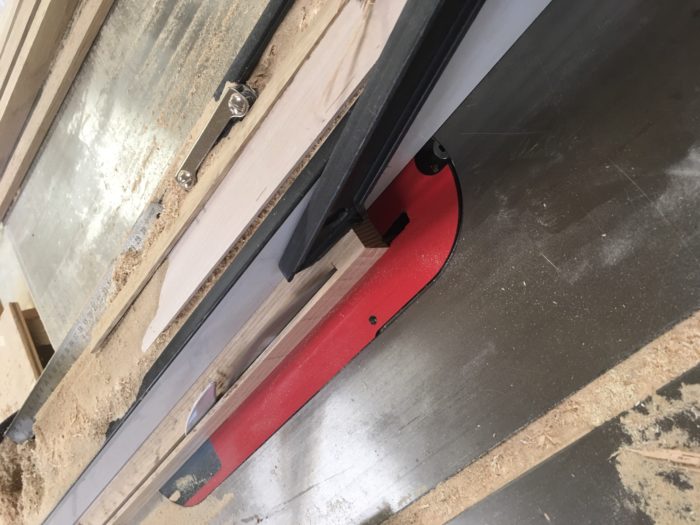
    As soon as you’ve ripped each lid from its piece of tubing, mark both parts so you can keep the grain matched when you glue them back together.

    I number each part for easy identification.

    Cut the channel

    I used a dado set to cut the channel in the main part of the tubing. It doesn’t matter if the “bottom” of the groove is slightly ridged from the dado blades. You’re just creating a channel through which to run the rod.

    Glue the lid back on

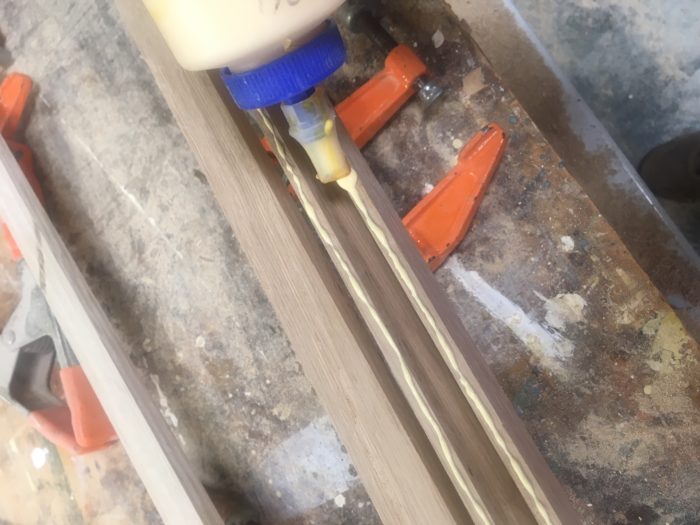
    Run a thin bead of glue along the edges of the tubing and top with the lid. I used blue tape to keep the parts in alignment while adding clamps.

    Trim to size and clean up

    You can use a handplane or run the tubes through a drum or wide-belt sander. Make sure you don’t remove too much material. Leave the tubing full-length for now and apply your chosen finish. You’ll cut it to length during the installation at the job site.

    Next time: Installation

    If you’re even thinking about remodeling a kitchen, you need to pick up a copy of Nancy’s new book Kitchen Think. It’s filled with the clever builds you’d expect from someone who has been creating beautiful, high-end kitchens for decades.

    Sign up for eletters today and get the latest techniques and how-to from Fine Woodworking, plus special offers.

    Sign Up

    Get woodworking tips, expert advice and special offers in your inbox

    Sign Up
    ×
    X
    X

    New Feature

    Fine Woodworking Forums

    Ask questions, offer advice, and share your work

    Get It All!

    UNLIMITED Membership is like taking a master class in woodworking for less than $10 a month.

    Start Your Free Trial

    Subscribe to Fine Woodworking

    Save up to 69%

    Subscribe

    Log in or create an account to post a comment.

    Sign up Log in

    Up Next

    Featured Workshop

    a diagram of a round Shaker stand and an image or a round Shaker stand

    Shaker candle stand with Christian Beckvoort

    He’s built dozens of round Shaker stands over four decades, so there is no one more qualified than Christian Becksvoort to demonstrate making this classic. In this seven-part video series,…

    Featured Projects & Plans

    Build a Contemporary Sideboard

    Chris Gochnour's sideboard combines usefulness, strength, and beauty in a contemporary case piece

    Related Stories

    • Consulting With Prospective Clients

    • Designer’s Notebook: Better Built-ins

    • A Unique Cutting Board

    • Free Chapter Download: Building Kitchen Cabinets

    Discussion Forum

    Recent Posts and Replies

    • |
    • |
    • |
    • |
    • |
    • |
    View More Create Post

    Member Exclusives

    More Member Exclusives
    • How to upholster a slip seat

      How to upholster a slip seat

      Michael Mascelli demonstrates how to create a finished, professional-looking upholstered slip seat.

    • kerf-bent cabinet

      Kerf-bent wall cabinet

      Philip Morley's small wall cabinet has sides that curve inward at the top, with an asymmetrical arrangement of drawers, door, and open shelves.

    • On Making Chairs Comfortable

      How to fit the seat to the sitter.

    • Chair Woods

      The Best Wood for Chairs

      Lessons on picking the right wood for making an attractive, strong chair that will stand the test of time.

    Highlights

    • Shape Your Skills

      when you sign up for our emails

      Plus tips, advice, and special offers from Fine Woodworking.

      Sign Up
    • Shop Talk Live Podcast

      Shop Talk Live Podcast

      Our biweekly podcast allows editors, authors, and special guests to answer your woodworking questions and connect with the online woodworking community.

    • Woodpecker Sweepstakes

      Woodpeckers Shop Upgrade Giveaway

      Enter now for your chance to win more than $2,000 worth of woodworking equipment from Woodpeckers. Click for full details.

    • Staff Picks Blog

      Our favorite articles and videos

      We have created these special content collections organized to give you a deep dive into a range of topics that matter.

    Built-ins

    View All
    • a craftsperson bent down installing something in a kitchen that is being renovated

      Why I fit kitchen cabinet doors and drawers on site

    • Designing built-ins for installation during a pandemic

    • How I bid a small job

    • How to build hanging shelves with integrated lighting, Part 2: Installation

    View All

    From the Store

    View More
    • Foundations of Woodworking

      Buy Now
    • Tool Guide 2022

      Buy Now
    • Complete Illustrated Guide to Woodworking USB

      Buy Now
    • The Why & How of Woodworking

      Buy Now
    View More

    Get the latest from Fine Woodworking Magazine

    • #292-NOV/DEC 2021

      • Kerf-bent wall cabinet
      • Online extras from FWW issue #292
      • How to tame curved parts with patterns
    • #291-Sep/Oct 2021

      • Build a modern coffee table
      • Online Extras from FWW Issue #291
      • Editor's Letter: Something old, something new
    • #290-July/Aug 2021

      • Build a Shaker chest of drawers
      • Online Extras from FWW Issue #290
      • From the editor: What we make matters
    • #289-May/June 2021

      • Arts & Crafts Coffee Table with Story-Book Charm
      • Links from Fine Woodworking issue #289
      • Step-by-Step Guide to Tuning Your Block Plane
    • #288-Mar/Apr 2021

      • Phil Lowe: A craftsman and gentleman
      • Online Extras from FWW Issue #288
      • Phil Lowe: craftsman, teacher, friend

    UNLIMITED membership - Get access to it all

    Start Free Trial Upgrade Membership

    Fine WoodWorking

    Follow

    Newsletter

    Get woodworking tips, expert advice and special offers in your inbox

    Sign Up

    Membership & Magazine

    • Members
    • Digital Libraries
    • Join Unlimited
    • Magazine Subscription
    • Magazine Renewal
    • Gift a Subscription
    • Customer Support
    • Manage Preferences

    Taunton Network

    • Fine Homebuilding
    • Green Building Advisor
    • Fine Gardening
    • Threads
    • About
    • Contact
    • Advertise
    • Privacy Policy
    • Careers
    • Copyright
    • Terms of Use
    • Accessibility
    • California Privacy Rights
    • Site Map

    © 2021 The Taunton Press, Inc. All rights reserved.

    Get step-by-step instructions, woodworking tips, expert advice and special offers in your inbox. Sign Up Now!

      Main Menu

    • Projects and Plans
    • How-To
    • Shop Tips
    • Tools & Materials
    • Videos
    • Gallery
    • Magazine
    • Video Workshops
    • Members
    • Forum

      Popular Topics

    • Design
    • Small Projects
    • Beds
    • Chairs, Benches And Stools
    • Built-ins
    • Storage And Shelves
    • Cabinets
    • Carving
    • Casework
    • Desks
    • Tables
    • Shop Storage And Furniture
    • Woodturning Projects
    • Workbenches
    • Surface Prep

      More

    • TV
    • Forum
    • Blogs
    • Webinars
    • Podcasts
    • Customer Support

      Account

    • Log In
    • Join

      Magazine

    • Current Issue
    • Past Issues
    • Digital Libraries
    • Magazine Index
    • Subscribe

      Membership

    • Member Home
    • Start Free Trial
    • Gift Unlimited
    • Log In

      Shop the Store

    • Books
    • DVDs
    • Taunton Workshops

      Events

    • Fine Woodworking Live
    • Fine Woodworking HANDS ON

      Account

    • Log In
    • Sign Up

    Newsletter

    Get woodworking tips, offers, and expert advice in your inbox

    Sign Up

    Follow

    UNLIMITED

    Become an UNLIMITED member and get it all: searchable online archive of every issue, how-to videos, Complete Illustrated Guide to Woodworking digital series, print magazine, e-newsletter, and more.

    Start Your Free Trial

    Upgrade Membership