
Grind and get back to work – fast
For Megan Fitzpatrick, there is simply no faster way to remove a chip from a blade or erase a too-large secondary bevel than a high-speed wheel grinder.
 Jun 30, 2020

The thought of grinding a tool on a wheel can cause anxiety – I know this firsthand. For a long time, I used every manner of fancy machine (water-cooled, slow-speed, platter), all equipped with a bewildering array of tool-specific rests, jigs, and other “can’t-fail” gadgets (I had easy access to them at my former job). I felt confident I could safely and reliably use all of these to safely produce a good new edge on my tools. And I did. But it just took too darn long.
There is simply no faster way to remove a chip from a blade or erase a too-large secondary bevel than a high-speed wheel grinder. And with just a little practice (get a $5 chisel at the home center or a $1 chisel at a flea market for that), you may not be as reliable as a Tormek or Veritas Mk. II, but I promise you won’t ruin your blade, and you’ll produce an edge plenty good enough for first-class woodworking. And you’ll do it quickly, so you can get right back to the fun part – making the tools dull.
Buy an inexpensive 6-in. high-speed grinder (you don’t really need an 8-in. one in a home shop). What’s important is that the wheel doesn’t wobble, so if you’re buying used, make sure the shaft is straight. Then throw away the wheel it came with. Get a Norton 3X #80-grit I-grade wheel ($34 from Tools for Working Wood). It runs cool because it’s friable, so the grit breaks down as you introduce steel to it (harder wheels glaze over easily, and therefore burn the steel more quickly). The wheel in our shop has lasted 10 years – and we do a lot of grinding.

First thing, dress the wheel. Just as a waterstone or oilstone should be dead flat (with a few exceptions), a grinding wheel should be slightly crowned; this keeps the corners from digging into your blade. For this, I like a diamond-point dresser (about $57, and it will last a lifetime). Come straight in on the wheel with the dresser. Then, with the wheel’s center as the high point, gently rock the dresser toward each edge to produce the crown. You’ll know when it’s time to dress the wheel again during grinding, because it will stop cutting as well (every two or three blades is a good starting point).

Chances are that your grinder’s tool rest is sufficient support – but if it won’t hold a setting, either fix it or buy a new one. If you want more support, use double-stick tape to secure a square of 1/8-in.-thick hardboard (or other thin, rigid stuff) with a notch cut in it for the wheel.

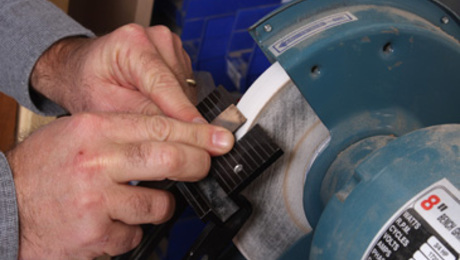
To set the rest, here’s the one jig that will come in handy: a Popsicle stick with the desired angle cut at one end. Mine is 25°. Note the thin line down one edge – that’s the thickness of the plane blade I’m working on here, marked by holding the blade on edge to the stick. Where that line meets the 25° angle is where the stick should touch the wheel. With that determined, I snug down on the rest’s wingnut to keep the setting.
With a container of water and oily rag at hand, I’m ready to grind.

In most cases, the first thing I do is blunt the cutting edge slightly by presenting the blade to the wheel at 90° and moving smoothly left and right for a few moments. A narrow flat at the end helps to protect the fragile edge from overheating. (I might not blunt the end if I still have a good cutting edge but have too large of a secondary bevel, say more than one-third of the primary bevel. That’s about when it starts to get too fragile up at the business end. If the grind is at the same angle as the previous grind, I can simply grind away most of that secondary bevel, stopping just before I get to the end of the blade – thereby leaving the very tip of the secondary bevel, the cutting edge.)

Then, it’s simply a matter of holding the blade flat to the tool rest and presenting it to the wheel, again moving it right and left smoothly across the crown The crown of the wheel is the only part that cuts, because it’s the only part touching the blade.

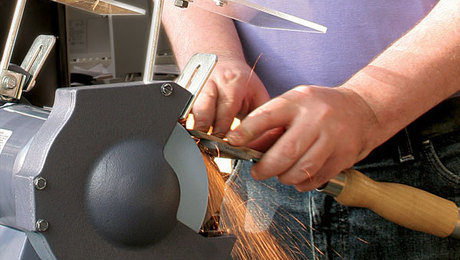
Depending on how aggressively I’m pushing the steel into the wheel, I stop every 15 to 25 seconds to grasp the end of the blade in my fingers. If I can hold it without burning myself, it’s not too hot. If it’s approaching painful, then I dunk it in the water for a few seconds. There’s no need to wipe the water off the blade before putting it back on the wheel. Water boils at 212°F, so if it starts to boil, it’s definitely time to dunk again. (When you’re done grinding, wipe the blade with an oily rag.)
No matter what you might have heard, dunking the tool in water will not change the structure of the steel or damage the blade, because it is not actually “quenching.” Quenching is (in brief) a rapid-cooling process that changes the structure of the steel – but to effect that, the steel has to be somewhere in the neighborhood of 1,500°F to 1,650°F. If you’ve gotten the blade that hot while grinding, you held it to the wheel for far too long without checking its temperature.
You can, though, more easily “draw the temper” (overheat it to the point of decreasing the hardness). But again, if you’re stopping and checking every 15 to 25 seconds and the blade is not too hot to hold, it will be just fine. (That said, if you fear you’ve drawn the temper, dunk it and just carry on. While that edge might be a bit more fragile – until your next grinding session, anyway – it will probably hold a good enough edge for getting back to work, though you may have to hone and polish a bit more often.)

If you’re having trouble getting a nice, straight grind across the edge, use a small square to help you mark a straight line with a thin Sharpie on the back of the blade, as close to the edge as possible. That gives you a target. Remove that line evenly across the blade, and there ya go. (Once you’re done, wipe the blade with an oily rag.)

And if you’re grinding a jack-plane blade or other blade that needs a curve, make a template for the desired curve out of a piece of scrap, then use that to mark the curve on the back of the blade when it’s time to grind.
Chisels aren’t any different; just mark a new line on your Popsicle stick for the thickness of the blade, and adjust the tool rest as needed.
Can’t tell if you’re getting a good grind? Mark across the bevel with red marker, and see what’s disappearing as you remove the steel from the wheel to check that it’s not getting too hot.
Even with stopping to take the photos above, I ground three blades in about 20 minutes – but that includes bringing the grinder into the air conditioning from the machine shop, getting the water, and making a new Popsicle stick jig.
My point is that it’s fast – so much faster than any other method. And a 6-in. grinder, Norton 3X wheel, and a diamond-point dresser together cost far less than the fancy (and slower) sharpening system.
 |
Bench Grinder Basics |
 |
Grind Perfect Edges Without BurningIn just seconds, get a tool ready for honing |
 |
STL218: Megan Fitzpatrick’s favorite tool storage |


Comments
I suppose if you like overcoming the inherent faults, poor built quality, lack of effective tool rest, not-so-good grinding wheels and all that wheel dressing....... If you also have the confidence to grind straight and even edges free hand without burning the steel (just once is enough to spoil it)......
Get a Sorby Proedge instead. I've had one a week and it's re-shaped and then sharpened 10 A2 plane blades, 12 chisels then sharpened all the ladywife's kitchen knives, in no time, all without swapping or adding all the things a typical wheel grinder requires to be changed or added before it works properly. You can use trizact belts on the Proedge to get blades to within 20 seconds of a leather & paste hand hone to the ultimate edge.
This fellow demonstrates quite convincingly:
https://www.youtube.com/watch?v=_OXYh3Q9ngI
Wheel grinders are for pilgrims. :-)
Lataxe
ummmmmm.... k
The grinder is never my first choice for sharpening, though it can be used -- with great care -- to shape a blade for a specific use. Using a grinder for wood turning tools is also quite appropriate, if you have the right grinding wheels.
I am not saying that other folks shouldn't use a grinder as they see fit. That is their business, not mine.
I am just saying that there is a lot that go wrong in a hurry when you use a grinder to sharpen good tools, especially chisels and plane blades. I speak from experience, sadly.
However, if you have the touch to get a good result using a grinder for chisels and plane blades, then I freely admit that you are better at this than I am. You have my respect.
There is some good information in this article. But the pictures show poor safety practices. You should always wear safety glasses and a face shield when using the grinder. Wheels can break and hit your face at amazing speeds. Also, the tool rest should not be more than 1/8" from the wheel. The tool can flip inward and bring your fingers with it, pinching your finger between the wheel and the lower housing.
Lataxe,
That's one I have not used – but it's about $350 more (or a car payment more) than my setup.
Purdue Dan,
That rest can't be that close to the wheel the way it's designed (and FWIW, I've never read or heard that edict). But if it's a concern, use the hardboard taped-on attachment, which can be positioned wherever one likes. And I am using the shield on the machine (plus my glasses) – that passes for safe here.
The safety rules are on the ANSI and OSHA sites. My wood shop gets inspected every year so I try to follow ANSI and OSHA rules. I am not trying to be critical, I just want people to be safe.
Great read! Can’t wait to try this technique. I am relieved I don’t need a fancy slow speed grinder.
Yes! Fancy slow speed things mean you can't get back to work - fast! .......
Hang on, though. Why would one want to get back to work at all? After all, work is a filthy invention of the Victorians. Oh yes it is! Just ask any wage slave.
Myself, I like to get back to play - slowly. This sea change of attitudes occured when I read an antidote to that Protestant Work Ethic nonsense they pour in our eyes and ears from the age of 3 months until one escapes at last from some satanic mill or other, decades later. I think it was an article in "Anarchist's Monthly" entitled something like, "How to become a daft olephart in a shed somewhere no one else goes". Or something like that.
Lataxe
Log in or create an account to post a comment.
Sign up Log in