Skip to content
Fine Woodworking
Main Menu
Subscribe
GET THE MAGAZINE & MORE
Magazine Cover
  • Save 69% off the cover price
  • Or, get everything with UNLIMITED, including 40+ years of the online archive.
Subscribe Now!
Subscribe
  • Projects & Plans
  • How-To
  • Shop Tips
  • Tools & Materials
  • Videos
  • Magazine
  • Video Workshops
  • Members
  • Forum
  • Gallery
  • Blogs
  • More
    • Log In
    • Join
    Fine Woodworking Main Menu Subscribe
    How-To

    Learn a fast, reliable way to sharpen a card scraper

    Bob Van Dyke demonstrates his process for sharpening a card scraper, including how to create smooth and square edges and faces, and how to draw out and form a burr to create the cutting edge.

    Author Headshot By Bob Van Dyke #279-Tools & Shops 2020 Issue
    Article Image
    Register against a square block when lapping the edge. Draw the scraper (not the wood) back and forth over the stone. The wood helps you maintain 90°. Aim for a uniform polish across the whole edge before moving to finer stones.

    Synopsis: Card scrapers are an essential part of Bob Van Dyke’s surfacing kit. They’re inexpensive, effective, and easy to sharpen. Here he takes you through his process for sharpening a card scraper, including how to create smooth and square edges and faces, and how to draw out and form a burr to create the cutting edge.


    Card scrapers are incredibly versatile, making them an essential part of my surfacing kit for any project—so much so that I keep several of them sharpened and ready to go at all times. After all, why not? They’re inexpensive and quick to sharpen.

    Interestingly, every furniture maker I know sharpens scrapers differently, and all their methods work. Personally, I prefer what’s considered a more traditional approach, while tossing in some modern conveniences like push pads and medium- and fine-grit diamond plates. My method guarantees fast, reliable results that let me use this simple tool to its full potential every time. (For more on how to use a card scraper, see Foolproof Surface Prep)
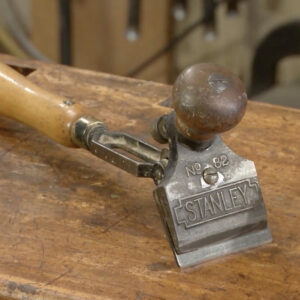
    Versatile tool

    surface squirrelly grain
    Surface squirrelly grain. Light shavings taken with a card scraper can handle even the tightest grain changes on this maple burl.

    Flush edging
    Flush edging. With a little practice, finesse tasks like flushing a hardwood edge are easily accomplished.

    leveling inlays abd bandings
    Banding is no issue. A sharp scraper is perfect for safely leveling inlays and bandings.

    Prep edges and faces

    Just like with any other edge tool, you start by creating polished planes that intersect, in this case the long edges and faces of the scraper. This sets the foundation for the sharpest and longest-lasting burr.

    Joint an edge square with a file
    Joint an edge square with a file. The edge is ready when the file makes a consistent pass, leaving an even scratch pattern. Van Dyke uses a 10-in. mill bastard file.

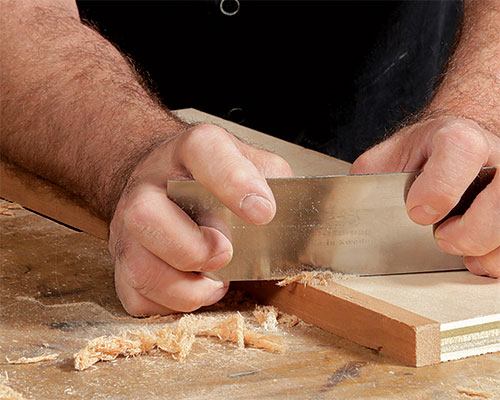
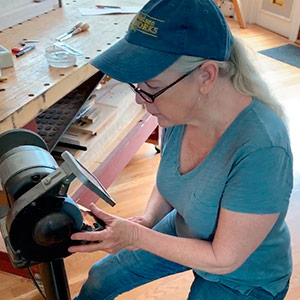
    I begin by jointing the scraper’s long edge square to its face with a 10-in. mill bastard file. Run the file until it makes a consistent pass, leaving an even scratch pattern. You’ll be able to see, hear, and feel when you’re there.

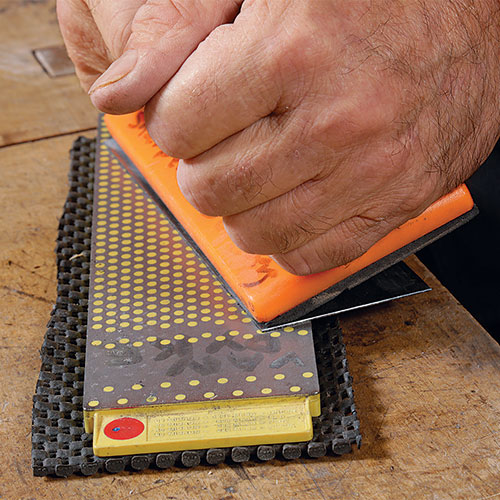
    Next, lap the scraper’s two faces. I find diamond stones to be the best for this step because they are flat and can be used without a lubricant, which would make the scraper slippery and harder to hold. The trick is to apply all your pressure evenly along the face adjacent to the long edge. This is where the push pad comes in; it does the job better than fingers alone. Angle the push pad up slightly and apply pressure next to the edge—not on the whole face. Lap until there are uniform scratches. Work your way from medium to fine stones.

    Lap the faces. To create an even scratch pattern along the length of the scraper, Van Dyke uses a push pad, tipping it slightly to direct pressure along the edge.

    uniform scratch pattern
    Look for a uniform scratch pattern. Work your way up to finer stones, lapping the face only near the jointed edge. There’s no need to lap the middle of the scraper.

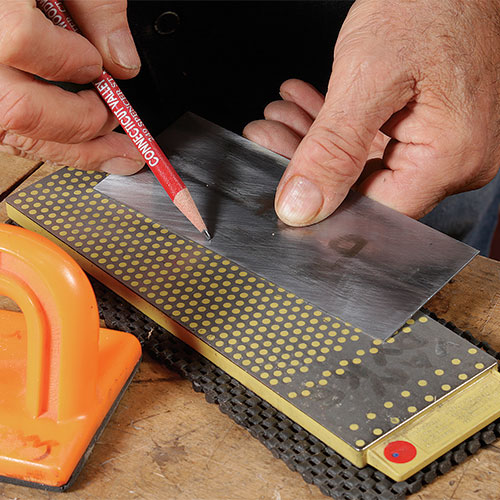
    After the faces, polish the long edge. For this, the scraper must stay square to the stone. An easy trick is to hold the scraper against a block of wood while rubbing the scraper (not the wood) over the stone. Again, aim for a uniform polish across the edge before moving on to finer stones. I prefer diamond stones for this job, too. If you use another kind, you’ll need to continually move the scraper across its surface to avoid quickly wearing a groove.

    Form the burr

    At this point you can begin burnishing the edge to create the cutting burr. This involves three steps: drawing out the steel, mushrooming it over, and turning the burr.

    1. Draw out the steel. Hold the burnisher at a very slight angle to the face, skew it, and pull it along the scraper while pressing it firmly against the face. This creates a slight burr along the edge.

    To draw out the steel, position the scraper near the edge of the bench and run the burnisher on the face adjacent to the edge at a very slight angle while exerting firm downward pressure.

    2. Mushroom out the burr. With the burnisher square to the scraper’s face, draw it across the edge four or five times to mushroom it out.

    The next step is to mushroom over the burr. Hang the scraper about 1 in. over the edge of the bench and, holding the burnisher square to the face, draw it across the edge four or five times.

    Turn the burr. Finally, angle the burnisher ever so slightly before drawing it up and across the edge two or three times. Don’t exert a lot of pressure. A small sharp burr is easier to use and will last longer than a big one.

    Now, turn the burr by angling the burnisher slightly (3° to 4°) and draw the burnisher up and across the edge two or three times. Avoid pressing too hard, since a big burr is harder to use and more fragile than a small one. The pressure here is surprisingly light—only about 4 oz., according to an early article by Tage Frid (“The Scraper,” FWW #6).

    TIP: Lubricate with oil. Running the burnisher on the scraper means metal on metal, so Van Dyke first rubs the scraper with an oil-based lubricant.

    Turning a slightly angled burr allows the scraper to be used almost vertically, which is easier to control. And because the body of the scraper is supporting it, the fragile steel burr lasts longer.

    When to resharpen

    Don’t expect the scraper to cut effectively for more than 5 or 10 minutes of continuous use. When the shavings degrade, stop cutting and reburnish the scraper. If you’re just making dust, you’ve waited too long. Trying to scrape with a dull tool will round over the jointed edge, which means you won’t be able to pull a new burr from it. You should be able to reburnish five or six times before the edge becomes too work-hardened and brittle. At that point, go back to the file and start the sharpening process from the beginning.

    From Fine Woodworking #279

    To view the entire article, please click the View PDF button below.

    Sign up for eletters today and get the latest techniques and how-to from Fine Woodworking, plus special offers.

    Sign Up

    Get woodworking tips, expert advice and special offers in your inbox

    Sign Up
    ×
    Download FREE PDF

    when you enter your email address below.

    Plus, get Fine Woodworking emails filled with plans, how-to, and special offers.

    or Log In

    Read our Privacy Policy
    Questions? Contact Customer Service

    View PDF
    X
    X

    New Feature

    Fine Woodworking Forums

    Ask questions, offer advice, and share your work

    Get It All!

    UNLIMITED Membership is like taking a master class in woodworking for less than $10 a month.

    Start Your Free Trial

    Subscribe to Fine Woodworking

    Save up to 69%

    Subscribe

    Log in or create an account to post a comment.

    Sign up Log in

    Up Next

    Featured Workshop

    a diagram of a round Shaker stand and an image or a round Shaker stand

    Shaker candle stand with Christian Beckvoort

    He’s built dozens of round Shaker stands over four decades, so there is no one more qualified than Christian Becksvoort to demonstrate making this classic. In this seven-part video series,…

    Featured Projects & Plans

    Build a Contemporary Sideboard

    Chris Gochnour's sideboard combines usefulness, strength, and beauty in a contemporary case piece

    Related Stories

    • Bevel-up Jack: Change the Angle of Attack

    • Tuning and Using the Stanley 82 Scraper

    • How to sharpen an adze

    • Grind and get back to work – fast

    Discussion Forum

    Recent Posts and Replies

    • |
    • |
    • |
    • |
    • |
    • |
    View More Create Post

    Member Exclusives

    More Member Exclusives
    • Bevel-up Jack: Change the Angle of Attack

      You can change the cutting angle of these hand tools to tackle a variety of planing tasks.

    • Spokeshave Fundamentals

      Chairmaker Peter Galbert takes you through the different types of spokeshave, how to tune them, where to use each type, and which ones he likes best.

    • How to upholster a slip seat

      How to upholster a slip seat

      Michael Mascelli demonstrates how to create a finished, professional-looking upholstered slip seat.

    • kerf-bent cabinet

      Kerf-bent wall cabinet

      Philip Morley's small wall cabinet has sides that curve inward at the top, with an asymmetrical arrangement of drawers, door, and open shelves.

    Highlights

    • Shape Your Skills

      when you sign up for our emails

      Plus tips, advice, and special offers from Fine Woodworking.

      Sign Up
    • Shop Talk Live Podcast

      Shop Talk Live Podcast

      Our biweekly podcast allows editors, authors, and special guests to answer your woodworking questions and connect with the online woodworking community.

    • Woodpecker Sweepstakes

      Woodpeckers Shop Upgrade Giveaway

      Enter now for your chance to win more than $2,000 worth of woodworking equipment from Woodpeckers. Click for full details.

    • Staff Picks Blog

      Our favorite articles and videos

      We have created these special content collections organized to give you a deep dive into a range of topics that matter.

    Sharpening

    View All
    • flatten backs of blades

      Workshop tip: Simple wood block makes it easier to flatten backs of blades

    • A reminder that it's time to sharpen

    • How to sharpen an adze

    • lapping plate

      Workshop tip: Marble or granite tile is a low-cost lapping plate

    View All

    From the Store

    View More
    • Foundations of Woodworking

      Buy Now
    • Tool Guide 2022

      Buy Now
    • Complete Illustrated Guide to Woodworking USB

      Buy Now
    • The Why & How of Woodworking

      Buy Now
    View More

    Get the latest from Fine Woodworking Magazine

    • #292-NOV/DEC 2021

      • Kerf-bent wall cabinet
      • Online extras from FWW issue #292
      • How to tame curved parts with patterns
    • #291-Sep/Oct 2021

      • Build a modern coffee table
      • Online Extras from FWW Issue #291
      • Editor's Letter: Something old, something new
    • #290-July/Aug 2021

      • Build a Shaker chest of drawers
      • Online Extras from FWW Issue #290
      • From the editor: What we make matters
    • #289-May/June 2021

      • Arts & Crafts Coffee Table with Story-Book Charm
      • Links from Fine Woodworking issue #289
      • Step-by-Step Guide to Tuning Your Block Plane
    • #288-Mar/Apr 2021

      • Phil Lowe: A craftsman and gentleman
      • Online Extras from FWW Issue #288
      • Phil Lowe: craftsman, teacher, friend

    UNLIMITED membership - Get access to it all

    Start Free Trial Upgrade Membership

    Fine WoodWorking

    Follow

    Newsletter

    Get woodworking tips, expert advice and special offers in your inbox

    Sign Up

    Membership & Magazine

    • Members
    • Digital Libraries
    • Join Unlimited
    • Magazine Subscription
    • Magazine Renewal
    • Gift a Subscription
    • Customer Support
    • Manage Preferences

    Taunton Network

    • Fine Homebuilding
    • Green Building Advisor
    • Fine Gardening
    • Threads
    • About
    • Contact
    • Advertise
    • Privacy Policy
    • Careers
    • Copyright
    • Terms of Use
    • Accessibility
    • California Privacy Rights
    • Site Map

    © 2021 The Taunton Press, Inc. All rights reserved.

    Get step-by-step instructions, woodworking tips, expert advice and special offers in your inbox. Sign Up Now!

      Main Menu

    • Projects and Plans
    • How-To
    • Shop Tips
    • Tools & Materials
    • Videos
    • Gallery
    • Magazine
    • Video Workshops
    • Members
    • Forum

      Popular Topics

    • Design
    • Small Projects
    • Beds
    • Chairs, Benches And Stools
    • Built-ins
    • Storage And Shelves
    • Cabinets
    • Carving
    • Casework
    • Desks
    • Tables
    • Shop Storage And Furniture
    • Woodturning Projects
    • Workbenches
    • Surface Prep

      More

    • TV
    • Forum
    • Blogs
    • Webinars
    • Podcasts
    • Customer Support

      Account

    • Log In
    • Join

      Magazine

    • Current Issue
    • Past Issues
    • Digital Libraries
    • Magazine Index
    • Subscribe

      Membership

    • Member Home
    • Start Free Trial
    • Gift Unlimited
    • Log In

      Shop the Store

    • Books
    • DVDs
    • Taunton Workshops

      Events

    • Fine Woodworking Live
    • Fine Woodworking HANDS ON

      Account

    • Log In
    • Sign Up

    Newsletter

    Get woodworking tips, offers, and expert advice in your inbox

    Sign Up

    Follow

    UNLIMITED

    Become an UNLIMITED member and get it all: searchable online archive of every issue, how-to videos, Complete Illustrated Guide to Woodworking digital series, print magazine, e-newsletter, and more.

    Start Your Free Trial

    Upgrade Membership