
Choosing Tools: How to Do More with Less
This basic set of tools is enough to get you started building projects right away.
 Feb 26, 2021

You don’t have to start your woodworking hobby by collecting a bunch of handplanes, handsaws, and fine chisels; learning to sharpen and use them; buying or making a big, traditional workbench; and then tackling the classic wood joints—as if you are an apprentice in a dark workshop in the 18th century.
I think it’s more fun to start building projects right away. That’s why I recommend using off-the-shelf building materials and a minimal tool set—mostly power tools—at least at first. The downside is noise, but a pair of earmuffs solves that, and the upside is having some early success, building your confidence, and having awesome projects to brag about as soon as possible.
Don’t get me wrong, you’ll love hand tools after you get through their learning curve, and they will definitely add some fun and refinement to your hobby, but I just wouldn’t start there. All of my essential power tools are great for beginners and veterans alike, and they will help you work on your house or apartment for years to come.
Making things even easier, not every part of your project needs to be made of wood. Anything you can find in a home center or hardware store is fair game to build with—be that plastic, metal, or wood—as long as it will look good and last. To take these projects to the next level, I also took advantage of the Internet, which brings a world of curiosities to your door.
Approaching woodworking this way, without any rules, means you won’t need complex joints to hold pieces together. In most cases, you can do it with screws, bolts, dowels, and creativity.
Build 100 Projects with 11 Tools
By using off-the-shelf lumber and supplies, you can avoid expensive woodworking machines like a tablesaw and planer. The following tools (OK, a few more than 11 if you count every little thing) will pay for themselves many times over as you do projects and remodeling jobs for years to come. And they are compact enough to fit into your Mini Cooper when you move cross-country.
- Miter saw
- Circular saw
- Jigsaw
- Impact driver and bits
- Small router
- Combination square
- Measuring tape
- Metal rule
- Compass
- Hammer, screwdriver, and other handyman tools
- Wood clamps
Three saws
You can build most beginner projects with just four or five power tools, and believe it or not, one is not a tablesaw—at least not at first. A tablesaw is great for precise cuts of all kinds, including specialized joints, but a decent one will run you $500 at least, and there is a learning curve if you want to stay safe.
There are three saws I think you do need, and all are pretty simple to use. The first is a miter saw, sometimes called a chopsaw. It does one thing really well, which is cut wood to precise lengths, at any angle. Team that up with “presurfaced” lumber, which is already cut to width and thickness, and you can build dozens of projects.

There are pricey sliding miter saws that glide forward and back and tilt in both directions, but I recommend a non-sliding model that tilts just one way and simply chops straight down through a board. It’s a breeze to use, and you can get one with a big 12-in. blade for under $250. That will be your biggest expense in this book, but this tool will pay dividends for a lifetime. By the way, I’ll give some general price ranges, but you almost always get a better tool if you spend a bit more.
With a miter saw, unlike a tablesaw, the workpiece stays put while the saw moves. So all you have to do is keep your fingers clear and your earmuffs on. If you ever decide to install wood flooring, or build a deck, or add some nice trim inside the house, the chopsaw will be your best friend. Chopsaws are portable, so they can go anywhere the job is, though it’s nice to give the saw a permanent home in your workshop, set up and ready to go.

For wider, longer cuts of all kinds, especially on plywood and other sheet goods, get a circular saw, the kind carpenters use, with a 7-1/4-in. blade. The more you spend on it, the smoother it will cut, but you shouldn’t have to spend more than $80. I got mine for $60.
A circular saw can be hard to steer perfectly straight, but you can turn it into a foolproof track-guided saw with a simple shopmade guide, just one of the many ways you can do much more with less.

And last, for cutting curves, you’ll need a jigsaw, also $80 or less. Arm it with a long blade designed to make smooth cuts in wood, and you’ll be surprised at how well the saw will follow a line and how clean it will cut. I like the saws with built-in LEDs that make it easier to see your pencil line as you cut.

Best drill in the biz
My last power-tool recommendation is my favorite tool in the shop, an impact driver, a special kind of cordless drill that is a joy to use. For an extra $80 or so over a standard drill, you can get a compact 12- or 20-volt model that will drive the longest screws with ease. What’s cool about an impact driver is the vibrating action that kicks in when the going gets tough. These staccato impacts make this small tool much stronger, so it can drive big bolts and screws without stressing your wrist or stripping the head of the screw. Trust me, it’s amazing.
Impact drivers work just as well for drilling, but they have a quick-change chuck that only accepts hex-shank drill bits. For a few more bucks you can get a special chuck that will fit into an impact driver and hold standard round shanks, letting you use more types of bits.

Get a Bit Holder for Driving Screws
Also called a screw guide, a bit holder holds different driver bits for all different types of screws. It extends your reach so you can drive screws in tight places. The holder has a collar that pulls out around the screw to keep it in line as you drive it. It works great.

A shop vacuum is nice
For general cleanup, and to attach directly to some of your power tools, a shop vacuum is a great idea. If you plan on buying a random-orbit sander at some point, you’ll definitely need a vac to keep it working well and to keep dust out of your airways.
Shop vacuums are available at all price ranges, with pricier models offering HEPA-level filtration, a self-cleaning feature that unclogs the filters and keeps suction strong, and an onboard tool outlet that turns on the vac automatically when you turn on the sander, chopsaw, or whatever. Like all tool choices, you can get as geeky as you like.
Add a few hand tools for layout
For measuring and marking, which is the critical first stage of any project, you’ll need a few essential hand tools. After a sharp pencil, the most important is a combination square, with a sliding 12-in. ruler. You’ll use that square to mark workpieces accurately in all sorts of ways, as well as to make sure your finished cuts and assemblies are coming out square.
To draw tighter circles and arcs, get a compass of some kind. I have a cool one called a Veritas Carpenter’s Gauge, from LeeValley.com, but a standard drawing compass will work fine. Watch out for the online retailers like Lee Valley, Rockler, and Woodcraft. You might be drawn into their powerful vortexes and never be seen again.

To make measurements larger than 12 in., you need a tape measure. Almost any one will do, but look for one that reaches at least 12 ft. I also like having a long metal ruler for drawing long, straight lines. I have a 4-ft. aluminum straightedge I got at the home center for $8. I also flex it to draw long, graceful arcs.
Beyond that, you’ll need some standard handyman tools, like a hammer, screwdrivers, adjustable wrench, and such. Buy them as you need them. As always, avoid the cheapest models. Buy decent tools and they will be your friends for life.

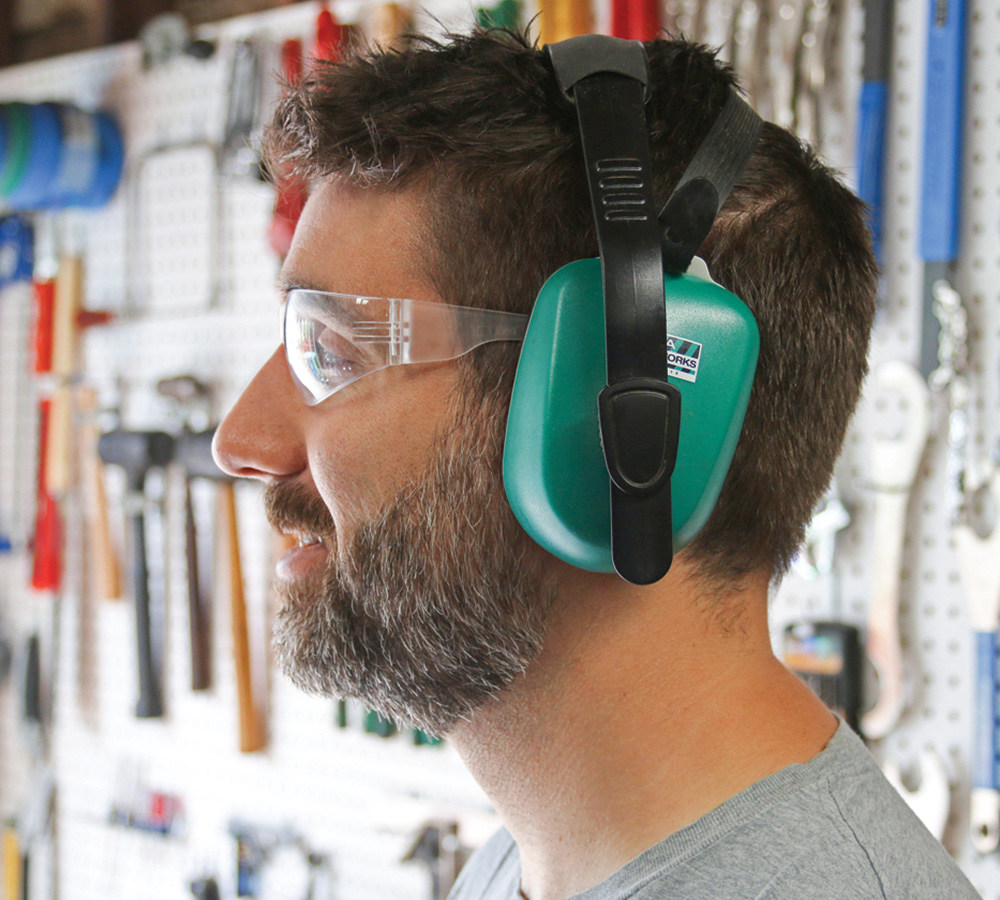
Safety Gear: The Most Important Tool of All
With all this hot talk about cool tools, I almost forgot the two most important pieces of gear in my workspace: eye and ear protection. With power tools, both of these are a must at all times.
Although ears take longer to hurt than eyes, which can be permanently damaged in an instant, ears lose their power in a cumulative way that is just as irreversible. And the loud bang of a hammer or air nailer can be just as destructive as the prolonged roar of your new miter saw.
The good news is that ear protection, in the form of earmuffs, is cheap, light, and effective. Get a couple of pairs in case you misplace one. Earplugs can also be a good choice, but only if you bother to roll them up and stick them in properly each time you need them. And even then, most muffs offer better protection. Another cool thing about earmuffs is how easy it is to build in Bluetooth, so you can listen to talk or tunes while you do something tedious. Just be careful that your death metal or pan flute isn’t distracting.
As for eye protection, you can probably get by with everyday prescription glasses if you wear them, but make sure the lenses are shatterproof polycarbonate. That said, real safety glasses are the best bet. They hug your face more closely, helping to ward off little projectiles that might bounce up and in. You can get safety glasses with prescription lenses if you don’t want to trust your everyday glasses.
Thanks to my friend Chris Gardner, editor of two awesome DIY websites, ManMadeDIY.com and curbly.com, for standing in as my safety model.
|
|
|
|


Clamp it!
Last but not least, they say a woodworker can never have enough clamps. I disagree. There are tons of types, and if you end up deep into fine furniture making, you might need them all. But for everything you will build in this guide, and 90% of what you will most likely make in the future, you can rely on just one type: an F-style bar clamp. These are lightweight, easy to use, and can put pinpoint pressure wherever you need it. Once again, buy quality. I went for the medium-duty bar clamps, called “economy standard fast-acting clamps” at LeeValley.com, in two sizes, 12 in. and 24 in. Get at least four of each.

It’s also a good idea to have a few pipe clamps. These are actually attachments that screw onto any length of plumbing pipe. And that’s their strength: They can reach as far as you need them to. Put them on some 3-ft. or 4-ft. lengths of pipe for easy handling, and then you can always buy longer pipe for special jobs.
One other “clamp” to mention: Wooden hand screws are not a must, but they are old-timey and can come in handy for some projects.


Log in or create an account to post a comment.
Sign up Log in