
Build a Lift-Lid Box, Part 1
Learn how to mill the stock and cut the joinery for a simple mitered box.
 Apr 06, 2021

A box, in essence, is a very simple thing: a top, a bottom, and four sides. But elevating the form to a higher level of beauty and quality can seem complex. This handsome design is intended as a starting point to teach basic techniques that will lead to better results on more complex projects.
The sides of this box are joined with simple miter joints strengthened by adding keys, a task made easy and accurate using a simple tablesaw jig. A plywood bottom is glued securely into saw kerfs cut in the sides, reinforcing the lower portion of the mitered joints. The lift lid is cut from hardwood and rabbeted for a snug fit.
As a practical matter, this box can be used as a ring box or gift box with this warning: The box may become treasured more than the gift inside. The box pictured here is made of white oak, but by changing the size, proportions, joinery, or wood choices, you can create countless variations on this simple design.
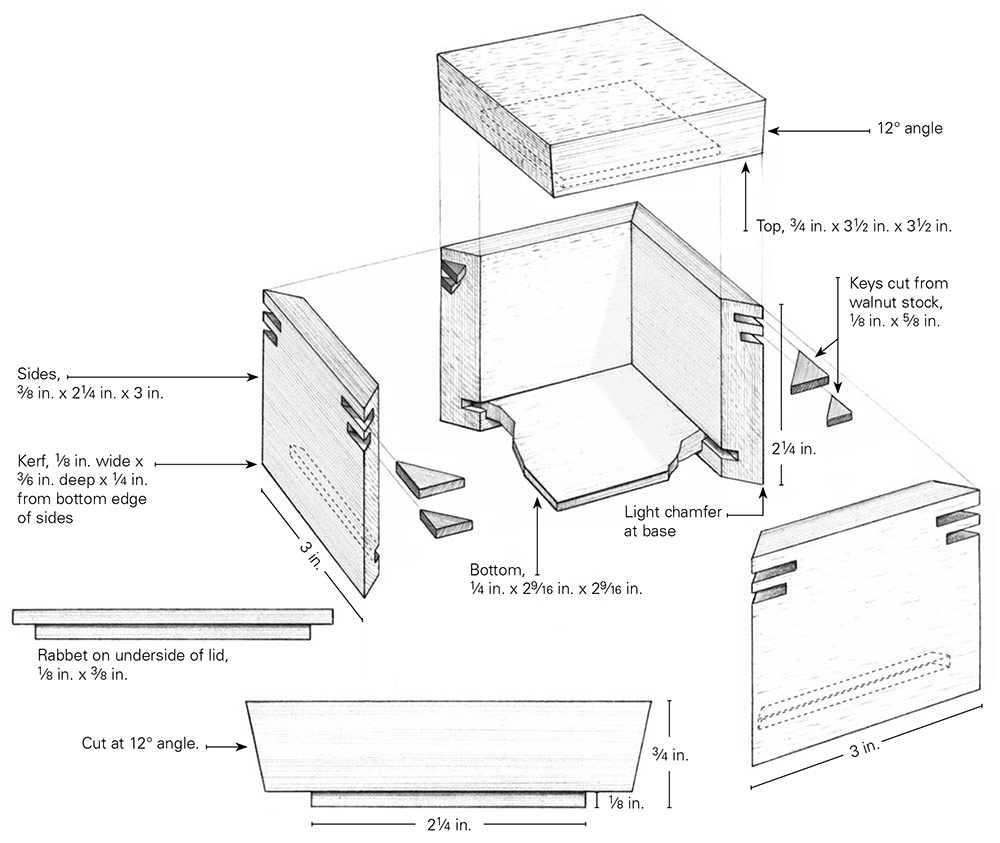
Mitered box with a lift lid
This simple lift-lid design features mitered corners secured and strengthened using keys of a contrasting walnut. The box is made from 3/8-in.-thick white oak and the top is spalted pecan, but either can be made from beautiful scrap lumber you’ve treasured and saved. Baltic birch plywood is used for the bottom.
Materials |
|||
| Quantity | Part | Actual Size | Construction Notes |
| 4 | Sides | 3 in. x 2 1⁄4 in. | 3⁄8-in. white oak |
| 1 | Bottom | 2 5⁄8 in. x 2 5⁄8 in.* | 1⁄4-in. Baltic birch plywood |
| 1 | Lid | 3 1⁄2 in. x 31⁄2 in. | 3⁄4-in. hardwood of your choice |
| 16 | Keys | 1⁄8-in. thick x 5⁄8-in. wide | 1⁄8-in. walnut, crosscut at 45° and sized to fit |
*Determine actual size by measuring widest point of saw kerf in box sides.
Prepare the Stock
The right start can make or break a project: If you don’t start with stock that is flat, square, and straight on all sides, it’s difficult to build a square box. Even a small amount of warp in the finished stock makes it hard to pull corners together during assembly, and a poorly fitted joint is doomed to failure. Fortunately, preparing stock properly is a simple procedure.
- Crosscut your stock to a length more easily handled on the saw. I generally prefer resawing stock in the range of 24 in. to 36 in.—long enough to allow a secure grip on the material, but short enough so it is not hard to manage.
- Pass either of the rough edges of the stock across the jointer. You may need to take more than one pass over the jointer, working until the edge is flat enough to ride smoothly along the tablesaw’s table in the next step. At this point, however, jointing a perfectly flat edge is unnecessary.
- Cut the stock to rough width on the tablesaw, allowing 1/4 in. to 3/8 in. more than is required for the exact dimensions of the box sides. Use a push stick to finish the cut.
Resawing at the tablesaw
Resawing stock can be done on either the bandsaw or the tablesaw, but for small stock, as is often used in box making, the tablesaw is an easier option. I use a thin-kerf blade because it requires less power and provides for a slightly greater finished thickness. That said, a standard 1/8in.-kerf blade will also work.
- Begin preparing the stock for resawing by passing one face across the jointer. At this point, a perfect finish is not required. The stock needs to be flat enough to follow the fence safely. Removing too much stock may limit your options for use of the offcut material or make it too thin for use.

| Work Smart: By listening to the jointer’s sound as it works, you can tell if it’s removing stock throughout the cut. As the jointer passes through high and low points in the edge of the stock, its sound will vary, becoming more uniform when the stock is straight. |
- For small boxes like this, I often am able to rip right down the middle to get equally thick planed sides, but even thinner stock from offcuts can be useful in other parts of box making. At the tablesaw, don’t try to resaw the full height in a single pass. Instead, adjust the tablesaw’s blade height to cut just over half the height of the stock at one time. By reducing the blade height, the stock passes more easily through the cut and there is less risk to the hands. Holding the stock upright and against the fence, take a pass along one edge.
| Work Smart: Although it may be harder for the beginning woodworker to imagine the beauty of wood while its grain and color are hidden by a rough surface, the additional thickness of unplaned wood offers greater flexibility for resawing. |
- Flip the stock end over end, keeping the same face against the fence, and make another cut along the opposite edge.

Surface one side. Passing one face of the board across the jointer makes resawing more accurate and safe, but a perfect finish is not required at this stage. Simply get one side flat enough to follow the tablesaw fence.
| Work Smart: Severely warped or twisted stock should be avoided when resawing. Not only will it produce useless material, but cutting it can present a safety hazard, particularly for a less experienced box maker. |
Plane and size the stock
A small portable planer is more than sufficient for box making, and it often gives better results than the large planers found in many cabinet shops. Large planers often have serrated infeed rollers that may leave marks when you’re removing a thin layer of wood, as is often the case in box making. Small portable planers, on the other hand, enable you to fine tune the thickness by removing small amounts of stock at a time.
- Your first pass through the thickness planer should be taken with the rough face toward the planer knives. Plane the material to final thickness by removing small amounts from each side, flipping the stock over between cuts.

- Once you’ve reached the desired thickness, smooth one edge of the stock at the jointer.

- Cut the stock to finished width by trimming the opposite edge on the tablesaw. Make sure you have a push block at hand to finish the cut. For greater safety, I also use a shopmade zero-clearance insert with an integral splitter, but after-market zero-clearance inserts are available for most saws.

Mark and Cut the Box Sides
When using oak or any wood with a distinctive grain pattern, carefully cutting and arranging parts can make the difference between a plain old box and one that might be regarded as art. I like for the grain pattern to run continuously around the box corners. To achieve this effect, I simply mark the parts in order prior to cutting them from a single board. During assembly the marks tell me which boards go where. Simple marking methods help keep parts aligned throughout the building process.
For making small boxes, there are two different tablesaw methods for cutting the mitered corners: You can angle either the blade or the miter gauge to 45 degrees. I normally make this cut with the blade tilted to 45 degrees, but for this small box it’s quick and easy to angle your miter gauge. Leave the blade set at 90 degrees and raised to the full height of the box sides. I use an aftermarket miter guide on my saw (because it has positive, accurate stops to assure that it is at 45 degrees), but the stock gauge on most saws will work fine. This technique works well on box sides low enough for the saw to handle in a single pass, and it comes in handy when you’re reluctant to adjust the arbor of the saw to 45 degrees.
Mitering the box sides this way requires carefully checking the angle of both the miter gauge and the blade. After setting the saw, I make a test cut on scrap wood, then check the results using a combination square. If adjustments need to be made, it’s better to do so before cutting actual box parts.

- To lay out the box sides, mark the top of the stock to denote the approximate cut lines, allowing 1/4 in. to 3/8 in. of waste between cuts. This wiggle room allows for slight inaccuracy in the initial cuts but has little effect on the matching grain at the box corners. To help keep parts in order, mark out an inverted “V” on the sides, pointing to the top edge on the face side of each piece. I also make a squiggle line through the length of the stock. During assembly, this squiggle helps keep the parts in order. All of the pencil marks are sanded away after the box is assembled.

- Begin cutting the parts to rough length by cutting a miter at one end of each side piece. To help align parts and reduce waste, it helps to make a mark on the throat plate of the saw that denotes the cut line.

| Work Smart: Even the small width of a pencil line can make the difference between sloppy work and perfectly fitted joints. But by using jigs, sleds, and stop blocks you can alleviate the errors easily. Rather than risk inaccuracies from marking on stock with a pencil or knife and then aligning it with the sawblade, simply measure from the edge of the sawblade to the stop block. |
- To cut miters on the opposite ends of the sides, use a piece of scrap clamped to the miter gauge as a stop block. Using a clamp to hold the stock is both safer and more accurate than trying to hold the small pieces with your hand. Not only does it get your hands out of the way, but it also applies enough pressure to hold the stock in place throughout the cut. C-clamps or quick-release clamps work well—just be sure to place the clamp so that it won’t interfere with the path of the blade.

- Once the joints are cut, dry-assemble the box sides and check the accuracy of the miters. A perfect fit will have no voids on either the inside or the outside of the miter.

Cutting a Perfect MiterWhen cutting miter joints there are two common but easily avoided errors that lead to sloppy joints. The first is in the accuracy of the angle. The second, which is often overlooked, is the length of the box sides. If the length of each side doesn’t perfectly match its mate on the opposite side, no amount of precision in setting the angle can compensate. I rely on stop blocks for controlling the accurate length of parts, achieving a level of accuracy that is hard to match when measuring and marking multiple parts with a pencil. To double-check the angle cut for miters, I use a simple technique shown in the photo above. Using wide stock to test the angle, even for thin sides, makes the discrepancies easily apparent. Another popular technique is to miter four pieces equal in length and check that the angle closes at all corners. If one or more corners shows a small space at the inside, either the angle of the blade or the miter gauge should be decreased very slightly. If the corners appear slightly open on the outside, increase the angle very slightly. It can be aggravating to go through trial and error every time you change the arbor setting of the saw or the exact angle of the miter gauge, so when you get it just right, adjust and tighten the angle stops on your miter gauge. For greater accuracy, consider buying an aftermarket miter gauge—it’s an investment that you won’t regret. |
Fit the Box Bottom
Using plywood for the bottom of this box allows you to forget about the seasonal wood movement that occurs with hardwoods. I used 1/4-in. Baltic birch plywood, but all plywoods offer more stability than hardwoods. By housing the plywood bottom in a groove, it’s easy to keep the entire assembly square during glue-up. Gluing the bottom in place also adds strength to the box.
- Start by cutting a 1/8-in. saw kerf in the lower portion of each box side. Pay close attention to the inverted “V” markings on the box sides. For making this cut, the “V” should be visible and pointing away from the tablesaw fence. I use a 1/8-in.-kerf combination blade, which makes a nice flat-bottomed cut, but any 1/8-in.-kerf blade will work. Raise the blade 3/16 in. above the surface of the saw and set the fence so that it measures 1/4 in. to the outside of the blade. I use 1/4-in.-thick plywood—on edge and against the fence—as a quick measuring aid. Use a push block to guide the box sides across the saw.

- To achieve a perfect fit for the bottom, you’re better off measuring the actual parts in hand than blindly following the measurements given in the Materials List. To determine the length and width of the bottom, measure the full width of the deepest part of the grooves cut in the box sides. Because this is a square box, the length should be the same as the width. Reduce the measurement by 1/64 in. to 1/32 in. to ease the fit as the box is assembled.

- To size the bottom, rip the plywood to width at the tablesaw. Then cut the bottoms to length using the miter gauge. Clamping a stop block in place helps to accurately control the length. Even if you are only making one box, this production technique provides greater accuracy—and it’s a lot safer than trying to crosscut such a short piece against the fence.


Crosscut to width. Use a miter gauge or crosscut sled to cut the bottom to length. A stop block assures the accuracy of the cut.
- To form the tongue that fits into the grooves on the sides, adjust the fence so that there is 1/8 in. between the fence and the blade. Rather than going by measurements alone, I begin making this cut with the blade a bit low and adjust gradually to achieve a perfect fit.

Rabbet the bottom. Use the tablesaw to cut the tongues on the box bottoms. The space between the blade and fence must equal the width of the saw kerf cut in the box sides. Making a test cut on scrap stock is the easiest way to check your settings.
 Excerpted from Doug Stowe’s book, Basic Box Making.
Browse the Taunton Store for more books and plans for making boxes.


Comments
I want to compliment Doug Stowe on the quality of his boxes, his talent, and his generosity in sharing techniques with us all. I used this exact box from your book as the basis for an introduction to the wood shop class and my students loved it. Your book was included in the cost of the class and it always made me happy to see students flipping through it and planning their next project.
Log in or create an account to post a comment.
Sign up Log in